Multi-Factor Methods configuration
Configure the MFA methods for your organization using the Multi-Factor Methods tab in SecureAuth IdP realm. For your users to login securely, choose a login workflow that includes second factor on the Workflow tab.
On the Multi-Factor Methods tab, you can configure different authentication methods as described in this topic.
What's new in SecureAuth IdP version 9.3
Inline Initialization - Self-service has been enhanced to enable setting a maximum of four different types of phone numbers and four different types of email addresses to be required in a user's profile.
Prerequisites
SecureAuth IdP 9.3
SecureAuth IdP realm or integrated application with the following configured:
Overview tab
Data tab / Directory integration
Workflow tab
Note
On the New Experience user interface in version 9.3, you can configure an Active Directory integration or SQL Server integration to be applied to applications made from App onboarding library templates. Configure the remaining components – for example, Workflow, Multi-Factor Methods, and Adaptive Authentication tabs – on the Classic Experience user interface.
Multi-Factor Method tab configurations
In the SecureAuth IdP Web Admin, set any of the following multi-factor methods.
Phone Settings
In the Phone Settings section, set the following configurations.
Phone Field 1
From the list, select a delivery method for the registration code to Phone 1.
See the Data tab for the data store and profile property mappings.
Phone Field 2 to Phone Field 4
Select delivery methods as applicable.
Or, if you don't want to send a registration code to another phone number, select Disabled.
Phone / SMS Selected
If the user selects the SMS option on the login page, select whether to send a code by SMS/text or Voice.
Phone / SMS Visible
To display both SMS/text and Voice options to the user on the login page, set to True.
Default Country Code
For phone numbers in the data store that do not have a country code, append it with a default phone country code.
If there is no default country code, leave this field empty.
Phone Mask (Regex)
Set how to display the phone number to the end users. If the out-of-box display is acceptable, leave this field blank.
When entering a value in this field, the user's phone number must contain the same number of number of digits. Any dash or character other than
xandnwill appear in its appropriate place in the user's phone number.For example, if the Regex value is
xxx-xxn-nnnn, and the phone number entered is1234567890, then the number will appear asxxx-xx6-7890.To include a country code, the Regex value needs a pipe character (
|) between the country code and the start of the phone number.For example, if the Regex value is
x|xxx-xxn-nnnn, and the phone number is+1 123-456-7890, then this number will appear asxxxx-xx6-7890.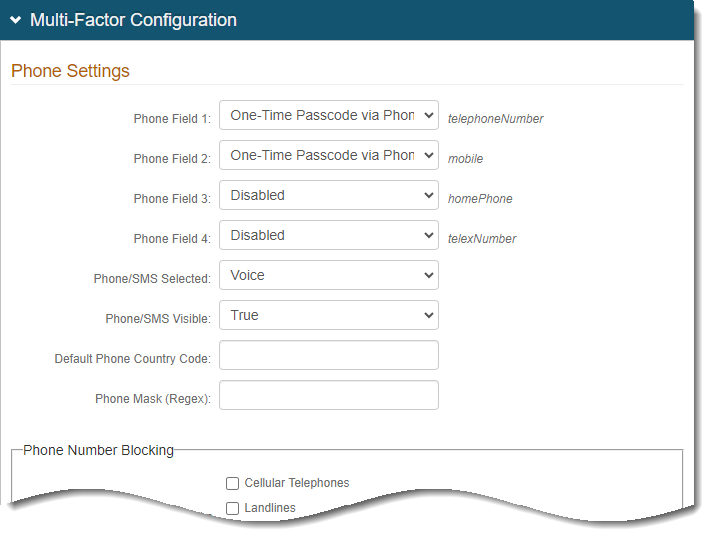
Next, configure the Phone Number Blocking settings.
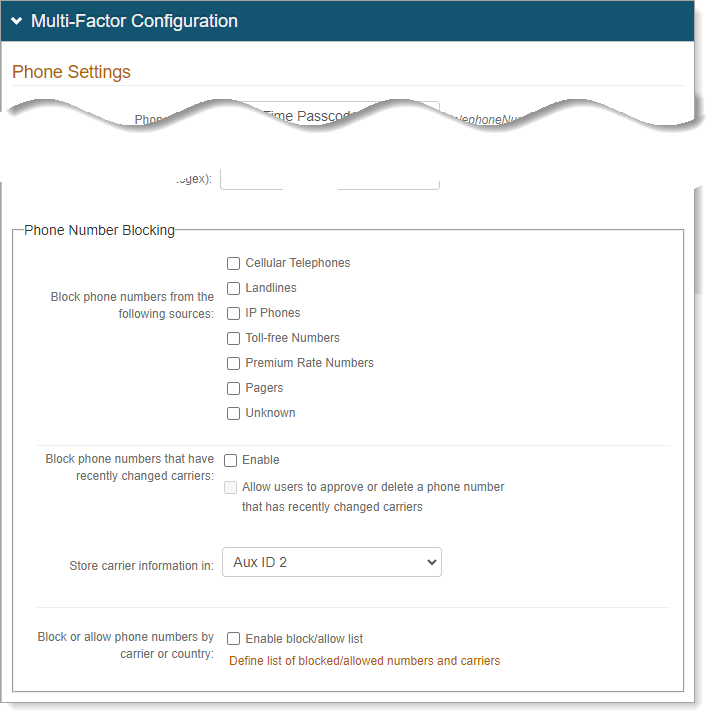
Phone Number Blocking
In the Phone Number Blocking section, set the following configurations.
Block phone numbers from the following sources
Select the types of phone numbers to block.
Block phone numbers that have recently changed carriers
Select this option to block phone numbers from changed carriers. Then, select the directory attribute to store the carrier information.
Store carrier information in
If you selected the previous option, select the diretory attribute to store the carrier information.
Block or allow phone numbers by carrier or country
Indicate whether to you want to have a block or allow list of phone numbers by carrier or country.
Define list of blocked/allowed numbers and carriers
If you selected previous option, define the list of blocked or allowed For phone numbers in the data store that do not have a country code, append it with a default phone country code.
If there is no default country code, leave this field empty.
For more detailed information about phone number blocking, see Phone Number Profiling Service Configuration Guide.
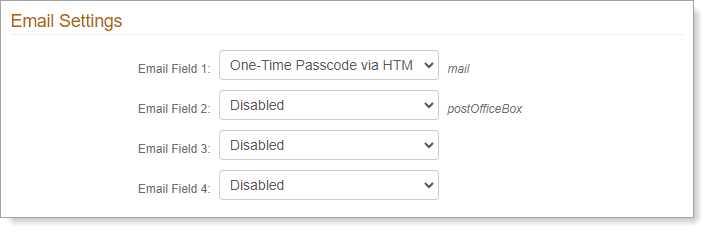
Email Settings
In the Email Settings section, set the following configurations.
Email Field 1
From the list, select a delivery method for the registration code to Email 1.
See the Data tab for the data store and profile property mappings.
Email Field 2 to Email Field 4
Select delivery methods as applicable.
Or, if you don't want to send a registration code to another phone number, select Disabled.
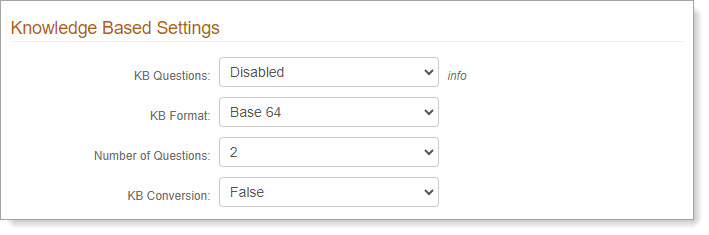
Knowledge Based Settings
In the Knowledge Based Settings section, set the following configurations.
KB Questions
To use knowledge-based questions for MFA, set to Enabled.
See the Data tab for the data store and profile property mappings.
KB Format
Set the format of knowledge-base questions: Base 64 or Encrypted. Select delivery methods as applicable.
Base 64 – uses an encoding algorithm for data transfer
Encrypted – maximum data security
Number of Questions
Set the number of KB questions to appear on the login page.
KB Conversion
If you want to convert the KB questions to certificate-based encryption via Base64 encoding, set this to True.
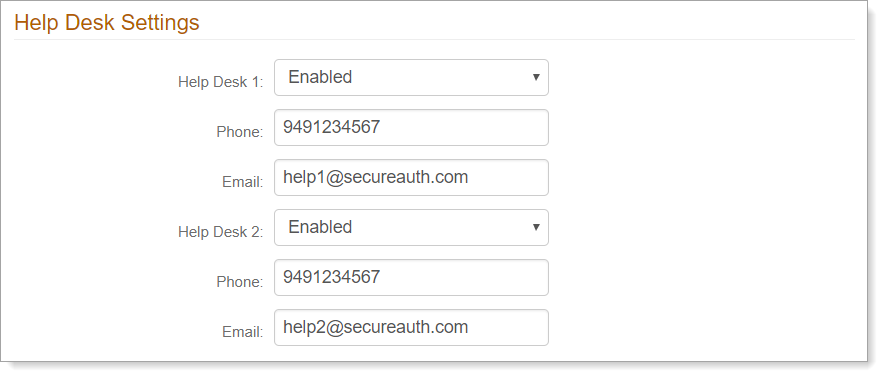
Help Desk Settings
In the Help Desk Settings section, set the following configurations.
Help Desk 1
Phone
Email
To use Help Desk 1 for multi-factor authentication, set to Enabled.
Provide the phone number for the Help Desk. Users can call this number to get a registration code.
Provide an email contact for the Help Desk. Users can send an email to request help.
Help Desk 2
Phone
Email
To use Help Desk 2 for multi-factor authentication, set to Enabled.
Provide the phone number for the Help Desk. Users can call this number to get a registration code.
Provide an email contact for the Help Desk. Users can send an email to request help.
For more detailed information about help desk registration method, Second Help Desk Registration Method Configuration Guide.
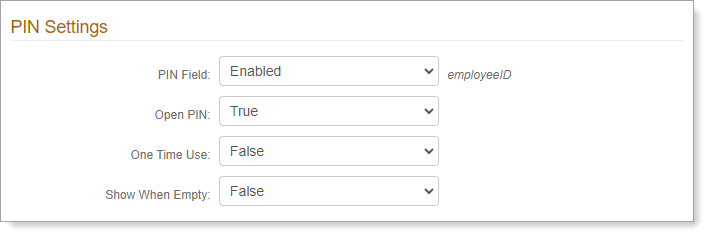
PIN Settings
In the PIN Settings section, set the following configurations.
PIN Field
To allow the use of static PINs for multi-factor authentication, set to Enabled.
The PIN for the user must be in the data store and mapped to the SecureAuth IdP property for PIN.
See the Data tab for the data store and profile property mappings.
Open PIN
Set how the PIN is stored:
True – plain text format
False – encrypted format
One Time Use
To allow a one-time use PIN, set to True. The PIN will be cleared from the data store after use.
The typical use case is for first-time users in a self-service enrollment process.
Show When Empty
If you want to show the one-time use PIN on the login page, but not be usable, set to True.
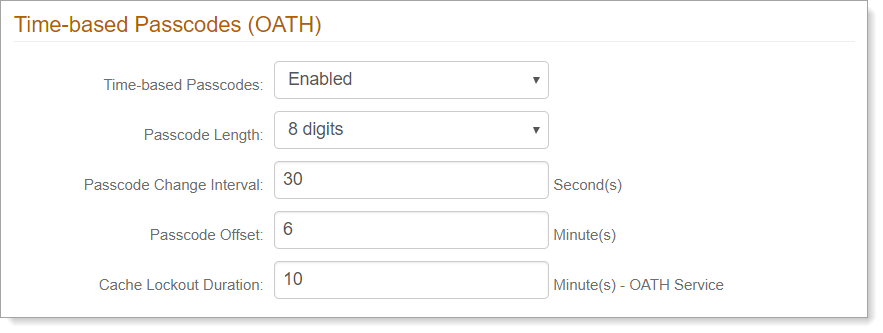
Time-based Passcodes (OATH)
In the Time-based Passcodes (OATH) section, set the following configurations.
Time-based Passcodes
To use mobile, browser, desktop, or thir-party OATH OTP soft tokens for multi-factor authentiation, set to Enabled.
Passcode Length
Set the length of the passcode.
Passcode Change Interval
Set how often in seconds, the passcode changes.
The typical use case is for first-time users in a self-service enrollment process.
Passcode Offset
To account for time differences between devices, set a tolerance in minutes for passcode validity.
Cache Lockout Duration
Enter the number of minutes an account stays locked after too many failed OTP attempts.
Mobile Login Requests (Push Notifications)
In the Mobile Login Requests (Push Notifications) section, set the following configurations.
Request Type
Set the type of mobile login requests:
Passcode (OTP) – Allow the use of push notifications. These are one-time passcodes sent directly to the user's enrolled mobile device.
Accept / Deny – Allow the use of push-to-accept login requests. These are login requests sent to the SecureAuth Authenticate app that requires a user to tap Accept or Deny.
Passcode (OTP) + Accept /Deny – Allow the use of push notifications and push-to-accept login requests.
Login Request Timeout
For the login push notification, set the length of time a user has to accept a login request at one, two, three, four, or five minutes.
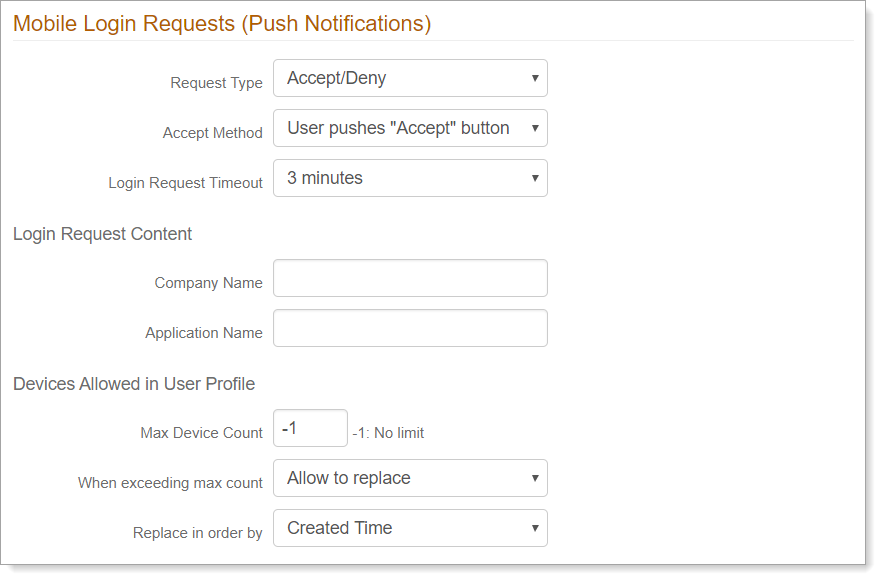
In the Login Request Content section, set the following configurations.
Company Name
Set the name of your organization that appears on the push notification login request.
Application Name
Set the name of the application that appears on the push notification login request.For the login push notification, set the length of time a user has to accept a login request at one, two, three, four, or five minutes.
In the Devices Allowed in User Profile section, set the following configurations.
Max Device Count
Set the number of devices a user can register to receive authentication tokens. Values range from no limit or up to ten devices. Set to
-1for no limit.When exceeding max count
Indicate whether to allow device replacement when a user has reached the maximum number of devices.
Replace in order by
Choose one of the following options for replacing an authentication token:
Created Time – replace the oldest authentication token with the newest one
Last Access Time – replace the least used and last accessed authentication token with the newest one
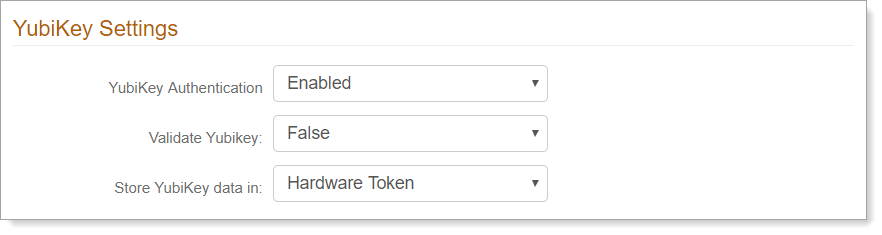
YubiKey Settings
In the YubiKey Settings section, set the following configurations.
YubiKey Authentication
Allow users to use a YubiKey device for multi-factor authentication.
Validate YubiKey
To require a one-time passcode (OTP) in addition to a YubiKey to validate a login request, set to True.
Store YubiKey data in
Select the mapped property to store the YubiKey data. You can use Hardware Token or Aux ID 1 through Aux ID 10.
See the Data tab for the data store and profile property mappings.
For more detailed information about YubiKeys, see YubiKey Multi-Factor Authentication Configuration Guide.
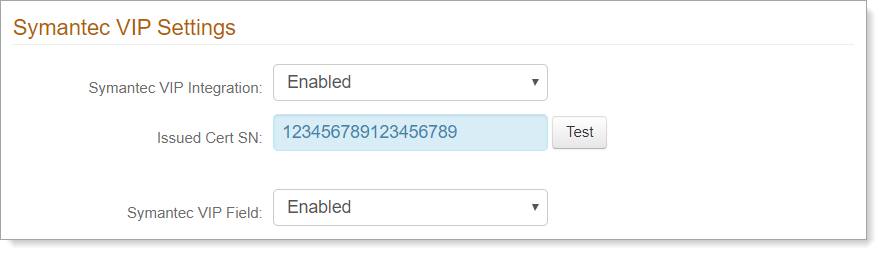
Symantec VIP Settings
In the Symantec VIP Settings section, set the following configurations.
Symantec VIP Integration
Allow users to receive a timed passcode on a Symanetc VIP token.
Issued Cert SN
The certificate serial number provided by Symantec.
Symantec VIP Field
Indicate whether to show or hide the Symantec VIP field on the login page.
Multi-Factor Settings
For more information, see the Multi-Factor Throttling Configuration Guide.
In the Multi-Factor Settings section, set the following configurations.
Inline Initialization
To allow users to update or provide missing information in their profile and redirect them back to the login pages, select the check boxes for Missing Phone, Missing Email, Missing KB Answers, Missing PIN.
If you selected Missing Phone and Missing Email, you can specify up to four different types of phone numers or email addresses required for entry in the user profile.
For more information, see Inline Initialization - Self-service profile update.
Auto-Submit When One Avial
Enable this option to automatically select the registration method on the login page when only one is availble for the user profile.
OTP Length
Set the number of digits to use in one-time passcodes (OTPs) for a configured PIN OTP page.
For more information, see PIN OTP Page Configuration Guide.
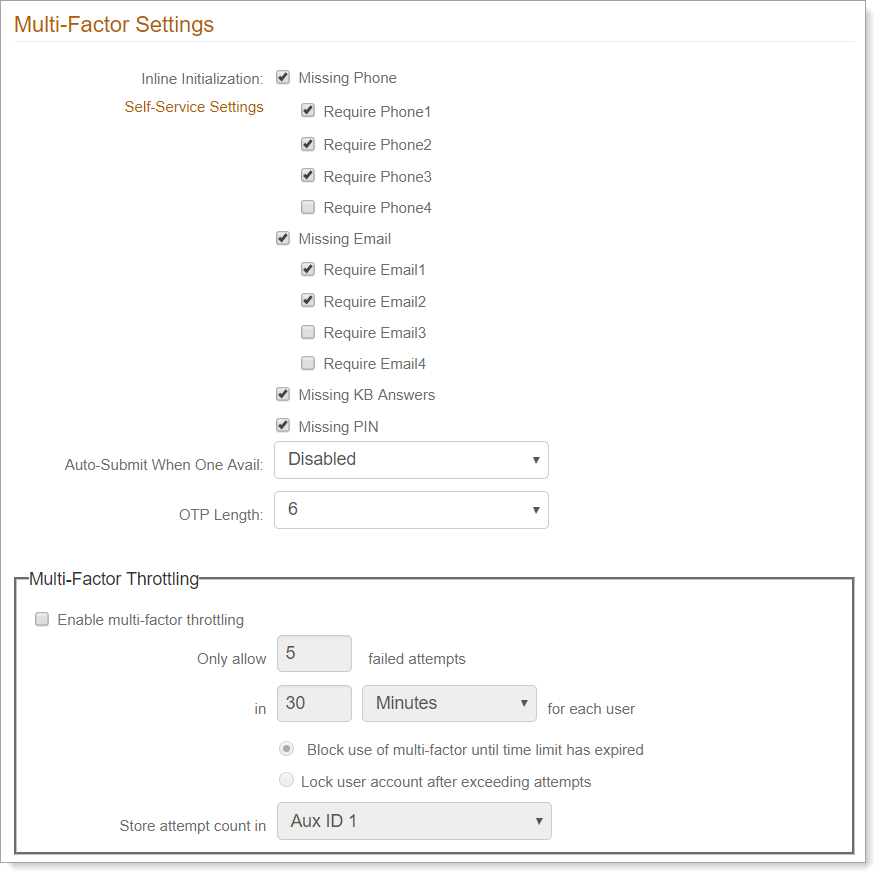
In the Multi-Factor Throttling section, set the following configurations.
Enable multi-factor throttling
Select this check box.
Only allow #number failed attempts in #time
Set the number of allowed authentication attempts within a moving timeframe before throttling takes effect for each user.
Action
Select what action to take when the user exceeds the allowed number of authentication attempts:
Block use of multi-factor until time limit has expired. End user cannot do another authentication attempt until the attempt count has decremented by at least one (1).
Lock user account after exceeding attempts. Lock the user account when they exceed the configured number of authentication attempts. For more information about locked accounts, see the Unlock Account page configuration guides..
Store attempt count in
Select one of the following:
Set to the same profile property that you mapped this directory attribute to on the Data tab. For example, Aux ID 1.
Set to Browser Session to store the number of MFA attempts as a cookie for the length of the user's browser session.
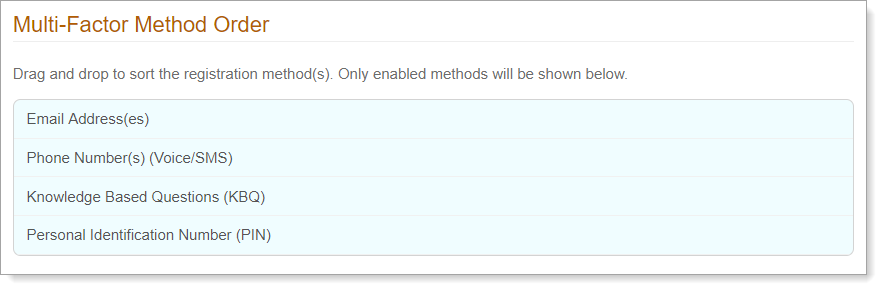
Multi-Factor Method Order
In the Multi-Factor Method Order section, drag and drop the order of enabled registration methods to appear on the login page.