Office 365 Integration Guide
Introduction
Use this guide to enable Multi-Factor Authentication for external user access and internal desktop Single Sign-on (SSO) via WS-Federation and WS-Trust to Microsoft Office 365 web and thick applications.
Prerequisites
SecureAuth IdP Prerequisites
1. Create a new realm for the Office 365 integration – this document refers to the realm in this step as Realm A
2. Configure the following tabs in the Web Admin before configuring the Post Authentication tab:
Overview – the description of the realm and SMTP connections must be defined
Data – an enterprise directory must be integrated with SecureAuth IdP
Workflow – the way in which users will access this application must be defined
Multi-Factor Methods – the Multi-Factor Authentication methods that will be used to access this page (if any) must be defined
Office 365 Prerequisites
1. Obtain Admin access to an Office 365 account
2. Activate Office 365 Account and Tenant – Welcome to the new Office, Office 365 Developer Site, and Office 365 Readiness Wizard
3. Register a valid domain with Office 365
4. Ensure the Microsoft Active Directory Domain Controller has the same domain suffix as the one registered with Office 365
5. Verify the Windows Server is domain-joined for Directory Synchronization
6. Obtain access to a Windows Workstation or Server for Microsoft Online Services Module for Windows PowerShell
This is not required to be domain-joined
7. Acquire a publicly trusted SSL / signing certificate
A third-party certificate is required if using thick clients (Outlook, Lync, etc.)
SecureAuth IdP Configuration Steps
Note
Follow these steps to configure Realm A for external end-user access
NOTE: After configuring this realm, proceed to steps for copying this realm to create Realm B
Data
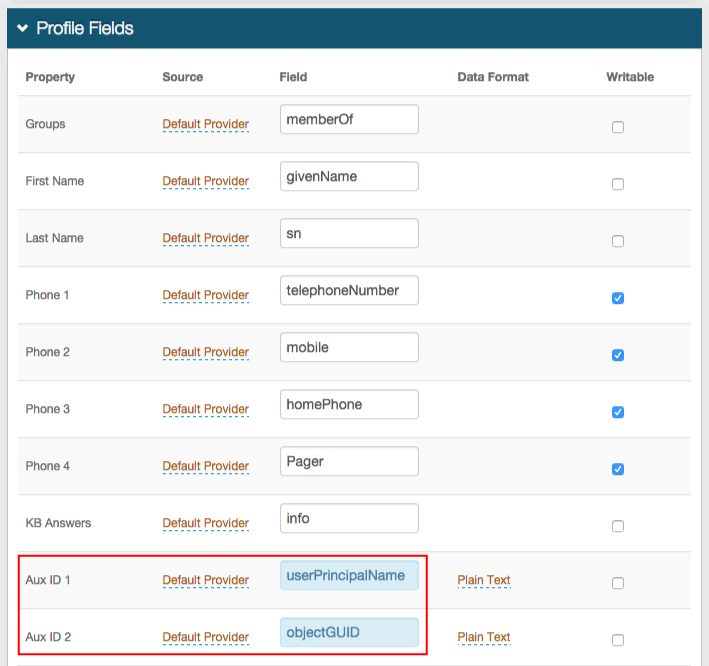 |
1. In the Profile Fields section, map the userPrincipalName to a SecureAuth IdP Property (e.g. Aux ID 1)
2. Map the objectGUID to a SecureAuth IdP Property (e.g. Aux ID 2)
Warning
Click Save once the configurations have been completed and before leaving the Data page to avoid losing changes
Post Authentication
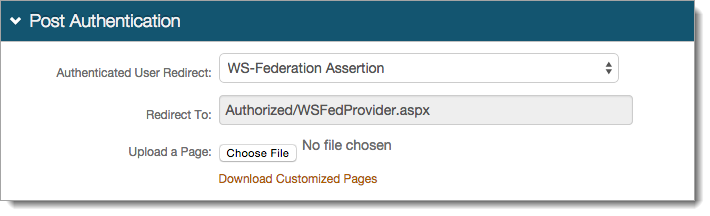 |
3. Select WS-Federation Assertion from the Authenticated User Redirect dropdown in the Post Authentication section
4. The unalterable URL, auto-populated in the Redirect To field, will append to the domain name and realm number in the address bar (Authorized/WSFedProvider.aspx)
User ID Mapping
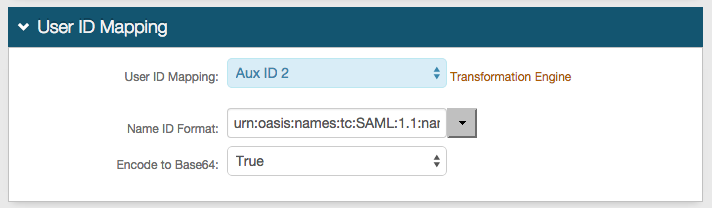 |
5. Select the SecureAuth IdP Property corresponding to the directory field that contains the objectGUID (Aux ID 2)
6. Select urn:oasis:names:tc:SAML:1.1:nameid-format:unspecified from the Name ID Format dropdown (default)
Select a different option if Office 365 requires it, which the Service Provider (SP) will provide
7. Select True from the Encode to Base64 dropdown
SAML Assertion / WS Federation
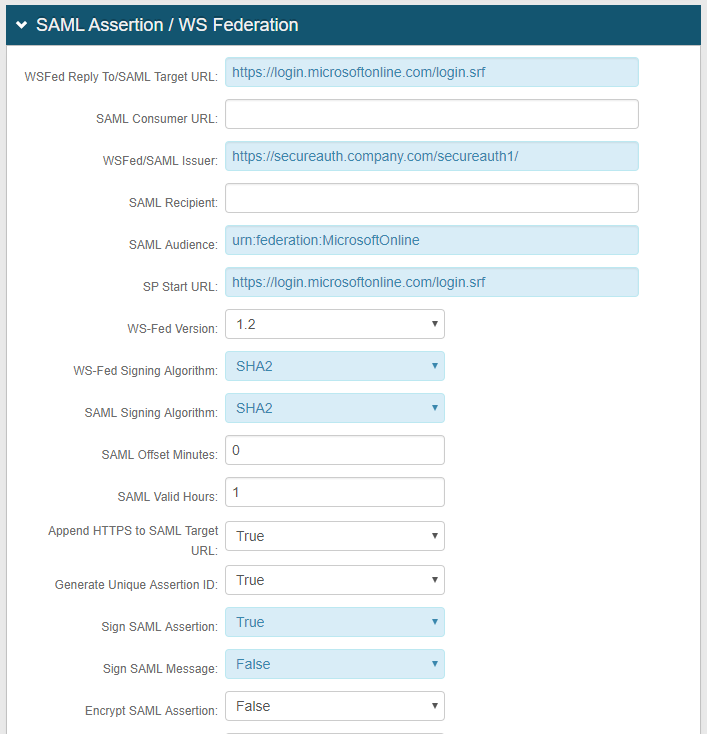 |
8. Set the WSFed Reply To/SAML Target URL to https://login.microsoftonline.com/login.srf
9. Set the WSFed / SAML Issuer to https://SecureAuthIdPFQDN/SecureAuthIdPRealm1/ and replace the values with the actual Fully Qualified Domain Name (FQDN) of the SecureAuth IdP server and the number of Realm A – e.g. https://secureauth.company.com/secureauth1/
The WSFed / SAML Issuer must match exactly on the SecureAuth IdP side and the Office 365 side
10. Set the SAML Audience to urn:federation:MicrosoftOnline (case sensitive)
11. Set the SP Start URL to https://login.microsoftonline.com/login.srf
12. Select True from the Sign SAML Assertion dropdown
13. Select False from the Sign SAML Message dropdown
Notice
No configuration is required for the SAML Consumer URL or the SAML Recipient fields
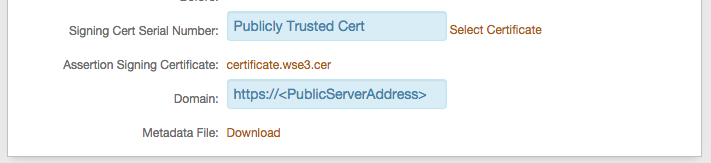 |
14. Click Select Certificate to select the appropriate publicly trusted SSL / signing certificate
15. Provide the Domain in order to Download the Metadata File to send to Office 365 (if required)
SAML Attributes / WS Federation
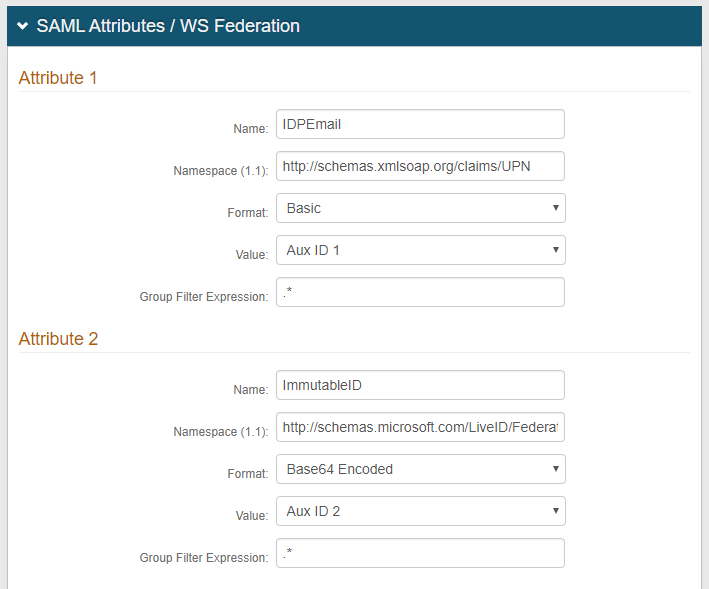 |
16. Add IDPEmail as a WS-Federation Attribute in the Name field (Attribute 1)
17. Set the Namespace to http://schemas.xmlsoap.org/claims/UPN
18. Select Aux ID 1 (or the field that contains the userPrincipalName) from the Value dropdown
19. Add ImmutableID in the Name field (Attribute 2)
20. Set the Namespace to http://schemas.microsoft.com/LiveID/Federation/2008/05/ImmutableID
21. Select Base64 Encoded from the Format dropdown
22. Select Aux ID 2 (or the field that contains the objectGUID) from the Value dropdown
Warning
Click Save once the configurations have been completed and before leaving the Post Authentication page to avoid losing changes
WS-Trust Endpoint Configuration
 |
23. Click View and Configure WS-Trust endpoints
WS-Trust Host Name
 |
24. Provide the Fully Qualified Domain Name (FQDN) of the SecureAuth IdP appliance in the Host Name field – e.g. secureauth.company.com
WS-Trust Endpoint Configuration
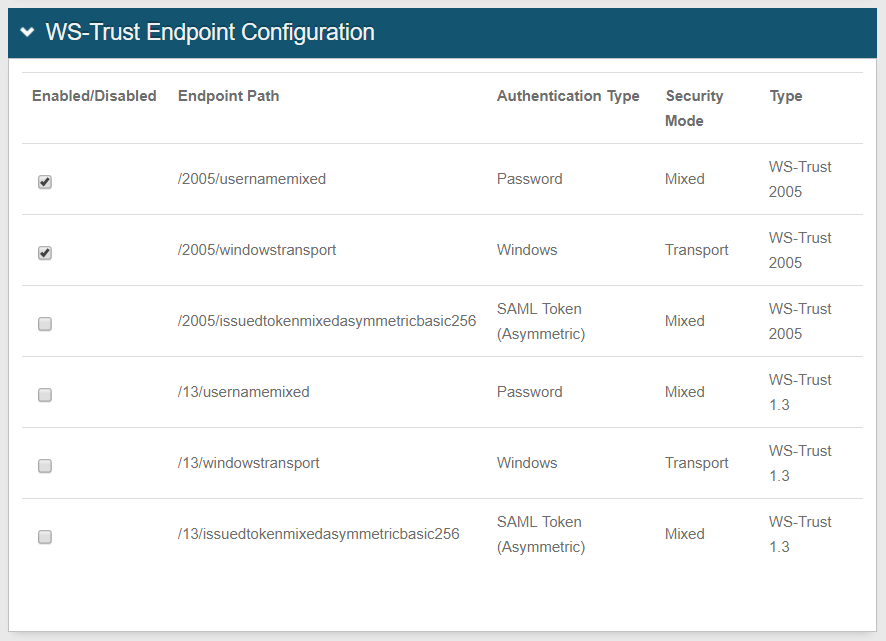 |
25. Under Endpoint Paths, check to enable /2005/usernamemixed and /2005/windowstransport
Warning
Click Save once the configurations have been completed and before leaving the WS-Trust Endpoints page to avoid losing changes
Notice
After configuring and testing the configuration, optionally the WS-Trust request blocking feature can be configured to prevent Denial of Service (DoS) attacks on WS-Trust in the Office 365 environment
See WS-Trust Request Blocking Configuration Guide to configure and implement this feature
Forms Auth / SSO Token
Optionally, in the Forms Auth / SSO Token section, click the View and Configure FormsAuth keys/SSO token link to configure the token/cookie settings and configure this realm for SSO.
 |
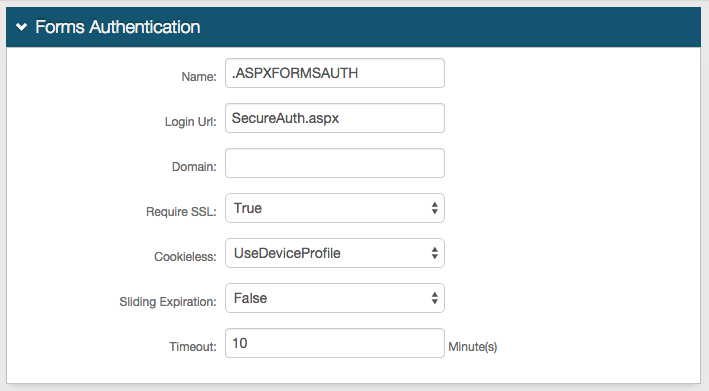
In the Forms Authentication section, set the following:
Require SSL
If the SSL is required to view the token, set to True.
Cookieless
Indicate whether SecureAuth IdP will deliver the token in a cookie to the user's browser or device:
UseCookies – Always deliver a cookie
UseUri – Do not deliver a cookie, deliver the token in a query string
AutoDetect – Deliver a cookie if the user's settings allow it.
UseDeviceProfile – Deliver a cookie if the browser settings allow it, regardless of the user's settings
Sliding Expiration
For the cookie to remain valid as long as the user is interacting with the page, set to True.
Timeout
Set the length of time in minutes the cookie is valid.
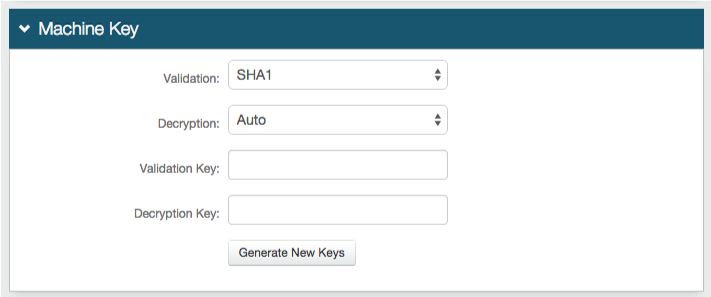
In the Machine Key section, set the following:
Validation
If the default value does not match your organization's requirements, choose another value.
Decryption
If the default value does not match your organization's requirements, choose another value.
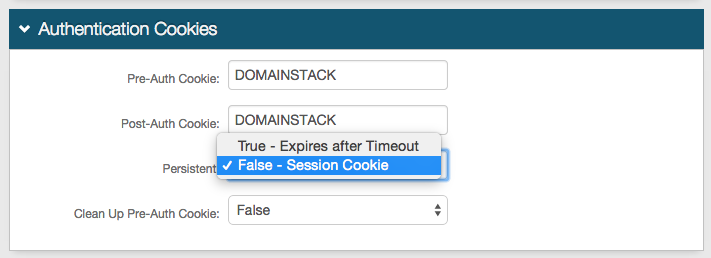
In the Authentication Cookies section, set the following:
Persistent
Set one of the following values:
True - Expires after Timeout – Allow the cookie to be persistent
False - Session Cookie – Allow the cookie to be valid as long as the session is open, and expires when the browser is closed or the session expires
Save your changes.
Note
To configure this realm for SSO, refer to SecureAuth IdP Single Sign-on Configuration
Note
To configure this realm for Windows Desktop SSO, refer to Windows desktop SSO configuration
Duplicate Realms
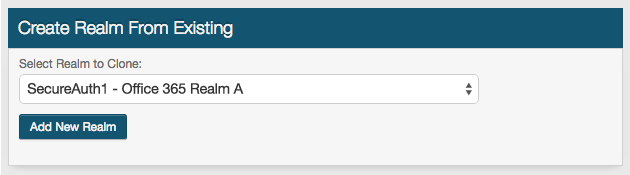 |
27. Create a New Realm from Existing and select the SecureAuth IdP realm number that corresponds to Realm A in this guide
This action duplicates Realm A to create Realm B
Notice
Realm B should be identical to Realm A, with the configuration steps below included
Workflow
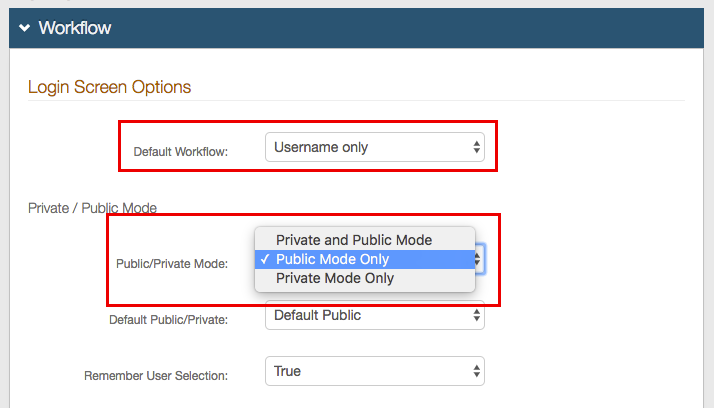 |
28. In the Workflow section, under Login Screen Options, select Username only from the Default Workflow dropdown
29. Select Public Mode Only from the Public / Private Mode dropdown
Custom Identity Consumer
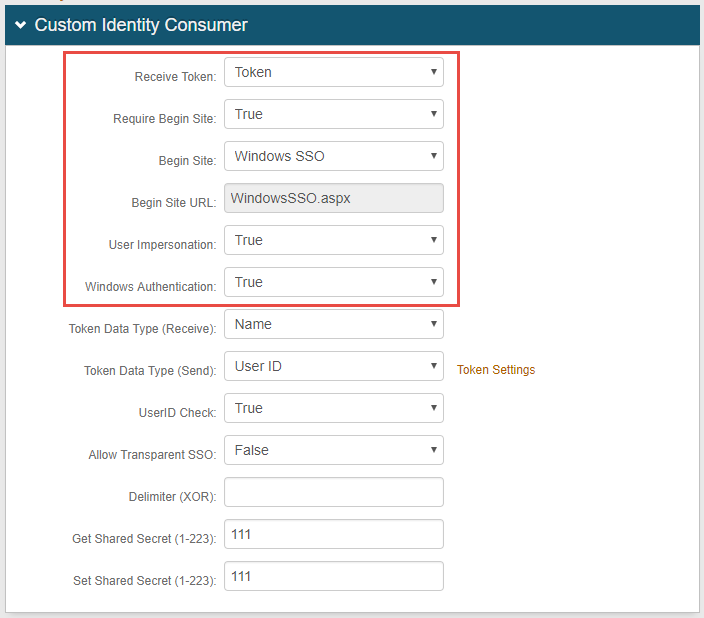 |
30. Select Token from the Receive Token dropdown
31. Select True from the Require Begin Site dropdown
32. Select Windows SSO from the Begin Site dropdown
33. WindowsSSO.aspx auto-populates the Begin Site URL field
34. Select True from the User Impersonation dropdown
35. Select True from the Windows Authentication dropdown
Notice
The User Impersonation and Windows Authentication fields appear only after Windows SSO is selected in step 32
Warning
Click Save once the configurations have been completed and before leaving the Workflow page to avoid losing changes
Additional Configuration Steps
Required Configuration for Specific Use Case
If the user's Office 365 user ID is not the same as the sAMAccountName value in the directory, then the following configuration steps are required in Realm B
Notice
If the user ID is the same as the sAMAccountName value in the directory, then skip to Office 365 Configuration Steps below
Data
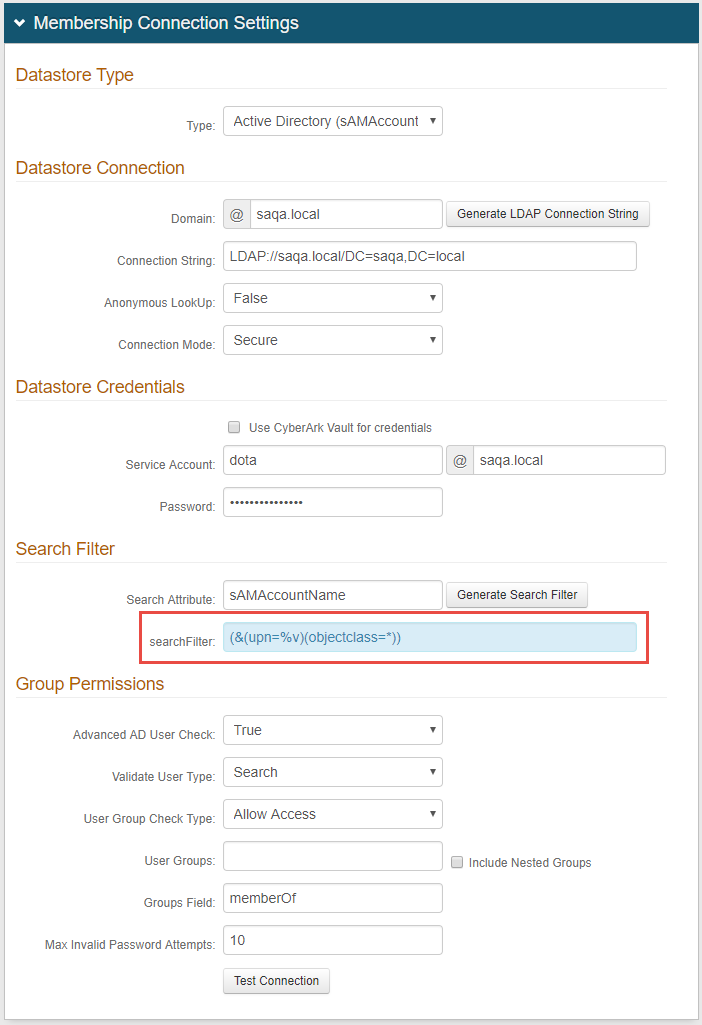 |
1. In the Membership Connection Settings section, modify the searchFilter field to set upn=%v
Warning
Click Save once the configurations have been completed and before leaving the Data page to avoid losing changes
System Info
 |
2. In the Links section, click Click to edit Web Config file
Web Config Editor
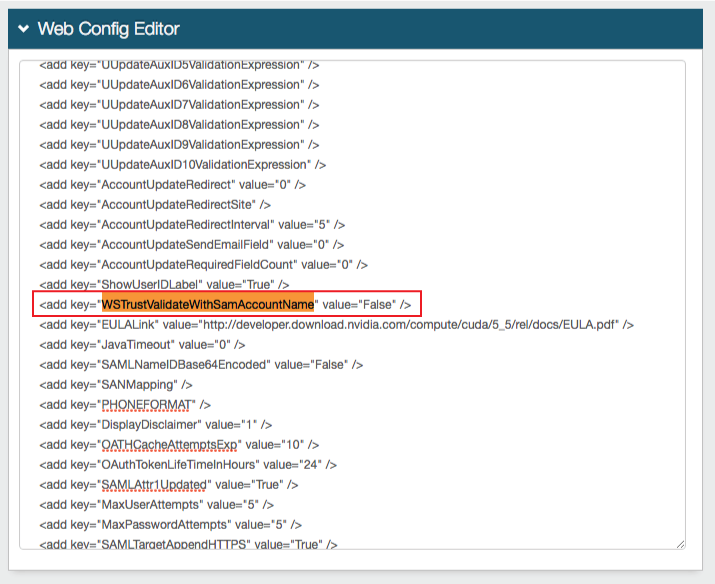 |
3. Locate <add key="WSTrustValidateWithSamAccountName" value="True" /> and set it to False
Warning
Click Save once the configurations have been completed and before leaving the Web Config Editor page to avoid losing changes
Office 365 Configuration Steps
Note
This guide should be used for general configuration, though the proposed configuration may not fit every Office 365 environment
SecureAuth is not responsible for configuring the Office 365 application; however, these steps are included to assist customers in preparing their Office 365 environment for the SecureAuth IdP integration
Windows Azure AD for SSO
Office 365 utilizes Microsoft Windows Azure AD in the cloud to store user identities and can be used as a directory store for MS CRM Online, Windows Intune, and Windows Azure
Follow Microsoft's Single Sign-on Roadmap to configure Office 365 for SSO
Notice
Read Prepare for Single Sign-on to learn the benefits of SSO and what end-users will experience when they connect from different locations
Ensure the environment meets the requirements to enable SSO and verify the Active Directory is compatible with the SSO requirements
1. Prepare Active Directory by running the Microsoft Office 365 for Enterprises Deployment Readiness Tool
2. Set up and manage Active Directory Synchronization
Follow Configure Filtering for Directory Synchronization to limit the synchronization to a specific organizational unit
3. Install the Microsoft Online Services Sign-in Assistant for IT Professionals
Windows PowerShell
Install Microsoft Online Services Module for Windows PowerShell
1. Refer to Install Windows PowerShell for Single Sign-on with ADFS
2. Start Microsoft Online Services Module for Windows PowerShell
Configure Office 365 Domain Federation via PowerShell
Follow the steps in the table below to enter the PowerShell commands
Run the commands exactly in the order specified
Replace the "DomainName" placeholder with the SecureAuth IdP Domain Name
Replace the "SecureAuthIdPFQDN" placeholders with the actual SecureAuth IdP Hostname
Replace the "SecureAuthIdPRealm1" and "SecureAuthIdPRealm2" placeholders with the actual SecureAuth IdP realms used for Realm A (SecureAuthIdPRealm1) and Realm B (SecureAuthIdPRealm2)
Place quotation marks around the links used, e.g. if the command requires $dom="DomainName", then enter the domain name in quotes ($dom="secureauthdev.com")
Note
NOTE: The entries for DomainName, SecureAuthIdPFQDN, SecureAuthIdPRealm1, and SecureAuthRealm2 are unique to each configuration
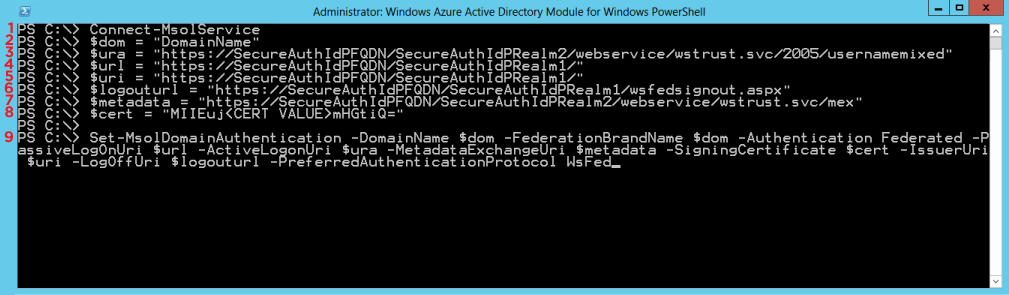 |
1 | Connect-MsolService Function: The Connect-MsolService cmdlet initiates a connection to the online service |
2 | $dom="DomainName" Function: The domain name registered with Office 365 (see Prerequisites) |
3 | $ura="https://SecureAuthIdPFQDN/SecureAuthIdPRealm2/webservice/wstrust.svc/2005/usernamemixed" Function: The variable containing the SecureAuth IdP FQDN and Office 365 Realm B, followed by /webservice/wstrust.svc/2005/usernamemixed This URL specifies the endpoint used by active clients when authenticating with domains set up for SSO (identity federation) in Office 365 Example: "https://secureauth.company.com/secureauth2/webservice/wstrust.svc/2005/usernamemixed" NoteSecureAuthIdPFQDN and SecureAuthIdPRealm2 are unique for every appliance |
4 | $url="https://SecureAuthIdPFQDN/SecureAuthIdPRealm1/" Function: The variable containing the SecureAuth IdP FQDN and Office 365 Realm A This URL is to where web-based clients are directed when signing into Office 365 Example: "https://secureauth.company.com/secureauth1/" |
5 | $uri="https://SecureAuthIdPFQDN/SecureAuthIdPRealm1/" Function: The variable containing the SecureAuth IdP FQDN and Office 365 Realm A This is the unique identifier of the domain in the Office 365 platform that is derived from the federation server Example: "https://secureauth.company.com/secureauth1/" NoteThe uri command and the WSFed/SAML Issuer in the SecureAuth IdP Web Admin must match exactly, including the trailing forward slash "/" |
6 | $logouturl="https://SecureAuthIdPFQDN/SecureAuthIdPRealm1/wsfedsignout.aspx" Function: The variable containing the SecureAuth IdP FQDN and Office 365 Realm A, followed by /wsfedsignout.aspx This is the URL to where users are redirected to sign out of Office 365 NoteIf both IdP-initiated and SSO are used and issues are encountered when logging in, then contact Support Example: "https://secureauth.company.com/secureauth1/wsfedsignout.aspx" |
7 | $metadata="https://SecureAuthIdPFQDN/SecureAuthIdPRealm2/webservice/wstrust.svc/mex" Function: The variable containing the SecureAuth IdP FQDN and Office 365 Realm B, followed by the metadata location /webservice/wstrust.svc/mex This URL specifies the metadata exchange endpoint used for authentication from rich client applications, such as Lync Online Example: https://secureauth.company.com/secureauth2/webservice/wstrust.svc/mex" |
8 | $cert="<CERT VALUE>" Function: The variable containing the Certificate Value of the certificate used to sign tokens passed to the Office 365 identity platform Replace <CERT VALUE> with the actual value NoteExport the certificate used in the SecureAuth IdP Web Admin for signing the WS-Federation Assertion 1. Export the SSL certificate in Base64 format 2. Open the exported certificate in a text editor (Windows Notepad or Notepad++) 3. Remove the Begin Certificate and End Certificate lines from the file 4. Remove all returns (CR-LF) so that the certificate value is one line of text with no formatting |
9 | Set-MsolDomainAuthentication -DomainName $dom -FederationBrandName $dom -Authentication Federated -PassiveLogOnUri $url -ActiveLogonUri $ura -MetadataExchangeUri $metadata -SigningCertificate $cert -IssuerUri $uri -LogOffUri $logouturl -PreferredAuthenticationProtocol WsFed Function: This command configures Office 365 with the variables set in previous lines (above) |
Verify Office 365 Account Configuration
Verify the Office 365 account is configured correctly by entering this code into Azure PowerShell: Get-MsolDomainFederationSettings -DomainName <DomainName> and replacing "<DomainName>" with the actual domain name, e.g. Get-MsolDomainFederationSettings -DomainName secureauthdev.com
Review all information and confirm the configuration is correct
Correct Errors
If an error appears, then run this command to modify any incorrectly configured variable: Set-MsolDomainFederationSettings
For example, changing the $ura variable and then running the Set-MsolDomainFederationSettings -ActiveLogOnUri $ura changes the ActiveLogOnUri value to the new $ura variable
Note
PowerShell Issues and Federation Settings
If the Set-MsolDomainAuthentication command is not working in PowerShell, run PowerShell without the DomainName $dom and Authentication Federated variables; PowerShell then prompts for the domain name and Federated domain
Verify the Federation settings on the domain by running the command Get-MsolDomainFederationSettings -DomainName <DomainName>
A certificate issued from a trusted source may be required; if a certificate from a trusted source is added, use the certificate console to modify the permissions on the new certificate and add Network Service read permissions to the Private Key
Additional Configuration Option
Office 365 Tenant - Multi-domain Support
If the Office 365 tenant contains multiple domains to be federated for authentication, then Microsoft requires the domain to be created with the SupportMultiDomains flag set to True
If the domains were created without the flag, then the domain must be updated
Refer to Microsoft's Documentation for information on how to create, update, and remove domains in an Office 365 tenant
When federating for authentication, each domain in a Office 365 tenant must have a unique Issuer
SecureAuth IdP supports the ability to dynamically send an Issuer from one realm using the authenticating user's userPrincipalName to pull an Issuer from a configuration setting
For each federated domain in Office 365 for authentication, note the Issuer used in the configuration steps above
To enable the dynamic Issuer feature of SecureAuth, contact SecureAuth support by opening a ticket at https://support.secureauth.com/ or visit support.secureauth.com
Troubleshooting
Resolve Authentication Issues Using Firefox
If authentication issues appear after being passed through SecureAuth IdP, then use Firefox with SAML Tracer to view the POST to Office 365. Within the POST, identify the UPN, ImmutableID, and NameID in the Parameters tab. Use the Microsoft Online PowerShell to log in and check these values against the user by running Get-MsolUser -UserPrincipalName user@company.com | fl *
Update Federated Domain Properties after Federation
If the Federated Domain Properties (LogOutUri, MetadataExchangeUri, etc.) need to be updated, then update each of them using Set-MsolDomainFederationSettings (MSDN Technet Details). Additionally, verify the current Federated Domain settings by using Get-MsolDomainFederationSettings.