Microsoft Azure AD as Additional Profile Provider Configuration Guide
Introduction
Use this guide along with the Data Tab Configuration to configure a SecureAuth IdP realm that uses Microsoft Azure AD as an additional Profile Provider.
Prerequisites
1. Have Microsoft Azure AD and access to the admin console
2. Create or designate an existing administrator service account with read and optional write access for SecureAuth IdP
3. Create a Native Client Application on Azure AD (see Microsoft Azure AD Configuration Guide for configuration steps)
Azure AD Configuration Steps
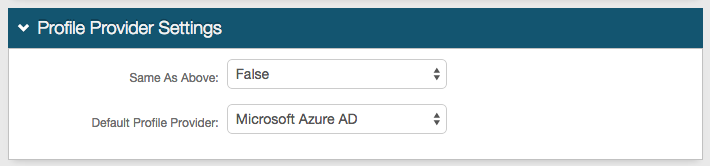 |
1. In the Profile Provider Settings section, select True from the Same as Above dropdown to copy the data store integration from the Membership Connection Settings section for use in profile connection; or select False if that directory is only used for the membership connection.
2. Select Microsoft Azure AD from the Default Profile Provider dropdown if Azure AD is to be used as the default profile provider
Note
If another Microsoft Azure AD data store is configured in the Membership Connection Settings section, and True is selected from the Same as Above dropdown, then those settings appear in the Profile Connection Settings (below) and must be modified to reflect the settings of the new Azure AD data store
Only one Microsoft Azure AD can be utilized for profile connection
If another directory is selected from the Default Profile Provider dropdown, then Microsoft Azure AD must be selected from Source dropdown in the Profile Fields section for the SecureAuth IdP Properties that are mapped to Azure AD fields
Profile Connection Settings
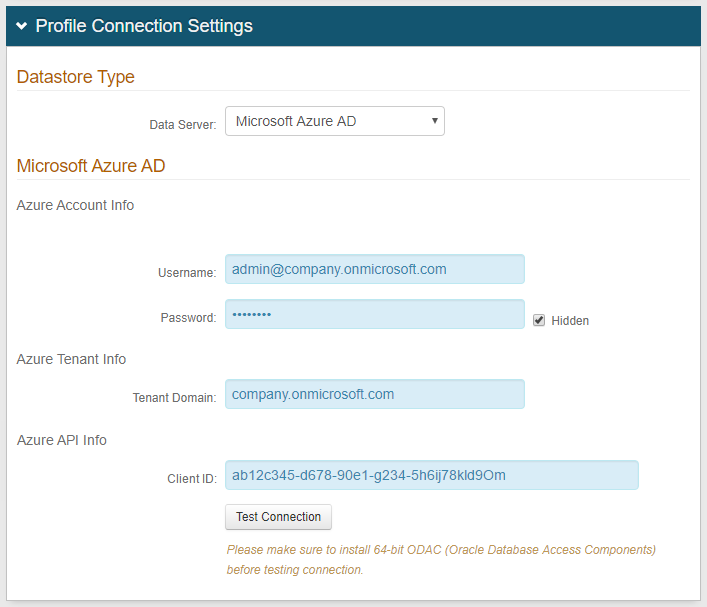 |
3. Select Microsoft Azure AD from the Data Server dropdown
4. Provide the Username and Password of the administrator service account
5. Set the Tenant Domain to the .onmicrosoft.com Domain Name of the Directory (see Microsoft Azure AD Configuration Guide for more information)
6. Set the Client ID to the Application ID / Client ID of the native client application (see Microsoft Azure AD Configuration Guide for more information)
7. Click Test Connection to ensure that the connection is successful
Note
Refer to Data Tab Configuration to complete the configuration steps of the Data tab in the Web Admin