Lightweight Directory Services (AD-LDS) configuration guide
Use this guide along with the Data Tab Configuration guide to configure a Lightweight Directory Services (AD-LDS)-integrated SecureAuth IdP realm.
Prerequisites
An on-premises Lightweight Directory Services (AD-LDS) data store
Identity Platform service account with read access (and optional write access)
Lightweight Directory Services (AD-LDS) configuration steps
Note
Refer to Data Tab Configuration to complete the configuration steps in the Data tab of the Web Admin.
Refer to LDAP Attributes / SecureAuth IdP Profile Properties Data Mapping for information on the Profile Properties section.
In Advanced Settings (formerly Classic Experience), go to the Data tab.
In the Membership Connection Settings section, set the following:
Datastore Type
Type
Select Lightweight Directory Services (AD-LDS).
Datastore Connection
Domain
Set the domain of the Active Directory.
Connection String
Click Generate LDAP Connection String to automatically populate this field.
Anonymous LookUp
Select False.
Connection Mode
Set the how the Identity Platform and the directory connect. Choose from the following values:
Secure – Enable a secure LDAP connection on Port 389, using NTLMv2.
SSL – Enable a secure connection on Port 636, but uses Secure Socket Layer technology, which relies on certificates.
Standard – Enable a standard LDAP connection on Port 389 that uses basic authentication (plain text).
Datastore Credentials
Use one of the following credentials.
Use CyberArk Vault for Credentials
To use CyberArk Vault, select this check box and follow the steps in CyberArk Password Vault Server and AIM Integration with SecureAuth IdP.
With this feature enabled, the Service Account, Domain, and password are not required.
Service Account, Domain, and Password
Provide the username, domain, and password for the service account login.
Search Filter
Search Attribute
To search for the user account in the directory, provide the search attribute.
For example, cn.
searchFilter
Click Generate Search Filter to automatically populate this field.
The value that equals %v is what the end user provides on the login page, so if it is different from the Search Attribute, change it here.
For example, if the Search Attribute is cn, but end users log in with their email addresses (field= mail), the searchFilter would be: (&(mail=%v)(objectclass=user)).
Group Permissions
Advanced AD User Check
To check the directory for more user information, set to True.
This is useful in a scenario in which a user account is locked.
Validate User Type
Choose how to validate usernames and passwords in the directory:
Bind – Make a direct call to the directory to validate the username and password
Search – Use the search function to find and validate a username and password
User Group Check Type
To allow or restrict group access to the realm, choose Allow Access or Deny Access. Provide a list of Allowed Groups and Denied Groups in a comma delimited format.
User Groups
If there is no access restriction, leave blank. Otherwise, provide a list of groups allowed or denied access.
For example, Admins.
Include Nested Groups
Select the Include Nested Groups check box to include a user group's subgroups in the access list too.
Groups Field
Provide the groups field containing the user groups.
For example, memberOf.
Max Invalid Password Attempts
Set the maximum number failed password attempts by the user before the account is locked.
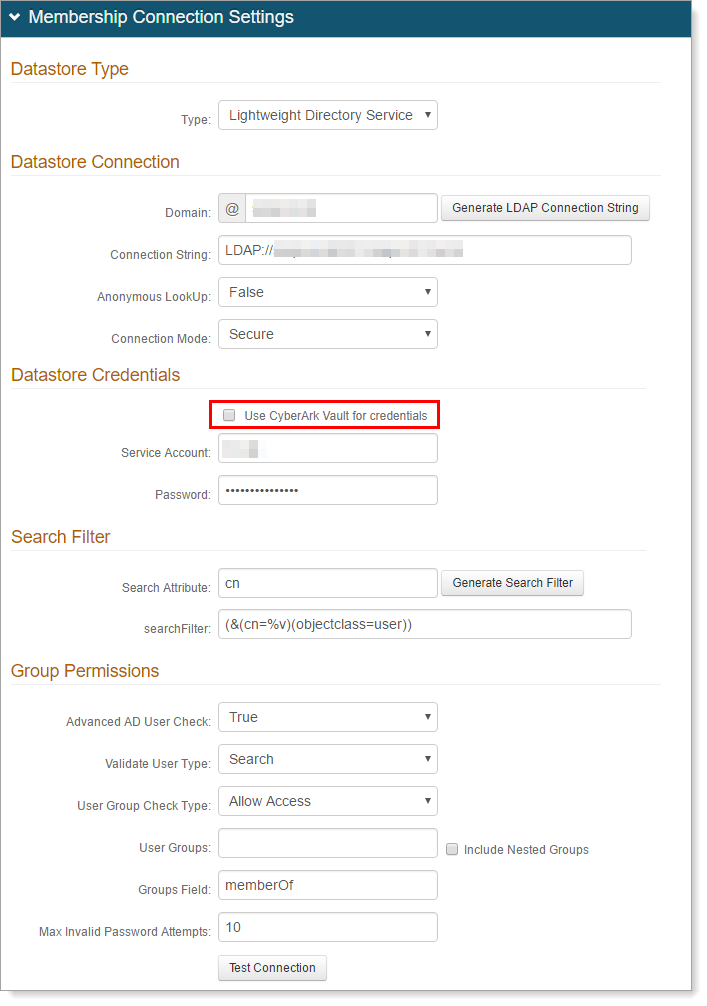
Click Test Connection to ensure the integration is successful.