SSL Certificate Replacement Guide - IIS X
Summary
The steps in this document follow the Microsoft standard SSL certificate request process. Review Configuring Internet Server Certificates (IIS 7) for more information. Contact SecureAuth Support with questions.
Purpose
Use this article to replace the SSL certificate bound to the Default Web site of the SecureAuth IdP Appliance by following steps detailed below.
Important Notice
Warning
Do not delete the existing SSL certificate that was shipped with the SecureAuth Appliance. This certificate is used for the encrypted communications to the SecureAuth IdP hosted/cloud services. It is bound to the Default Web site to enable SSL services required by SecureAuth IdP during the appliance installation process, but is not required to be bound to any Web site as long as a valid SSL certificate is bound to the Default Web site.
Incorporating the Certificate
Request a Certificate in Windows Server 2012
To create the Certificate Request:
1. Use Remote Desktop (RDP) to access the SecureAuth Appliance or connect to the Console.
2. Log on with the local administrator account.
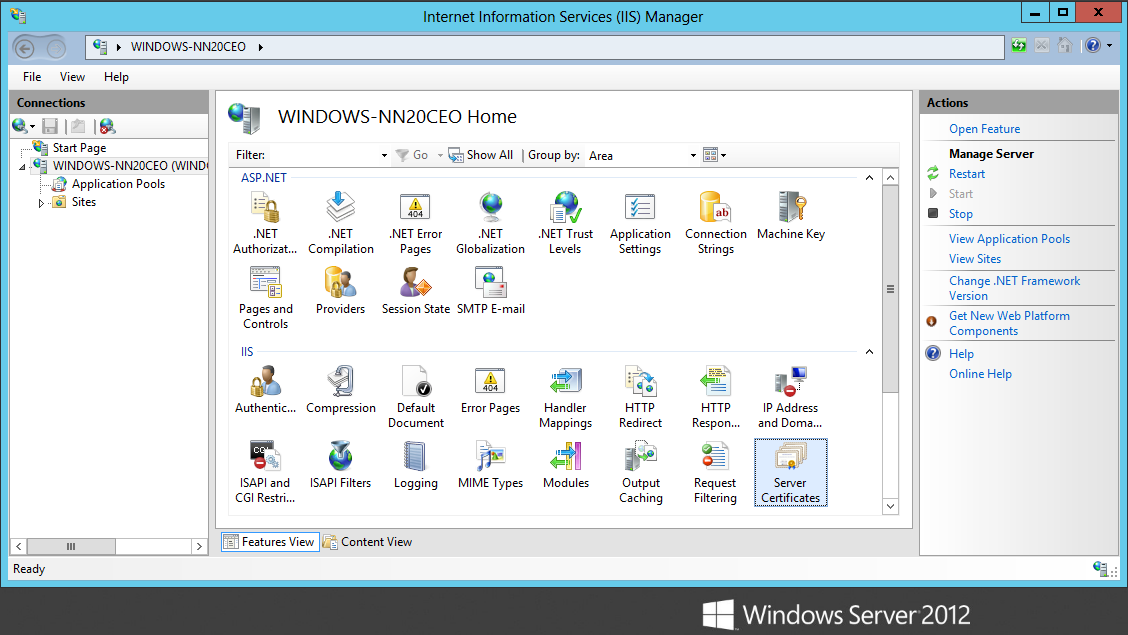
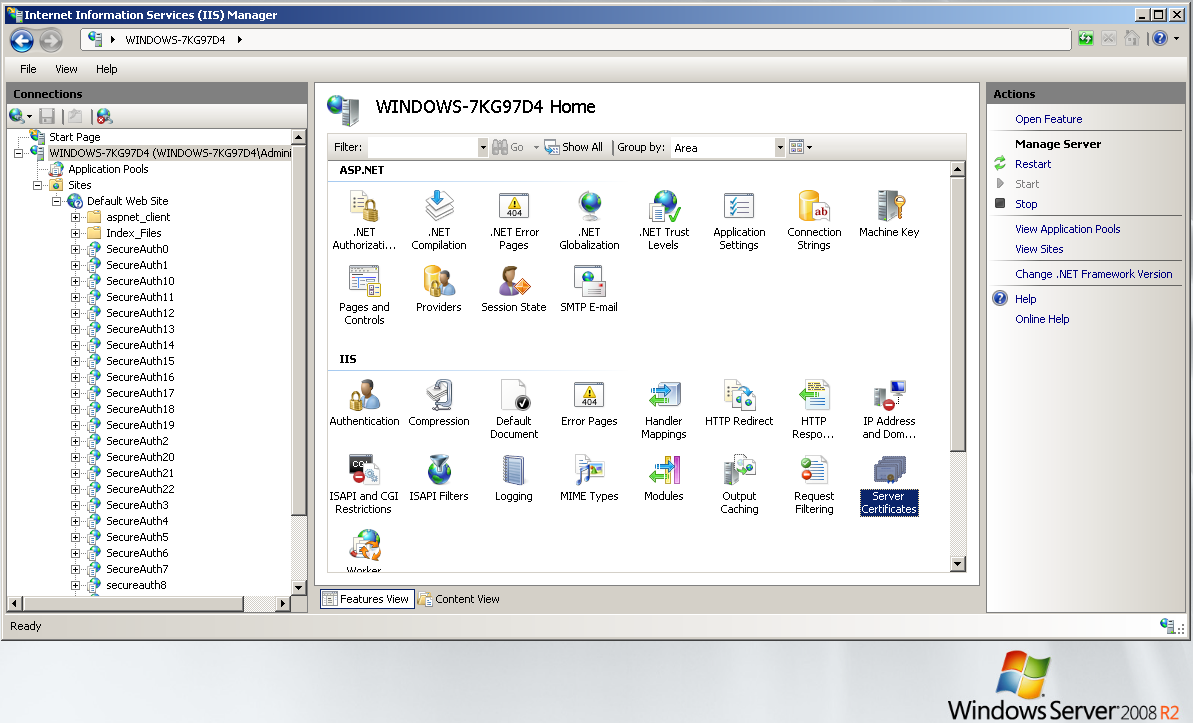
3. From the Start Menu, open IIS Manager.
4. Under Connections in the left pane, select the Appliance host name.
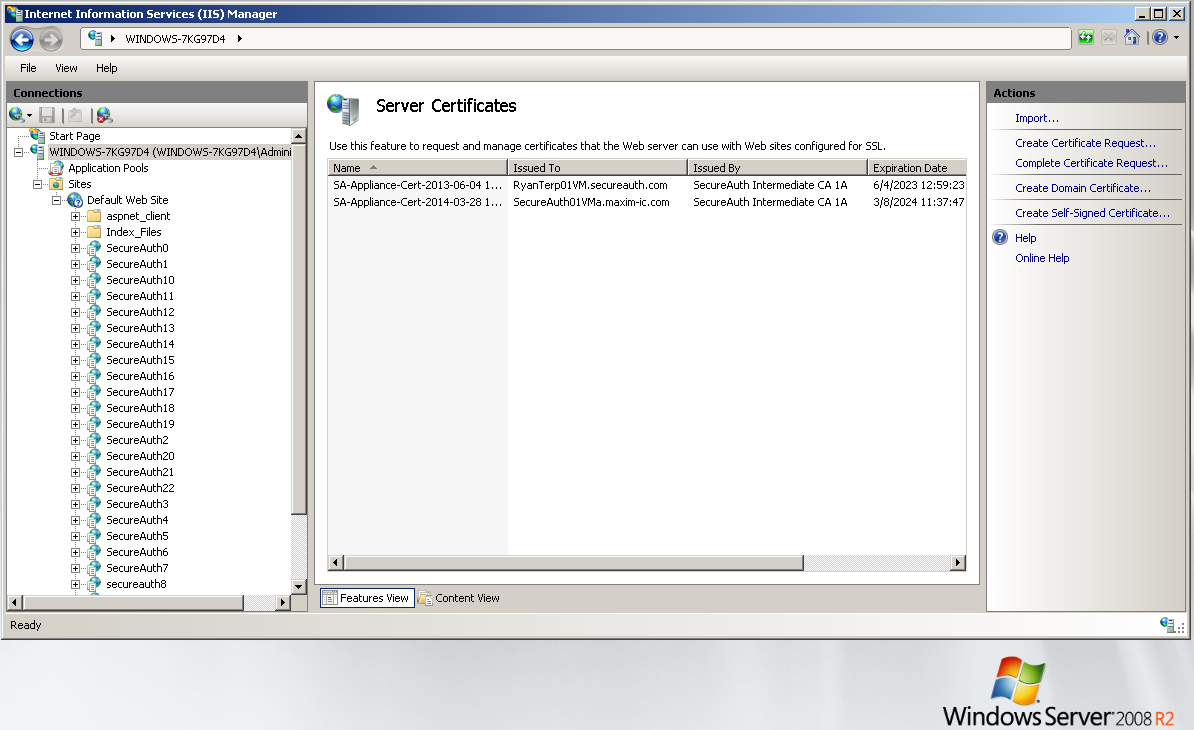
5. In the Features View, select Server Certificates.
 |
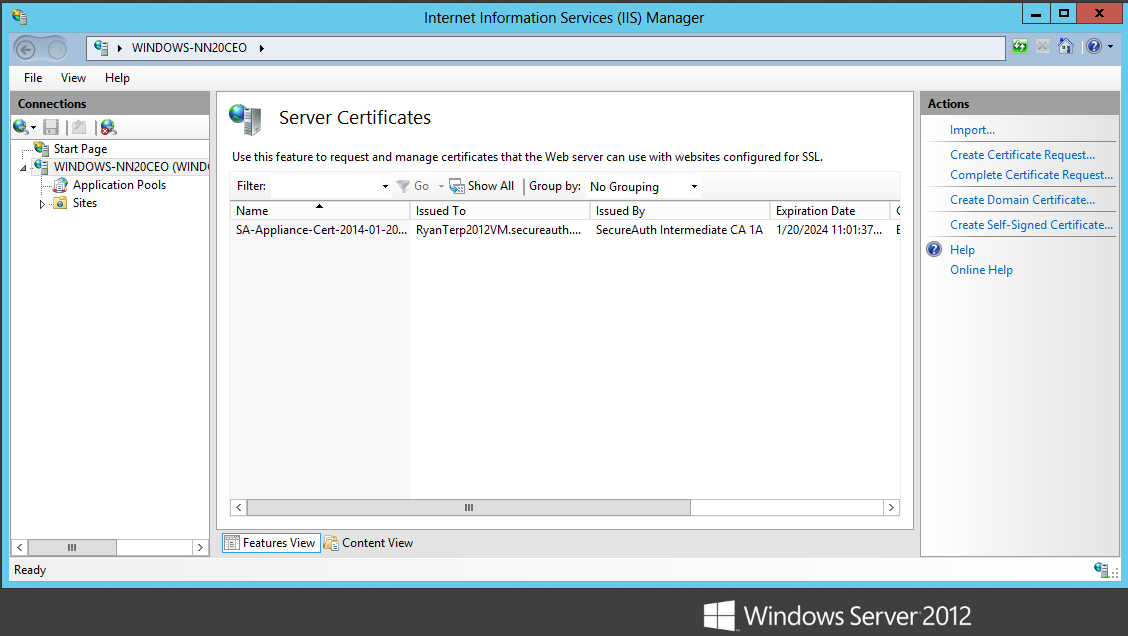 |
The installed certificates appear.
6. In the Actions frame, select Complete Certificate Request.
7. In Common Name, enter the FQDN of the certificate to create.
8. Enter the Organization name and Org Unit.
9. Enter the Geographical Information and click Next. (No abbreviations please other than the Country Code)
 |
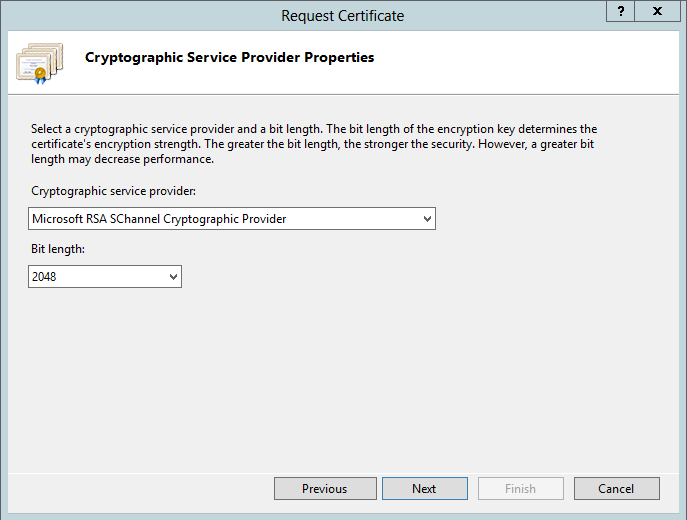
10. Unless instructed otherwise, accept the default Cryptographic service provider: Microsoft RSA S Channel Cryptographic Provider
11. Set the Certificate Bit Length to 2048 bits. Most 3rd party certificate vendors require a bit length of 2048.
 |
12. Select Next.
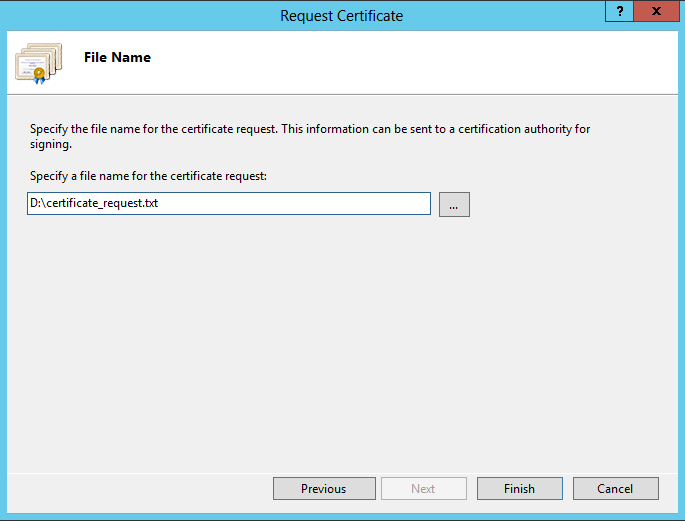
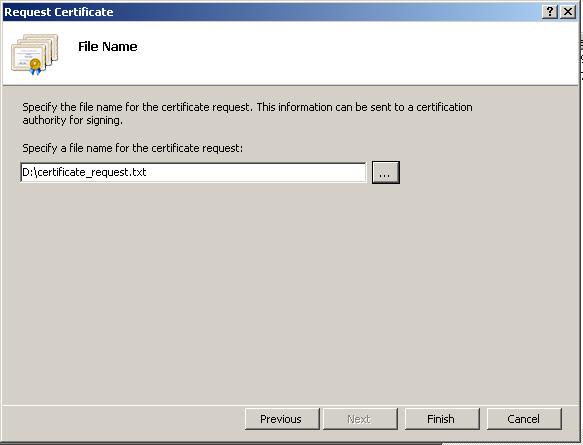
13. Enter the location and name of the certificate request file e.g. D:\certreq.txt or the preferred name and location.
 |
14. Select Finish.
Send the Certificate to the Vendor
To provide the certificate request to a certificate vendor for signing:
1. Process the certificate request with the preferred certificate provider.
2. Once the response / signed request has been received, copy the signed certificate back to the Appliance.
3. Place the signed response in the same location as the requested file.
4. Ensure the certificate has a .CER extension.
Install and Configure the Certificate
To install the new certificate:
This procedure contains information on how to process the signed response file on the SecureAuth appliance.
1. Use RDP to access the SecureAuth Appliance or connect to the Console.
2. Log on with the local administrator account.
3. From the Start Menu, open IIS Manager.
4. Under Connections in the left pane, select the Appliance host name.
5. In the Features View, select Server Certificates.
The currently installed certificates display.
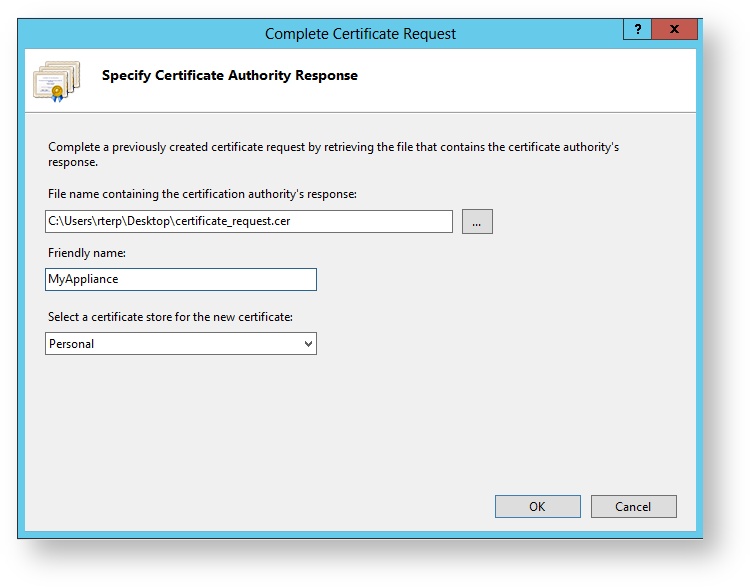
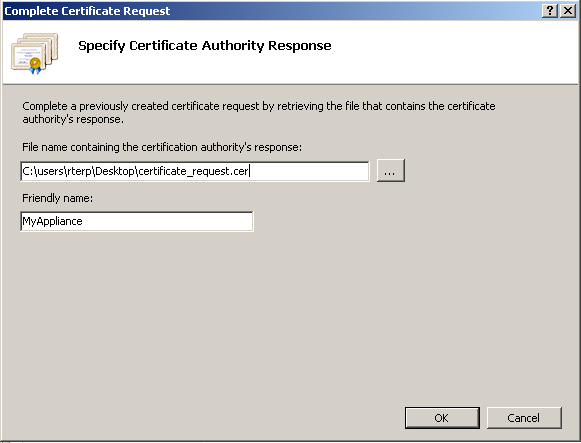
6. In the Actions frame, select Complete Certificate Request.
7. Browse to the response file with the .CER extension.
8. Enter a Friendly Name for the certificate. SecureAuth recommends using the CN to avoid confusion.
9. Click OK.
 |
The certificate appears on the Server Certificates List in IIS Manager.
10. View the certificate and verify that the certificate chain is present. If it is not, the certificate will not be trusted.
Use the New SSL Certificate on the Default Website
Warning
The following steps cause a short outage of SecureAuth services.
To configure the Default website to use the new SSL Certificate:
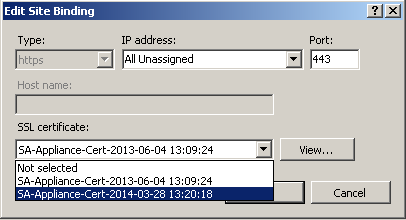
1. From the IIS Manger, expand Sites.
2. Right-click Default Web Site and select either Edit Bindings or select Default Web Site.
3. Select Bindings from the Actions Frame.
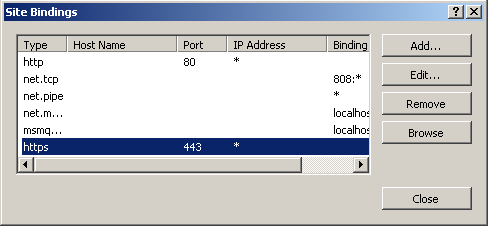
4. Select https.
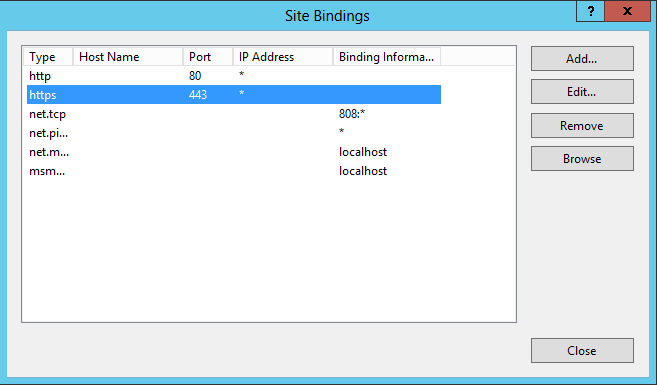 |
5. Select Edit.
|
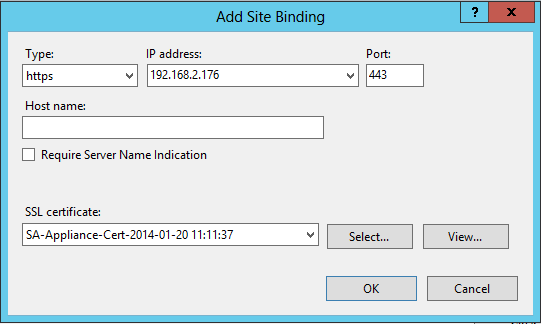
6. Unless there are multiple sites configured on the SecureAuth IdP Appliance, leave the IP address and Port settings at the default.
7. From the drop-down menu, select the required certificate.
8. Click OK. The certificate is now installed on the default web site.
Define an SSL identity in NAT environments
Note
SecureAuth recommends defining an additional SSL Identity for the Local Host using port 443 if the Appliance is configured on the internal network and a NAT rule is used for client traffic from the Internet.
To set additional SSL identity in NAT environments (only if required):
1. From IIS Manger, expand Sites.
2. Right-click Default Web Site and select either Edit Bindings or Default Web Site.
3. From the Actions Frame, select Bindings.
4. Click Add.
 |
5. Set Type to https.
6. Enter 127.0.0.1 for the IP Address.
7. Verify that the Port is set to 443.
8. Select the SSL Certificate to the same certificate that was selected in step 7 of To configure the Default website to use the new SSL Certificate.
9. Select OK to close the Add site Binging dialog.
10. Click Close to exit the Site Bindings dialog.
11. Close the IIS manager.
12. Open a Command windows (CMD) and execute an IISReset to ensure that the Certificate Chain is recognized.
13. From a workstation or another device, browse to the SecureAuth Appliance and verify that no certificate errors display.
Request a Certificate in Windows Server 2008
To create the Certificate Request:
1. Use Remote Desktop (RDP) to access the SecureAuth Appliance or connect to the Console.
2. Log on with the local administrator account.
3. From the Start Menu, open IIS Manager.
4. Under Connections in the left pane, select the Appliance host name.
5. In the Features View, select Server Certificates. The installed certificates appear.
 |
 |
6. In the Actions frame, select Complete Certificate Request.
7. In Common Name, enter the FQDN of the certificate to create.
8. Enter the Organization name and Org Unit.
9. Enter the Geographical Information and click Next. (No abbreviations please other than the Country Code)
|
10. Unless instructed otherwise, accept the default Cryptographic service provider: Microsoft RSA S Channel Cryptographic Provider
11. Set the Certificate Bit Length to 2048 bits. Most 3rd party certificate vendors require a bit length of 2048.
 |
12. Select Next.
13. Enter the location and name of the certificate request file e.g. D:\certreq.txt or the preferred name and location.
 |
14. Select Finish.
Send the Certificate to the Vendor
To provide the certificate request to a certificate vendor for signing:
2. Once the response / signed request has been received, copy the signed certificate back to the Appliance.1. Process the certificate request with the preferred certificate provider.
3. Place the signed response in the same location as the requested file.
4. Ensure that the certificate has a .CER extension.
Install and Configure the Certificate
To install the new certificate:
1. Use RDP to access the SecureAuth Appliance or connect to the Console. This procedure contains information on how to process the signed response file on the SecureAuth appliance.
2. Log on with the local administrator account.
3. From the Start Menu, open IIS Manager.
4. Under Connections in the left pane, select the Appliance host name.
5. In the Features View, select Server Certificates. The currently installed certificates appear.
6. In the Actions frame, select Complete Certificate Request.
7. Browse to the response file with the .CER extension.
8. Enter a Friendly Name for the certificate. SecureAuth recommends using the CN to avoid confusion.
9. Click OK. The certificate appears on theServer Certificates List inIIS Manager.
|
10. View the certificate and verify that the certificate chain is present. If it is not, the certificate will not be trusted.
Use the New SSL Certificate
Warning
The following steps cause a short outage of SecureAuth services.
To configure the Default website to use the new SSL Certificate:
1. From the IIS Manger, expand Sites.
2. Right-click Default Web Site and select either Edit Bindings or select Default Web Site.
3. Select Bindings from the Actions Frame.
4. Select https.
 |
5. Select Edit.
 |
6. Unless there are multiple sites configured on the SecureAuth IdP Appliance, leave the IP address and Port settings at the default.
7. From the drop-down menu, select the required certificate.
8. Click OK. The certificate is now installed on the default web site.
Define an SSL identity in NAT environments
Note
SecureAuth recommends defining an additional SSL Identity for the Local Host using port 443 if the Appliance is configured on the internal network and a NAT rule is used for client traffic from the Internet.
To set additional SSL identity in NAT environments (only if required):
1. From IIS Manger, expand Sites.
2. Right-click Default Web Site and select either Edit Bindings or Default Web Site.
3. From the Actions Frame, select Bindings.
4. Click Add.
 |
5. Set Type to https.
6. Enter 127.0.0.1 for the IP Address.
7. Verify that the Port is set to 443.
8. Select the SSL Certificate to the same certificate that was selected in step 7 of To configure the Default website to use the new SSL Certificate.
9. Select OK to close the Add site Binging dialog.
10. Click Close to exit the Site Bindings dialog.
11. Close the IIS manager.
12. Open a Command windows (CMD) and execute an IISReset to ensure that the Certificate Chain is recognized.
13. From a workstation or another device, browse to the SecureAuth Appliance and verify that no certificate errors display.