Cisco ASA SSL VPN Integration Guide (Certificate)
Introduction
Use this guide to enable Multi-Factor Authentication access via X.509 certificates to Cisco ASA SSL VPN.
Prerequisites
1. Have a Cisco ASA SSL VPN 5505 version 8.0(1)4+, with ADSM v6.2(3)+ and access to the admin console
2. Download the SecureAuth IdP Certificate Bundle, which includes the CA Certificates used for the integration
3. Create a New Realm for the Cisco integration in the SecureAuth IdP Web Admin
4. Configure the following tabs in the Web Admin before configuring the Post Authentication tab:
Overview – the description of the realm and SMTP connections must be defined
Data – an enterprise directory must be integrated with SecureAuth IdP
Workflow – the way in which users will access this application must be defined
Multi-Factor Methods – the Multi-Factor Authentication methods that will be used to access this page (if any) must be defined
SecureAuth IdP Configuration Steps
Workflow
1. In the Product Configuration section, select Certificate Enrollment Only from the Integration Method dropdown
Note
In versions 9.0.1+, this step is located in the Device Recognition Method section
Warning
Click Save once the configurations have been completed and before leaving the Workflow page to avoid losing changes
Post Authentication
2. Select Native Mode Cert Landing Page from the Authenticated User Redirect dropdown
Warning
Click Save once the configurations have been completed and before leaving the Post Authentication page to avoid losing changes
Retrieve Certificate
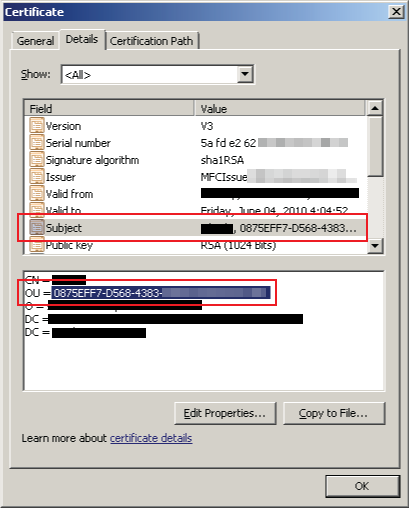 |
3. Go through the SecureAuth IdP workflow that is configured above to retrieve the certificate
Keep the Subject information handy as it will be used in the Cisco Configuration Steps below
Cisco Configuration Steps
Connection Profile
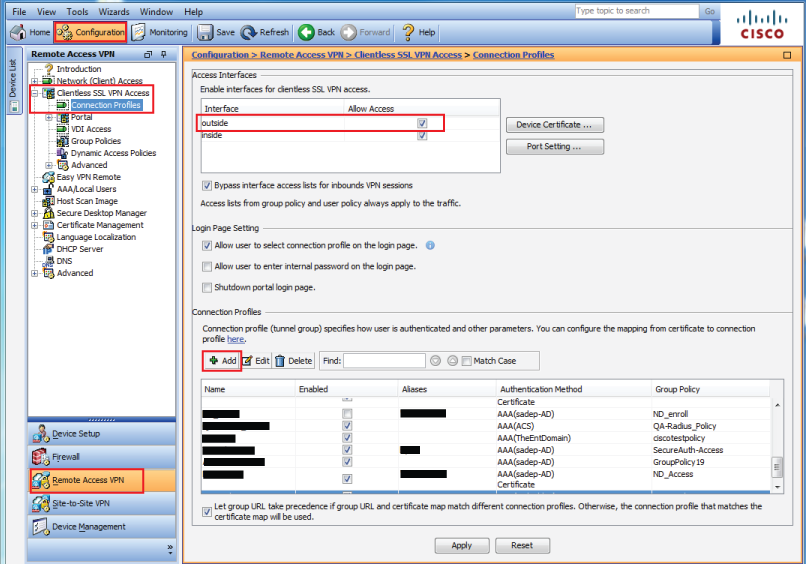 |
1. Log into the Cisco ASA VPN admin console, and select Remote Access VPN under Configuration, and expand the Clientless SSL VPN Access menu
2. Select Connection Profiles
3. Check outside to allow access in the Access Interfaces section
4. Click Add to create a new connection / access profile
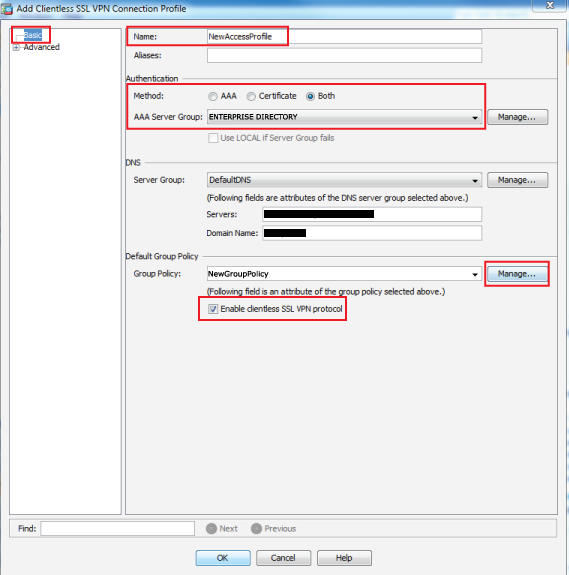 |
5. In the Basic section, provide a Name for the new access profile
6. Select Both from the Authentication Method options
7. Select the enterprise directory from the AAA Server Group dropdown
8. Select the Group Policy from the dropdown, or click Manage... to create a new one
9. Select the newly created Group Policy (steps 10-24 below) from the dropdown
10. Check Enable clientless SSL VPN protocol
Group Policy
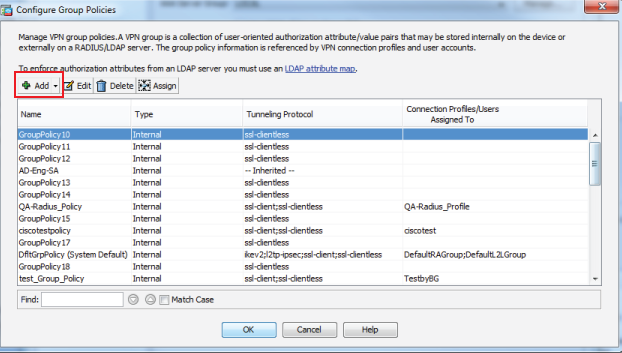 |
11. Click Add to create a new group policy
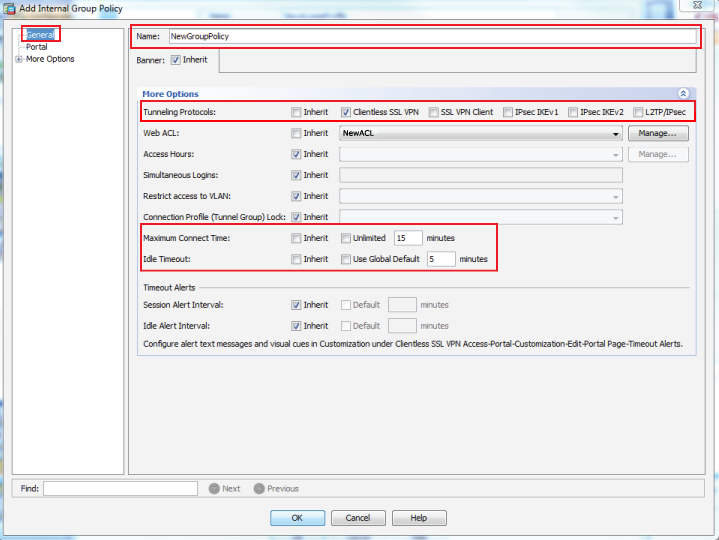 |
12. In the General section, provide a Name for the new group policy
13. Select Clientless SSL VPN from the Tunneling Protocols options
14. Set the Maximum Connect Time and Idle Timeout
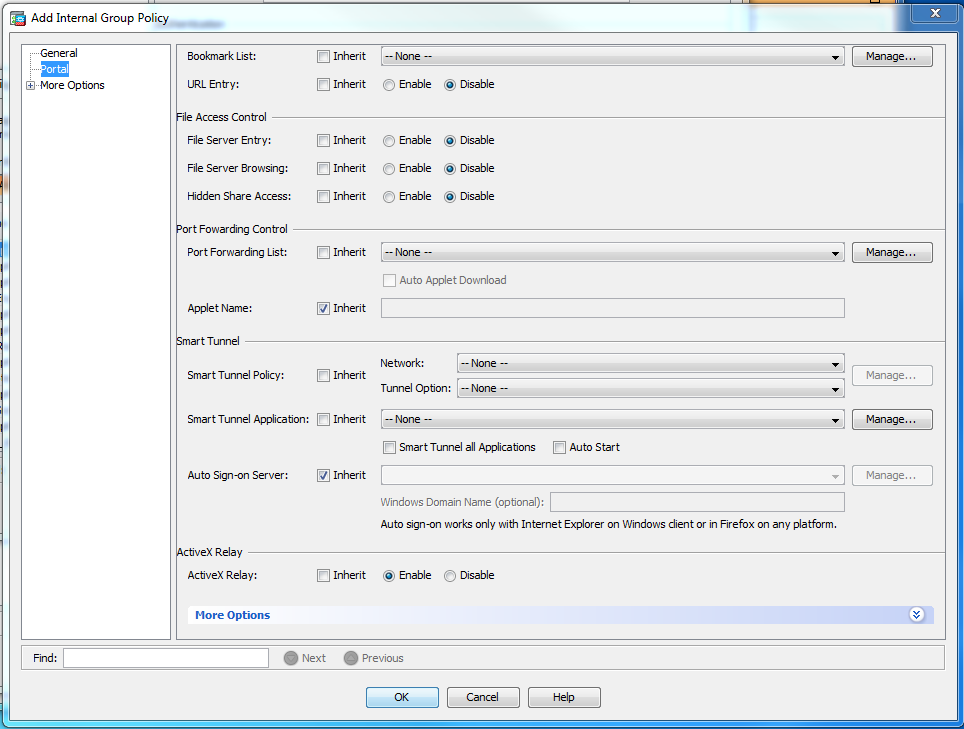 |
15. In the Portal section, Enable, Disable, or leave as Inherit the options as shown in the image
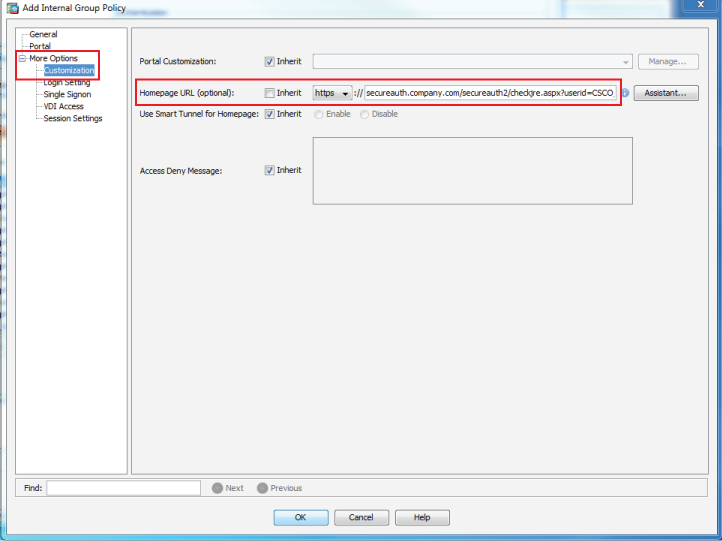 |
16. In the Customization section under More Options, select https from the Homepage URL dropdown, and set it to the FQDN of the SecureAuth IdP appliance, followed by the Cisco-integrated realm and checkjre.aspx?userid=CSCO_WEBVPN_USERNAME, e.g. secureauth.company.com/secureauth2/checkjre.aspx?userid=CSCO_WEBVPN_USERNAME
17. Click OK
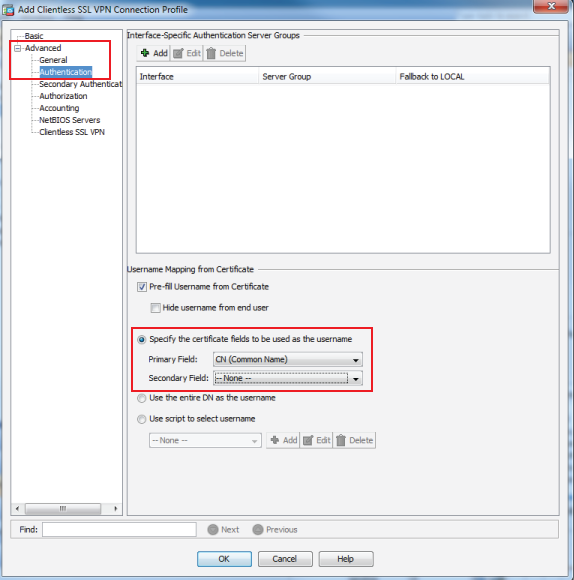 |
18. In the Authentication section under Advanced, select Specify the certificate fields to be used as the username
19. Select CN (Common Name) from the Primary Field dropdown
20. Select --None-- from the Secondary Field dropdown
21. Click OK
Certificate to AnyConnect and Clientless SSL VPN Connection Profile Maps
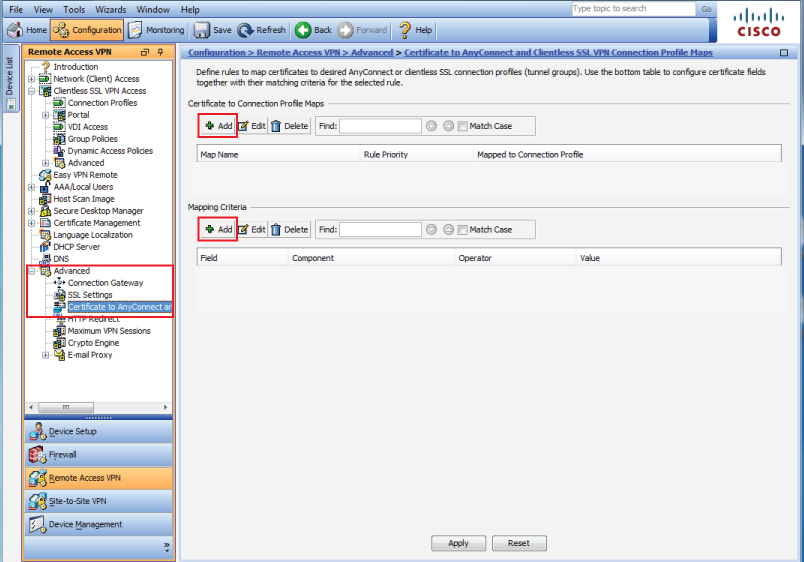 |
22. In the Remote Access VPN console, select Certificate to AnyConnect and Clientless SSL VPN Connection Profile Maps under Advanced
23. Click Add to create a Certificate Matching Rule (steps 33-36 below)
24. Click Add to create a Certificate Matching Rule Criterion (steps 37-41 below)
25. Click Apply once the rules have been created
Certificate Matching Rule
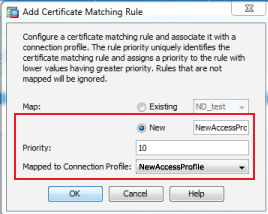 |
26. Select New and provide the name of the new access profile (step 4)
27. Set the Priority
28. Select the new access profile from the Mapped to Connection Profile dropdown
29. Click OK
Certificate Matching Rule Criterion
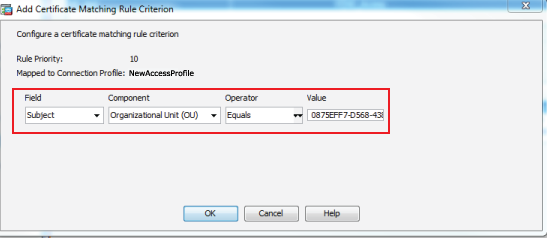 |
30. Select Subject from the Field dropdown
31. Select Organizational Unit (OU) from the Component dropdown
32. Select Equals from the Operator dropdown
33. Set the Value to the same OU value from the certificate obtained from SecureAuth IdP
34. Click OK
CA Certificates
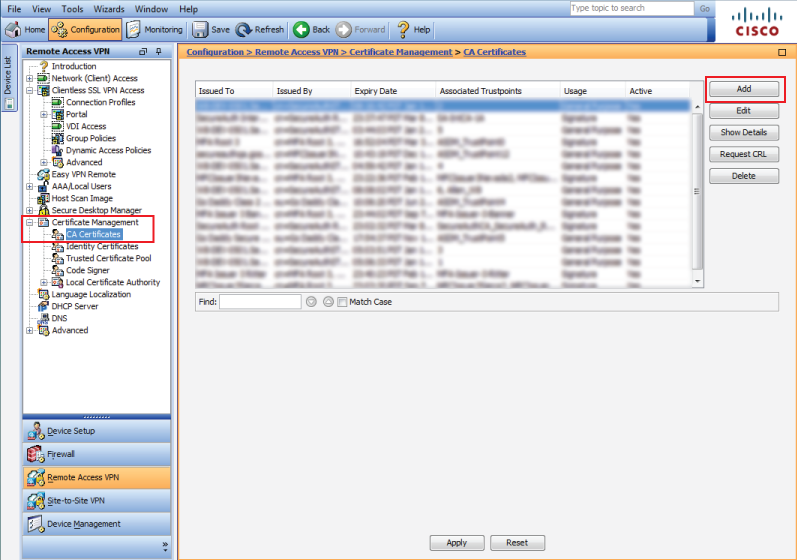 |
37. In the Remote Access VPN admin console, select CA Certificates under Certificate Management
38. Click Add to add a new CA
Install Certificate
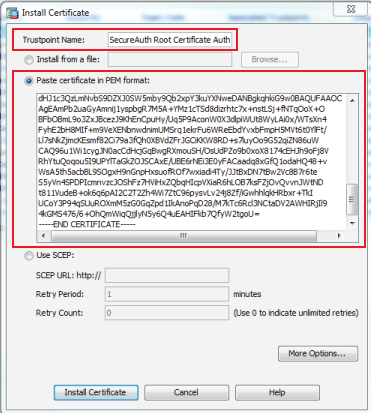 |
39. Set the Trustpoint Name to the name of the CA, e.g. SecureAuth Root Certificate Authority
40. Either Install the file or select Paste certificate in PEM format and input the certificate value into the field
41. Click Install Certificate
42. A success message will appear, click OK
43. Repeat these steps for the remaining CA Certificates
44. Once the CAs have been installed, click Apply on the CA Certificates homepage
Tip
Additional Resources: Clientless SSL VPN Browser Compatibility Information
Troubleshooting
Creating a new Web ACL may solve an issue where the SecureAuth URL does not resolve correctly due to existing group policies.
General
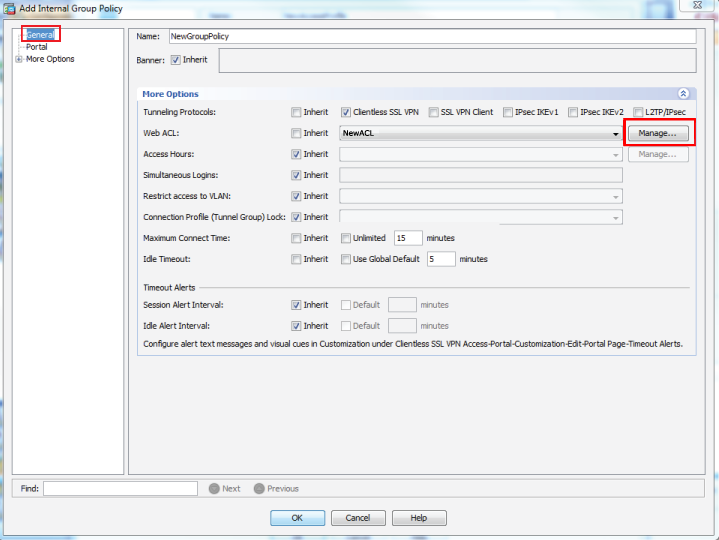 |
1. In the General section, click Manage on the Web ACL line to create a new ACL
Web ACL
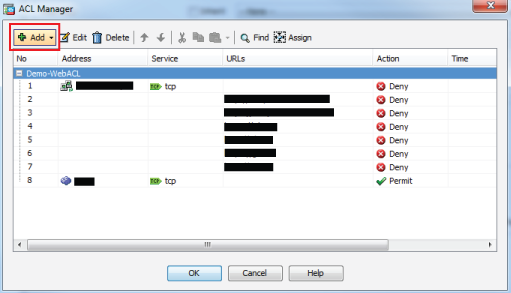 |
The ACL Manager opens
2. Click Add New ACL
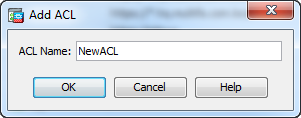 |
The Add ACL window opens
3. Set an ACL Name for the new ACL
4. Click OK
ACE
 |
5. On the ACL Manager page, click Add New ACE
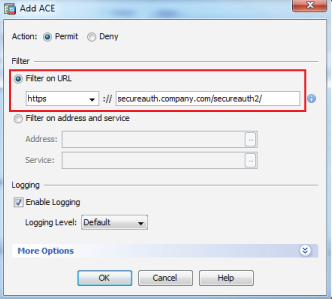
The Add ACE window opens
6. Select Filter on URL and select https from the dropdown and provide the Fully Qualified Domain Name (FQDN) of the SecureAuth IdP appliance, followed by the Cisco-integrated realm, e.g. secureauth.company.com/secureauth2/
7. Click OK
 |
8. Select the newly created Web ACL from the dropdown