Standard Multi-Factor Authentication Workflow Configuration
Introduction
Use this guide as a reference to configure a SecureAuth IdP realm that uses the Standard Multi-Factor Authentication workflow.
The Username | Second Factor | Password workflow prompts the end-user for the username, then a second factor option of the end-user's choice, and then the password, in that order.
This can be applied to any realm to access web, SaaS, mobile, or network applications and devices, and SecureAuth IdP out-of-the-box Identity Management (IdM) tools via Multi-Factor Authentication.
SecureAuth IdP Configuration Steps
Workflow
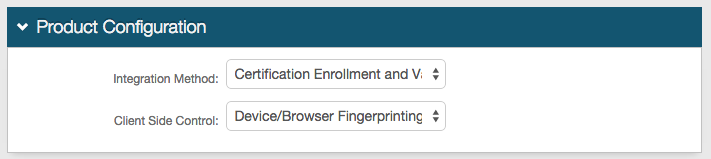 |
1. In the Product Configuration section, select Certification Enrollment and Validation from the Integration Method dropdown
2. Select Device/Browser Fingerprinting from the Client Side Control dropdown
Notice
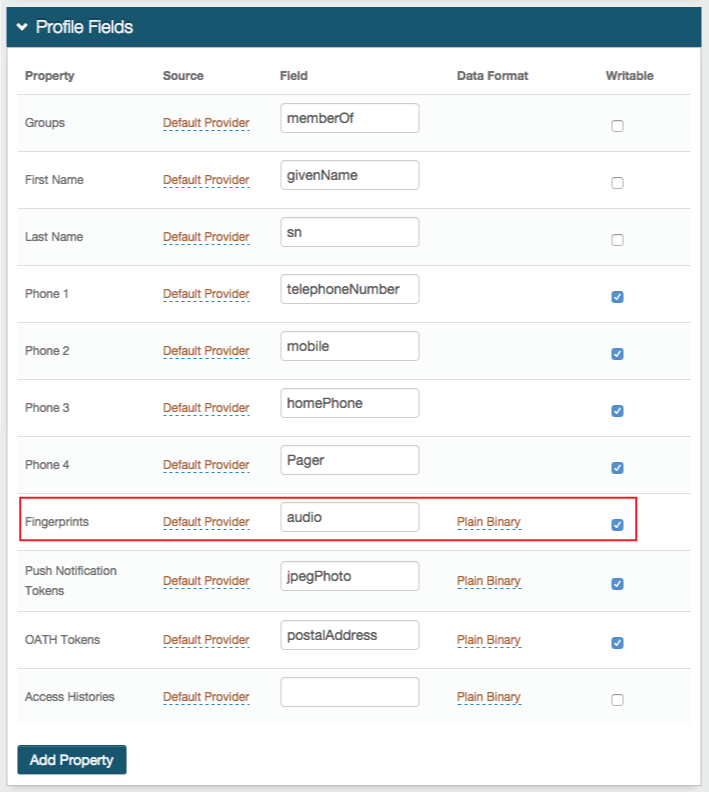
If using a different directory than LDAP, a stored procedure must be created to contain the Fingerprints
For LDAP data stores, the audio field is typically mapped to the Fingerprints Property in the Data tab
The Fingerprints Property can be stored as Plain Binary or in JSON format, and has distinct requirements for the LDAP directory attribute mapped to the Property based on the Data Format selection
For Plain Binary, these requirements must be met for the directory field that contains the device / browser profile information:
Length: 8 kB minimum per Profile Record; and if the Total FP Max Count is set to -1, then the size must be unlimited
Data Type: Octet string (bytes)
Multi-valued
For JSON, these requirements must be met for the directory field that contains the profile information:
Length: No limit / undefined
Data Type: DirectoryString
Multi-valued
 |
Workflow
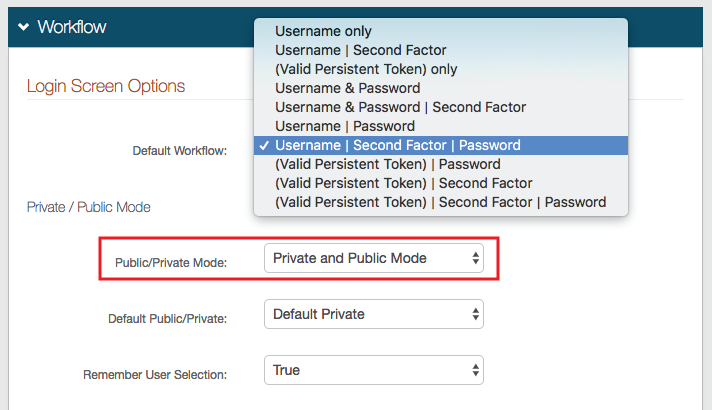 |
3. Select Username | Second Factor | Password from the Default Workflow dropdown
4. Select Private and Public Mode or Private Mode Only from the Public/Private Mode dropdown
Selecting Private and Public Mode or Private Mode Only generates a device / browser profile in this realm and checks for existing profiles
5. Select which option is selected by default on the client-side page from the Default Public/Private dropdown
SecureAuth recommends selecting Default Private to ensure that profiles are generated and checked in the realm
6. Select True from the Remember User Selection dropdown to automatically select Private or Public on the client-side page, based on the user's previous selection
Browser / Mobile Device Digital Fingerprinting
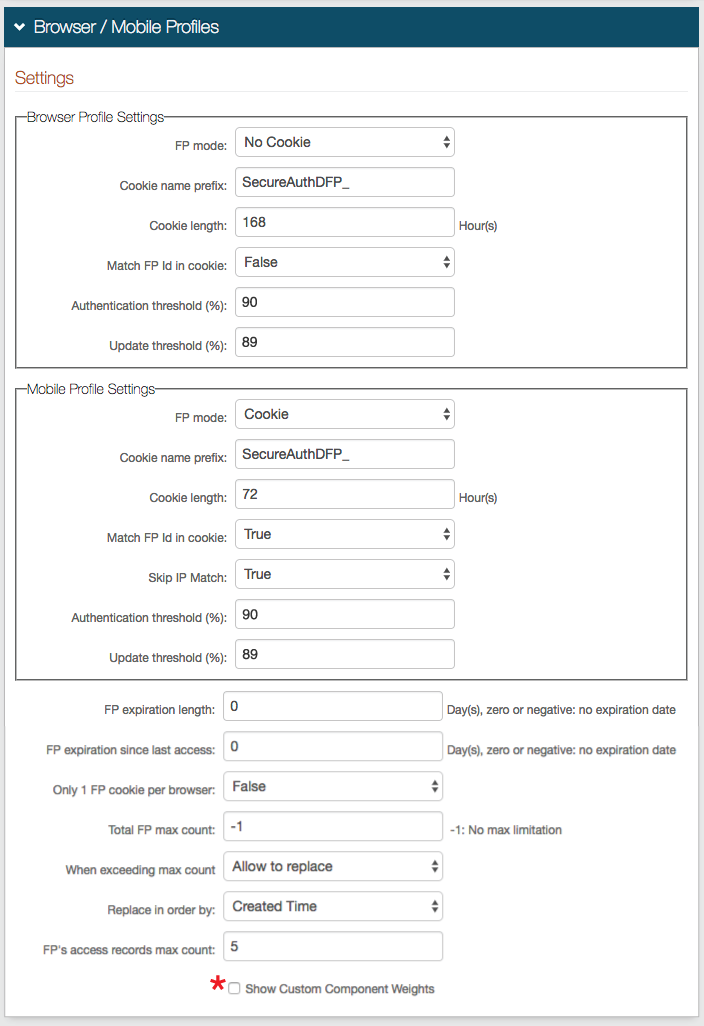 |
7. In the Browser Profile Settings section, select Cookie from the FP Mode dropdown to enable SecureAuth IdP to deliver a cookie to the browser after authentication; or select No Cookie if no cookie is to be used
8. If Cookie is selected in step 9, then provide the Cookie name prefix and Cookie length, or leave as default
The cookie name appears as Cookie Name Prefix + company name + hashed value of user ID
The Cookie length sets for how many hours the cookie is valid, e.g. 72 hours
9. Select True from the Match FP in cookie to require the profile ID to be presented and then matched to a profile ID in the directory, with an acceptable Authentication Threshold score; or select False to not require ID matching between the cookie and the stored profile
Tip
If No Cookie is selected in step 7, then steps 8 and 9 can be ignored
10. Set the Authentication Threshold to 90-100% based on preference
11. Set the Update Threshold to a percentage just below the Authentication Threshold
The Update Threshold must be less than the Authentication Threshold
Notice
Review the Profile Comparison Score information below for more explanation of the Thresholds
12. In the Mobile Settings section, select Cookie from the FP Mode dropdown to deliver a cookie to the mobile device; or select App Mode to utilize the DR App for further device / browser validation
13. Leave the Cookie name prefix as the default, or set it to a preferred name
The cookie name appears as Cookie Name Prefix + company name + hashed value of user ID
14. Set the Cookie Length to the amount of hours during which the cookie is valid, e.g. 72 Hours
15. Select True from the Match FP in cookie to require the profile ID to be presented and then matched to a profile ID in the directory, with an acceptable Authentication Threshold score; or select False to not require ID matching between the cookie and the stored profile
Tip
If App Mode is selected in step 12, then steps 13 - 15 can be ignored
16. Select True from the Skip IP Match dropdown to not require an exact IP Address match for profile comparison; or select False to require an exact match
17. Set the Authentication Threshold to 90-100% based on preference
18. Set the Update Threshold to a percentage just below the Authentication Threshold
The Update Threshold must be less than the Authentication Threshold
See Profile Comparison Score information in step 11
19. Set the FP expiration length to the number of days the profile is valid
For example, if this field is set to 10 days, then the user's profile expires in 10 days, no matter how often it is used
Set to 0 for no expiration
20. Set the FP expiration since last access to the number of days the profile is valid since last usage
For example, if this field is set to 10 days, then the user's profile expires if it is not used during the 10 days since it was last employed
Set to 0 for no expiration
21. Set the Total FP max count to the maximum number of profiles that can be stored in a user's account at a given time
If a maximum is to be set, a typical configuration would limit profile storage to 5-8
Set to -1 for no maximum entries
22. If a maximum is set in step 21, then select Allow to replace from the When exceeding max count dropdown to enable the replacement of an existing profile with a new one; or select Not allow to replace if the profiles cannot be automatically replaced
If Not allow to replace is selected, then the user or administrator must manually remove stored profiles from the user profile on the Self-service Account Update Page or Account Management (Help Desk) Page
23. If a maximum is set in step 21 and Allow to replace is selected in step 22, then select Created Time from the Replace in order by dropdown to enable the replacement of the oldest stored profile with the new one; or select Last Access Time to enable the replacement of the least recently used profile with the new one
24. Set the FP's access records max count to the number of access history entries per profile stored in the profile
SecureAuth recommends setting this to 5
* Check Show Custom Component Weights to modify the defaulted weights of each profile's components
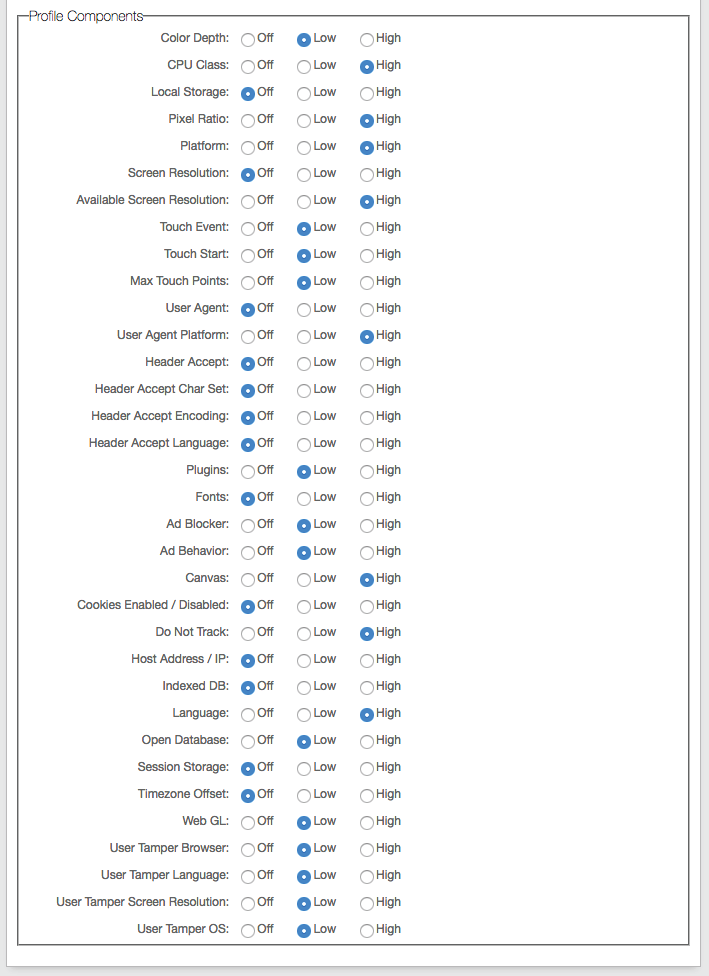 |
Set the components based on how profiles should be analyzed against the Thresholds
Off: Component is not considered in profile analysis
Low: Component is considered in profile analysis with low effect (small changes do not drastically change profile)
High: Component is considered in profile analysis with high effect (small changes could drastically change profile, requiring new profile for device / browser)
Refer to the table below for specific component information
Component | Definition | Affected by (example) | Default Weight |
|---|---|---|---|
Color Depth | Number of bits used to indicate the color of single pixel or number of bits used for each color component of single pixel | Settings change | Off |
CPU Class | Classification of central processing unit (CPU) | New device | High |
Local Storage | Has local storage or not | Settings change (true / false) | Low |
Pixel Ratio | Comparison of width and height of pixel | New device | High |
Platform | Framework on which applications run | New platform type | Off |
Screen Resolution | Clarity of text and images displayed on screen | Laptop dock, settings change | Off |
Available Screen Resolution | Available screen space on display | Laptop dock, settings change, menu bar location | High |
Touch Event | Touch screen detection and capabilities | Settings change, mobile to desktop device change | Off |
Touch Start | |||
Max Touch Points | |||
User Agent | Information about browser and operating system | New browser | High |
User Agent Platform | Native platform on which browser runs; mobile platform identifier | New platform type | Off |
Header Accept | Supported content types | Settings change | Off |
Header Accept Char Set | Supported character set | Settings change | Off |
Header Accept Encoding | Supported encoding algorithms | Settings change | Off |
Header Accept Language | Supported languages | Settings change | Off |
Plugins | List of native plugins | Native plugin addition / removal | High |
Fonts | List of browser fonts | Font addition / removal | High |
Ad Blocker | Installation of AdBlock | Settings change (true / false) | Off |
Add Behavior | Installation of IE specific AddBehavior | Settings change (true / false) | Off |
Canvas | HTML5 API used to draw graphics and animations on web page via scripting in JavaScript | New browser | High |
Cookies Enabled / Disabled | Browser cookies setting | Settings change (true / false) | Low |
Do Not Track | Enablement of DoNotTrack | Settings change (true / false) | Low |
Host Address / IP | Host / IP address of device | Network connection change | High |
Indexed DB | Has indexed DB or not | Settings change (true / false) | Off |
Language | Browser language | Language settings change | High |
Open Database | Browser storage allowed in open database | Settings change (true / false) | Off |
Session Storage | Has session storage or not | Settings change (true / false) | Off |
Timezone Offset | Amount of time subtracted from or added to UTC to get current time | Location change | High |
Web GL | JavaScript API for rendering interactive 3D graphics within compatible web browser without use of plug-ins | New device | High |
User Tamper Browser | Has user tampered with browser | Tampering (true / false) | Off |
User Tamper Language | Has user tampered with language settings | ||
User Tamper Screen Resolution | Has user tampered with screen resolution settings | ||
User Tamper OS | Has user tampered with OS settings |
Warning
Click Save once the configurations have been completed and before leaving the Workflow page to avoid losing changes
Multi-Factor Methods
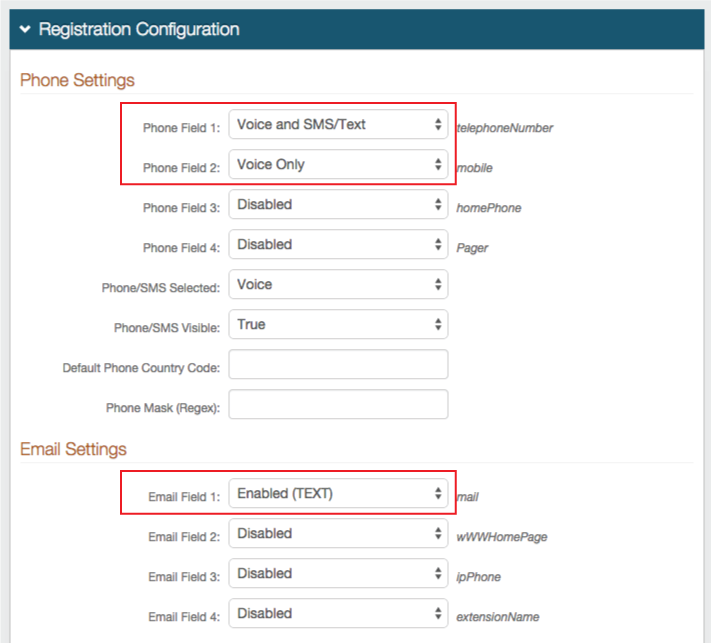 |
25. In the Registration Configuration section, ensure that at least one registration method is enabled for use in this realm
Warning
Click Save once the configurations have been completed and before leaving the Multi-Factor Methods page to avoid losing changes
System Info
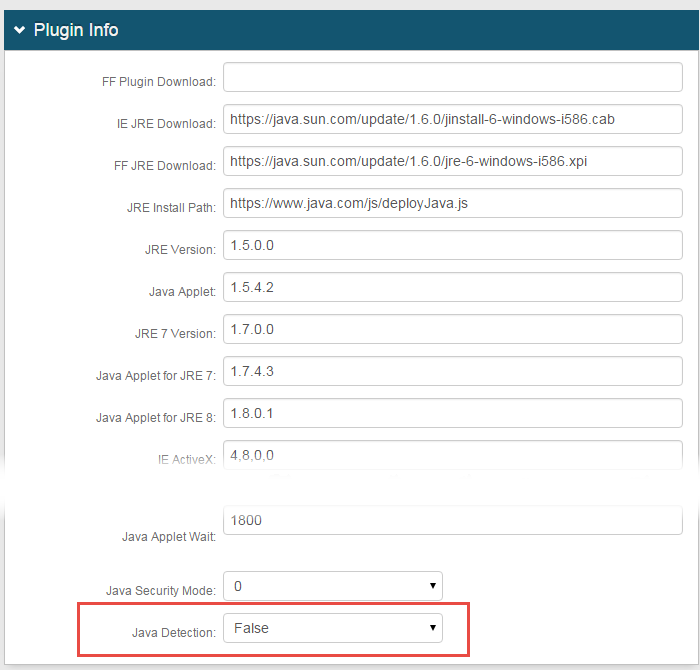
26. In the Plugin Info section, select False from the Java Detection dropdown
Warning
Click Save once the configurations have been completed and before leaving the System Info page to avoid losing changes
End-user Experience
Click here to see the Standard 2-FActor Authentication workflow