YubiKey Multi-Factor Authentication Configuration Guide
Introduction
A YubiKey device, made by Yubico, generates One-Time Passcodes (OTPs) end-users can use for Multi-Factor Authentication to access a realm in SecureAuth IdP version 9.1+.
The YubiKey must first be provisioned as a registered device in the end-user account before it can be used for this purpose.
This guide provides instructions for:
Administrators to configure a realm for end-users to provision their YubiKeys to register the devices in their accounts. NOTE: This realm can be configured to validate both the YubiKey ID and YubiKey OTP.
Administrators to configure a Help Desk realm end-users can access using their YubiKeys.
End-users to provision their YubiKeys.
End-users to use their YubiKeys to access the Help Desk page to manage YubiKeys.
Prerequisites
1. Have access to
One or more types of YubiKeys (YubiKey 5, YubiKey 5 Nano, YubiKey 4, YubiKey 4 Nano, YubiKey 4C, YubiKey Neo) to test configured SecureAuth IdP realms
The Yubico site to verify the SecureAuth IdP can communicate with the Yubico API endpoint
2. Create two realms on SecureAuth IdP v9.1 or later
Realm A to be configured for provisioning end-user YubiKeys to register the devices in their accounts
Realm B to be configured for authenticating end-users via their YubiKeys and giving them access to the Help Desk page
3. Configure the following tabs of the Web Admin on SecureAuth IdP realms A and B
Overview– the description of the realm and SMTP connections must be defined
Data– one or more data stores can be integrated with SecureAuth IdP
Workflow– the way in which users will access the target must be defined
Multi-Factor Methods– the Multi-Factor Authentication method that will be used to access the target (if any) must be defined
Post Authentication– the target resource or post authentication action must be defined
Logs– the logs that will be enabled or disabled for this realm must be defined
SecureAuth IdP Configuration Steps
Realm A
Data
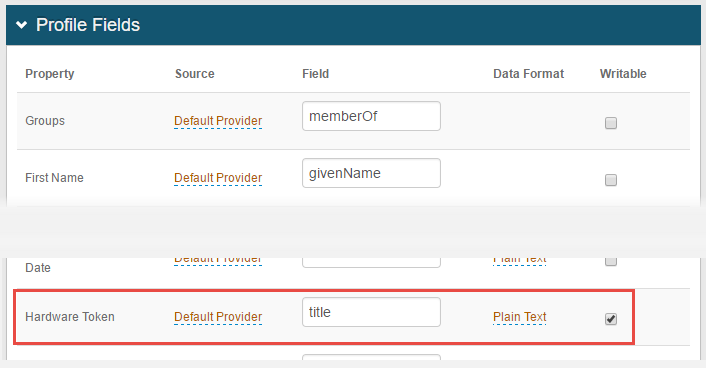 |
1. In the Profile Fields section, specify the search attribute (configured in step 1) as the Hardware Token and make the field Writable
Notice
Or, as an alternate, specify the search attribute (configured in step 1) as Aux ID 1 and make the field Writable
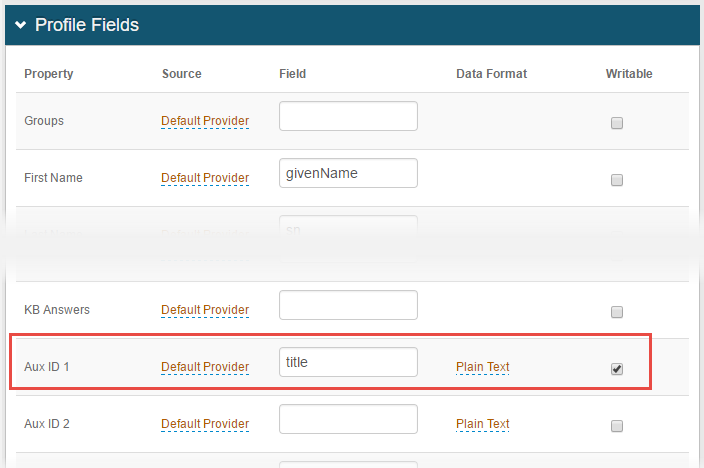
Warning
Click Save once the configuration is complete and before leaving the Data page to avoid losing changes
Workflow
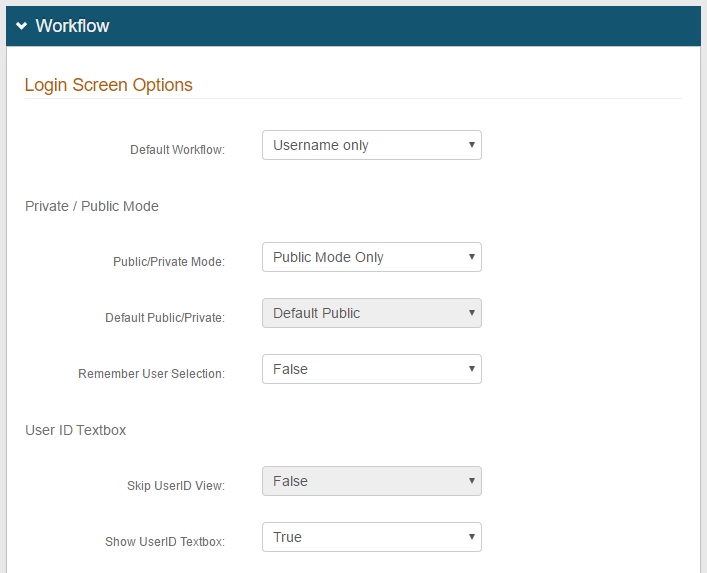 |
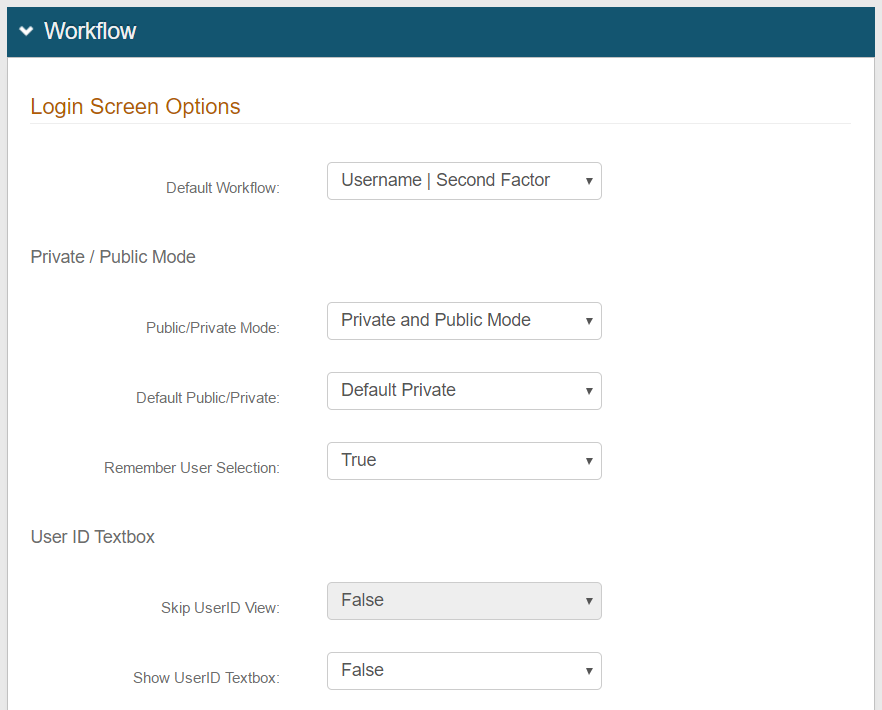
2. In the Workflow section, under Login Screen Options, specify the workflow to use, making a selection from the Default Workflow dropdown
In the example, with Username only selected, the end-user only needs to enter the username and use the YubiKey device to be authenticated
NOTE: If selecting Username | Password, in which the password entry would be required on the second page, after using the YubiKey device, the end-user is authenticated and the password entry page is skipped
3. Select Public Mode Only from the Public / Private Mode dropdown
4. Select False from the Remember User Selection dropdown
Warning
Click Save once the configuration is complete and before leaving the Workflow page to avoid losing changes
Post Authentication
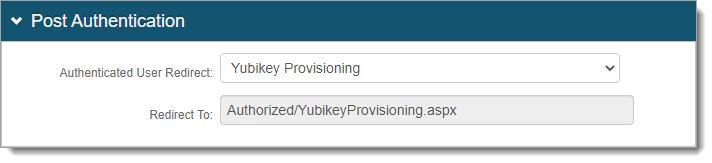 |
5. Select YubiKey Provisioning from the Authenticated User Redirect dropdown
When making this selection, Authorized/YubiKeyProvisioning.aspx appears in the Redirect To field below – this field cannot be edited
Warning
Click Save once the configuration is complete and before leaving the Post Authentication page to avoid losing changes
Notice
See the End-user Provisioning section for the end-user experience resulting from this configuration
Realm B
Data
|
1. In the Profile Fields section, specify the search attribute as the Hardware Token and make the field Writable
Notice
Or, as an alternate, specify the search attribute (configured in step 1) as Aux ID 1 and make the field Writable
Warning
Click Save once the configuration is complete and before leaving the Data page to avoid losing changes
Workflow
Workflow
 |
2. Under Login Screen Options, specify the workflow to use, making a selection from the Default Workflow dropdown
In the example, with Username | Second Factor selected, the end-user only needs to enter the username and use the YubiKey device to be authenticated
NOTE: If selecting Username | Password, in which the password entry would be required on the second page, after using the YubiKey device, the end-user is authenticated and the password entry page is skipped
3. Select Private and Public Mode from the Public / Private Mode dropdown
4. Select Default Private from the Default Public / Private dropdown
5. Select True from the Remember User Selection dropdown
6. Select False from the Show UserID Textbox dropdown
Custom Identity Consumer
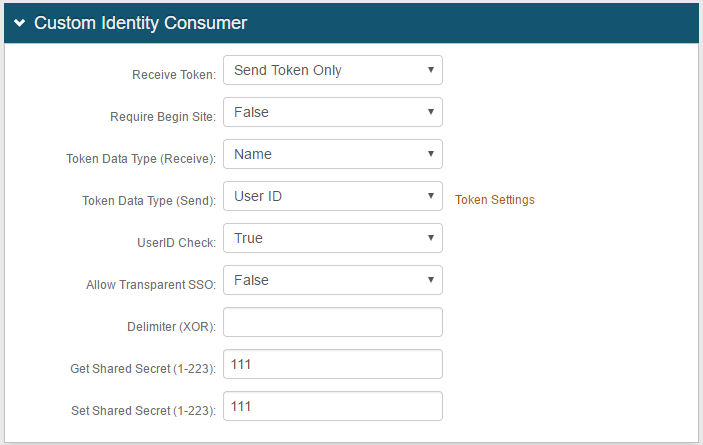 |
7. In the Custom Identity Consumer section, select Send Token Only from the Receive Token dropdown
8. Select False from the Require Begin Site dropdown
Warning
If Require Begin Site is set to True and YubiKey is selected from the Begin Site dropdown on a realm currently configured for Multi-Factor Authentication, then the warning icon (white exclamation symbol in a red circle) appears beside the Begin Site field
Hover over the icon to view information pertaining to the warning which specifies a realm configured for Multi-Factor Authentication should not also be configured as a Begin Site for Pre-authentication
To modify configuration settings, click YubiKey Settings to configure YubiKey Settings in the Multi-Factor Configuration section on the Multi-Factor Methods tab
 |
9. Select Name from the Token Data Type (Receive) dropdown
10. Select User ID from the Token Data Type (Send) dropdown
Notice
Click Token Settings to configure YubiKey token settings in the Forms Auth / SSO Token section on the Post Authentication tab
Warning
Be sure to click Save before clicking YubiKey Settings to avoid losing configuration settings made on the Workflow page
11. Select True from the UserID Check dropdown
Warning
Click Save once the configuration is complete and before leaving the Workflow page to avoid losing changes
Multi-Factor Methods
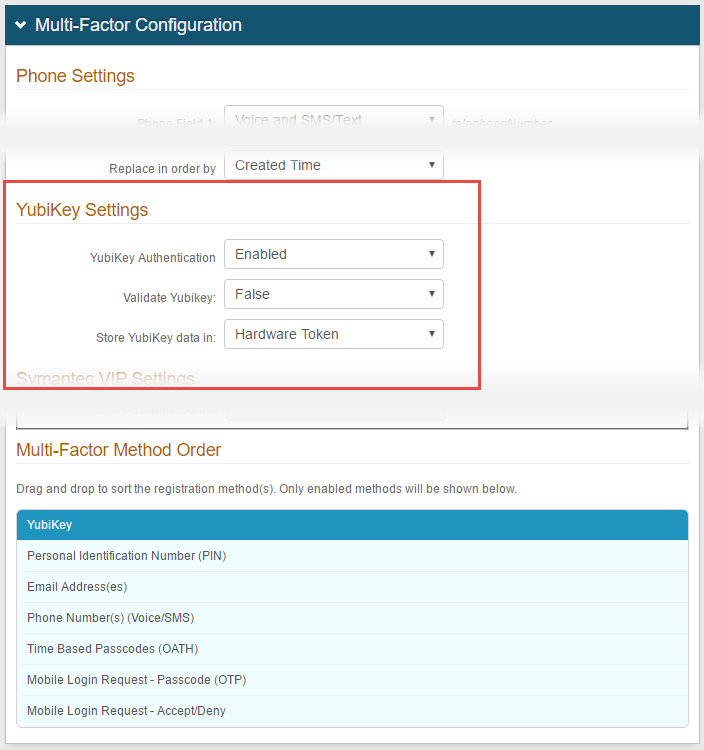 |
12. In the Multi-Factor Configuration section, select and configure Multi-Factor Authentication methods to be made available to the end-user during authentication
13. Under YubiKey Settings, select Enabled from the YubiKey Authentication dropdown
14. Select True from the Validate YubiKey dropdown if the 12-character YubiKey ID and the YubiKey OTP will be used to authenticate the end-user
Select False if only the 12-character YubiKey ID will be used to authenticate the end-user
15. If Hardware Token is specified on the Data tab (in step 1) as the Profile Field in which to store YubiKey data, then select Hardware Token from the Store YubiKey data in dropdown
Notice
Or, if Aux ID 1 is specified on the Data tab (in step 1) as the Profile Field in which to store YubiKey data, then select Aux ID 1 from the Store YubiKey data in dropdown
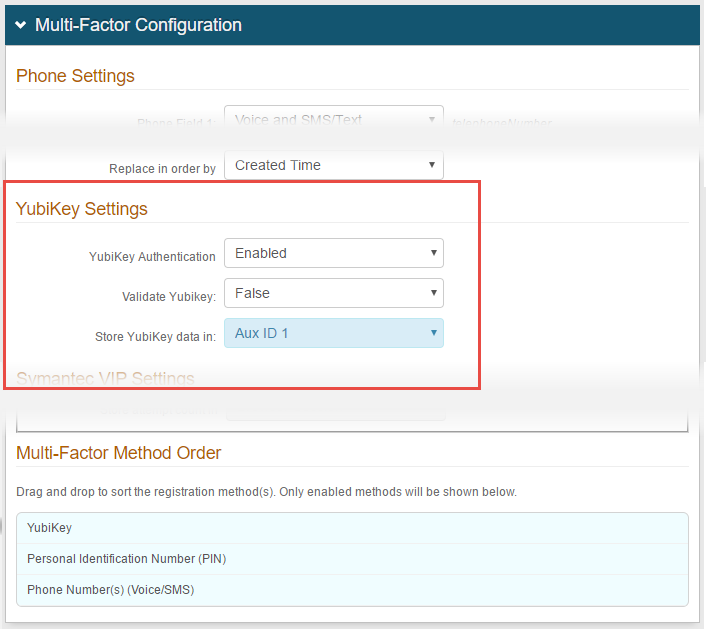
16. Under Multi-Factor Method Order, set the order in which YubiKey will appear on the Multi-Factor Authentication methods page
Only Multi-Factor Authentication methods registered by the end-user will be available for selection by that end-user
Warning
Click Save once the configuration is complete and before leaving the Multi-Factor Methods page to avoid losing changes
Post Authentication
Post Authentication
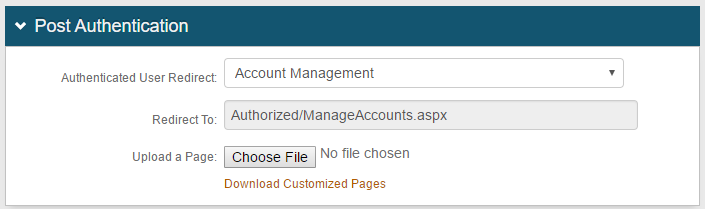 |
16. Make a selection from the Authenticated User Redirect dropdown to specify the type of page the end-user will access after successfully authenticating – example: Account Management
In this example, with Account Management selected, Authorized/ManageAccounts.aspx appears in the Redirect To field below and cannot be edited
Warning
Click Save once the configuration is complete and before leaving the Post Authentication page to avoid losing changes
Identity Management
 |
17. In the Identity Management section, click Configure help desk page
NOTE: Refer to Account Management page configuration for more information about configuring a Help Desk page
Help Desk
 |
18. On the Help Desk page, configure settings for the page and set YubiKey to Show Enabled
Notice
If Aux ID 1 is specified on the Data tab (in step 1) as the Profile Field in which to store YubiKey data, then set Aux ID 1 to Show

Warning
Click Save once the configuration is complete and before leaving the Help Desk page to avoid losing changes
Notice
See the End-user Multi-Factor Authentication section for the end-user experience resulting from this configuration
End-user Experience
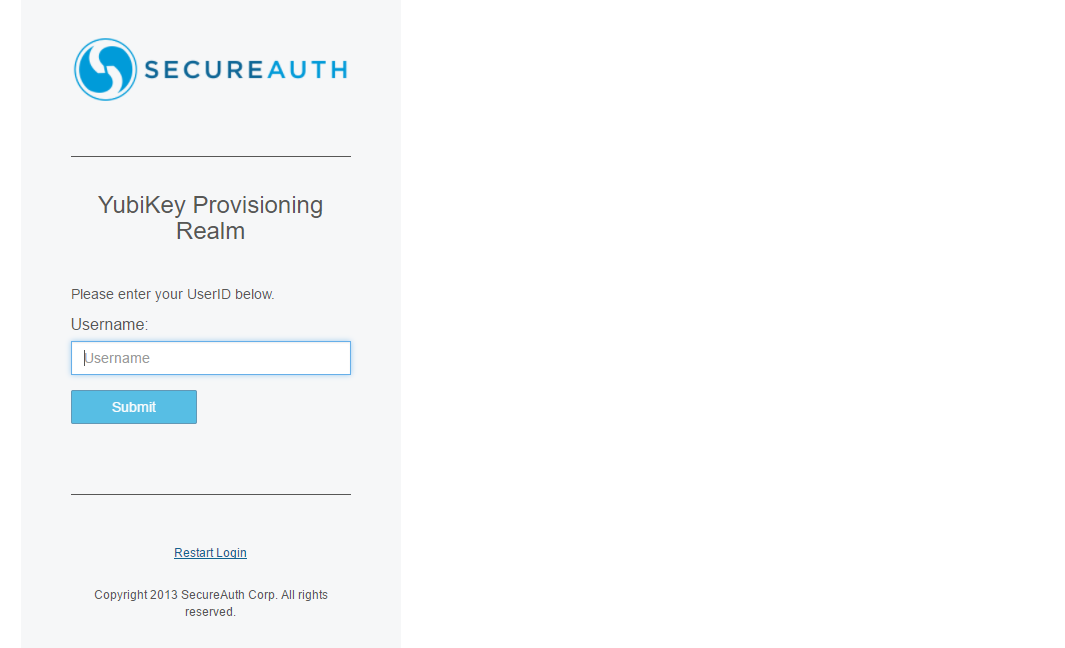
End-user Provisioning
These steps register the YubiKey device in your account.
1. Enter your Username and click Submit
 |
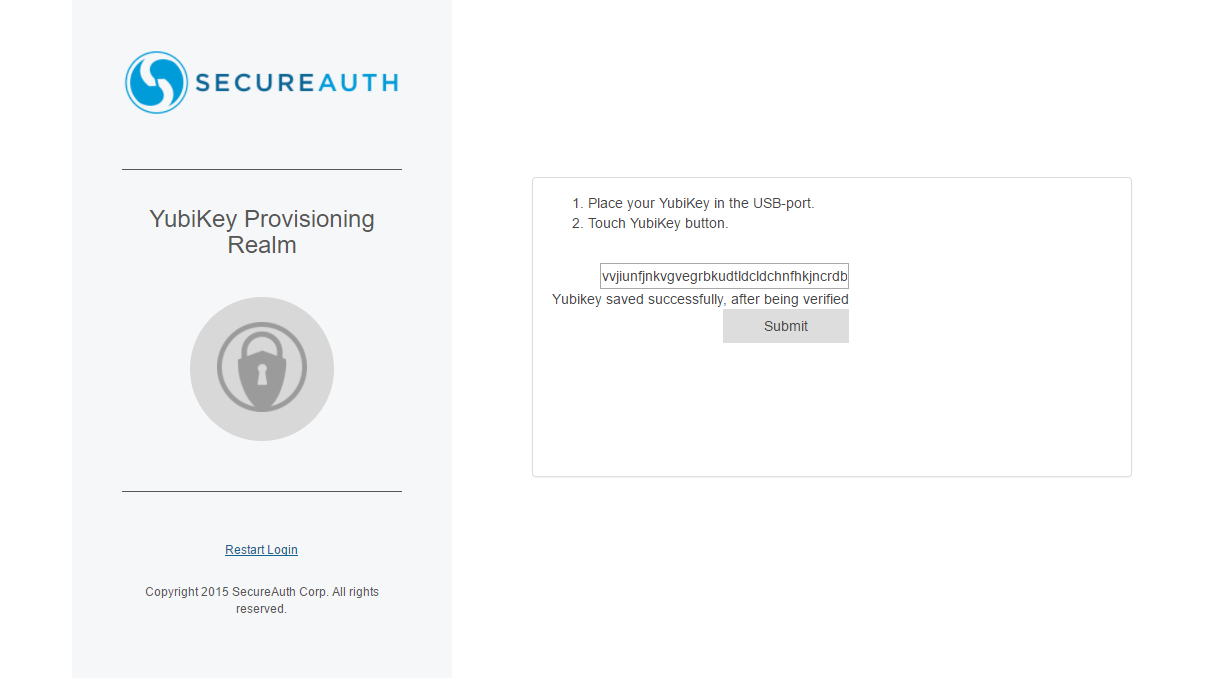
2. Place the cursor in the text box
3. Plug the registered YubiKey device into the USB port and touch the sensor button on the device
 |
4. Upon verification by the Yubico website, the validated YubiKey ID is saved to your profile
 |
End-user Multi-Factor Authentication
These steps show how you use a YubiKey as a Multi-Factor Authentication method to access the Help Desk page, and then manage the device in an account.
Note
NOTE: The sample end-user workflow shown below is pertinent to the settings made in the steps above – end-user workflows will differ based on the realm configuration made in each customer environment.
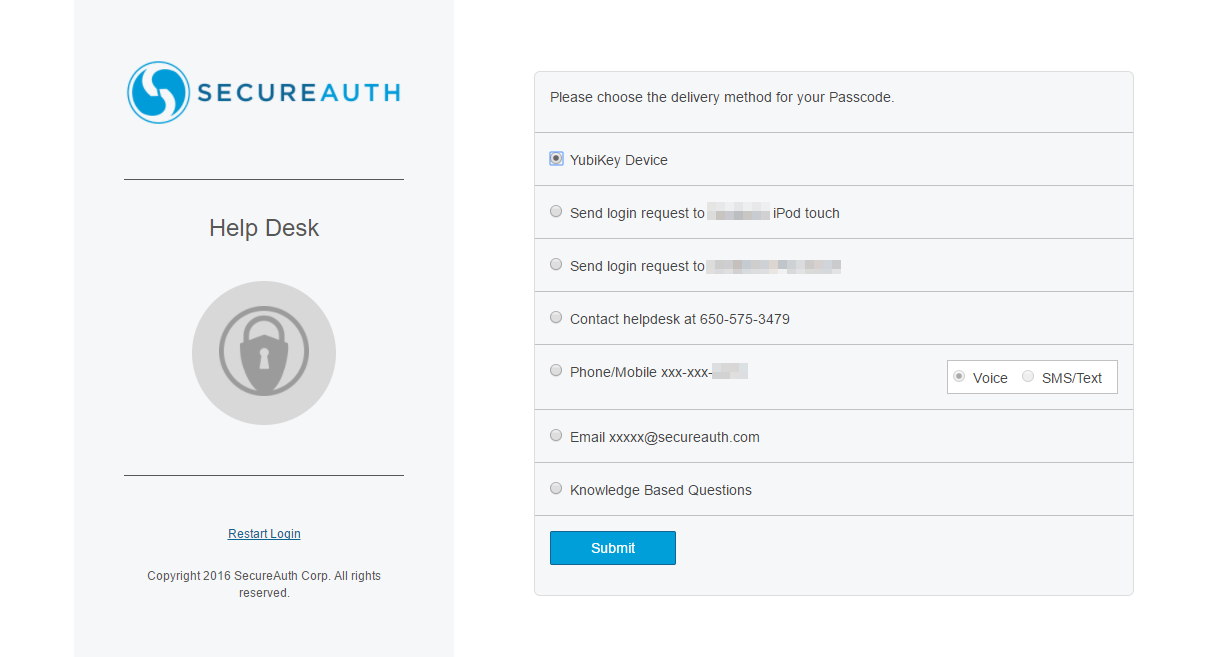
1. Enter your Username and click Submit
 |
2. Select YubiKey Device as the passcode delivery method and click Submit
 |
3. Place the cursor in the text box
4. Plug the provisioned YubiKey device into the USB port and touch the sensor button on the device
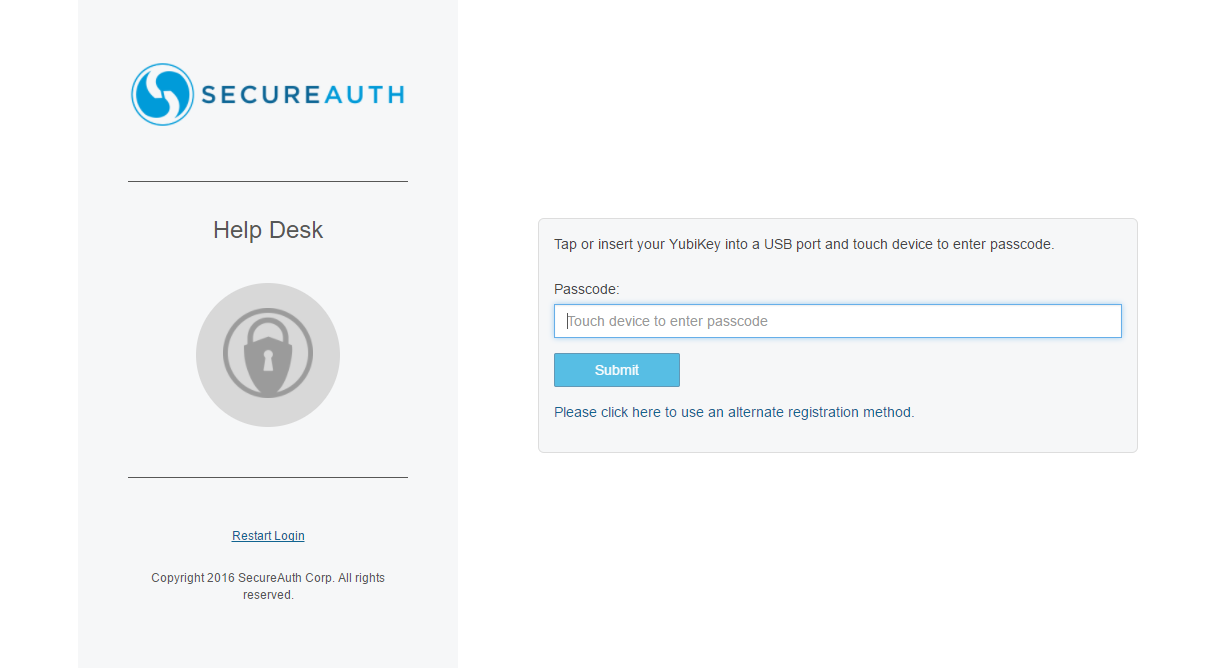 |
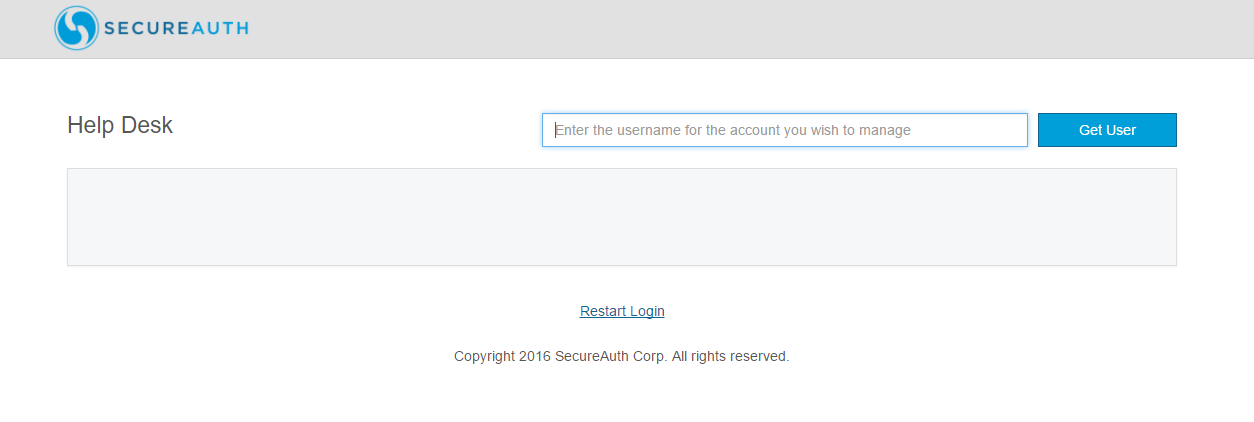
5. Enter the username of the account to be managed and click Get User
 |
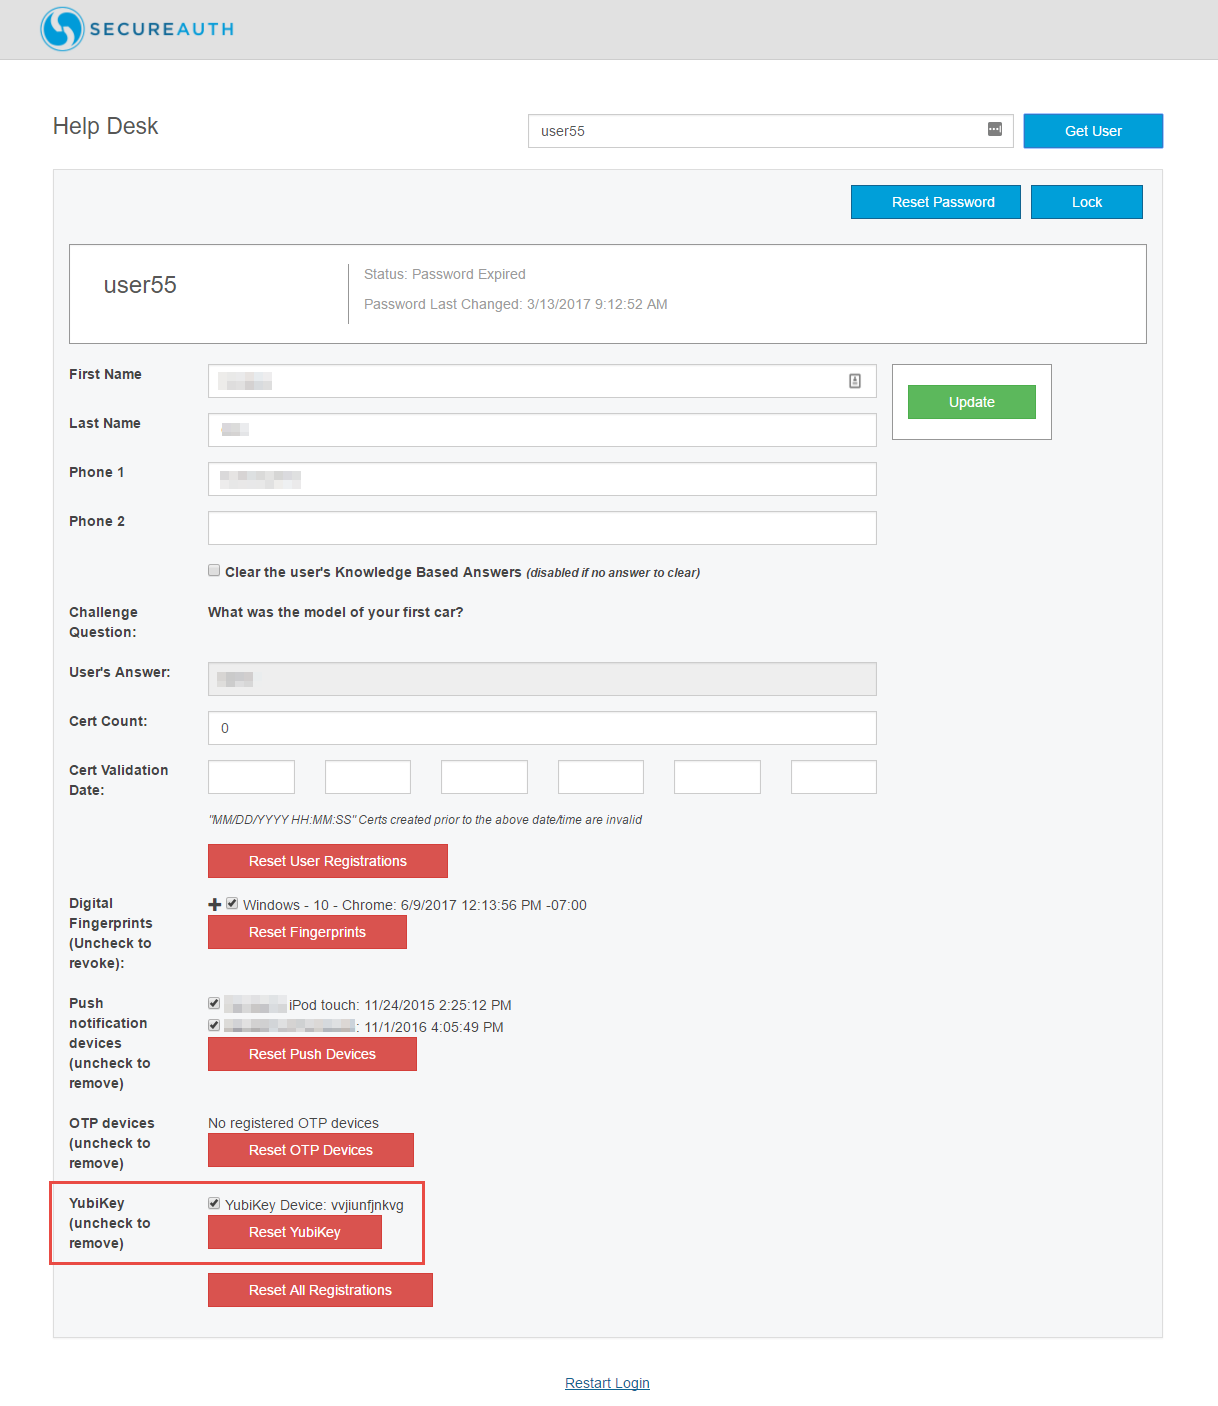
6. The Help Desk page shows the end-user'sYubiKey ID beside the YubiKey Device checkbox
 |
Notice
NOTE: To remove the YubiKey device from the end-user profile, uncheck YubiKey Device, click Reset YubiKey, and then click Update
The YubiKey device must be provisioned again if the device will be re-associated with this profile