Outlook Web Access (OWA) 2016 configuration guide
Updated January 4, 2021
Enable multi-factor authentication (MFA) and single sign-on (SSO) access via claims-based authentication and WS-Federation to Microsoft Outlook Web Access (OWA) 2016.
Prerequisites
Microsoft OWA 2016 installed on a server
SecureAuth® Identity Platform (formerly SecureAuth IdP) version 9.3 or later, with a realm created for the OWA 2016 configuration
Download and unzip the WSFedSignOut.zip file. You will need these files in Step B.
Step A: Identity Platform Classic configuration
Make the following configuration settings in the Identity Platform Classic Web Admin.
Select the Data tab.
In the Profile Fields section, map the userPrincipalName to a Property, for example, Email 2.
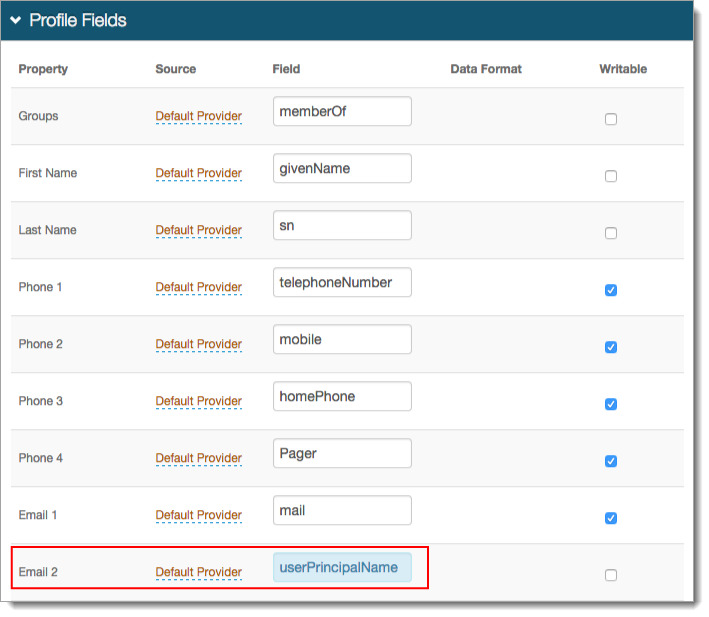
Save your changes.
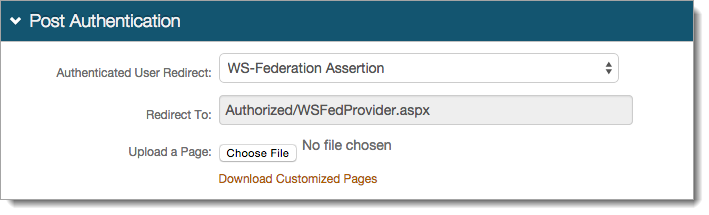
Select the Post Authentication tab.
In the Post Authentication section, set the Authenticated User Redirect to WS-Federation Assertion.
The Redirect To field is auto-populated with the URL (Authorizted/WSFedProvider.aspx) that appends to the domain name and realm number in the browser address bar.
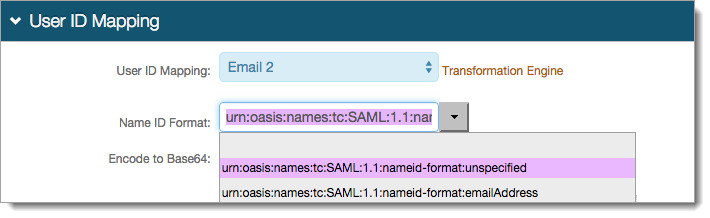
In the User ID Mapping section, set the following:
User ID Mapping
Set to the mapped directory property containing the userPrincipalName field. For example, Email 2.
Name ID Format
Set to urn:oasis:names:tc:SAML:1.1:nameid-format:unspecified.
Encode to Base64
Set to False.
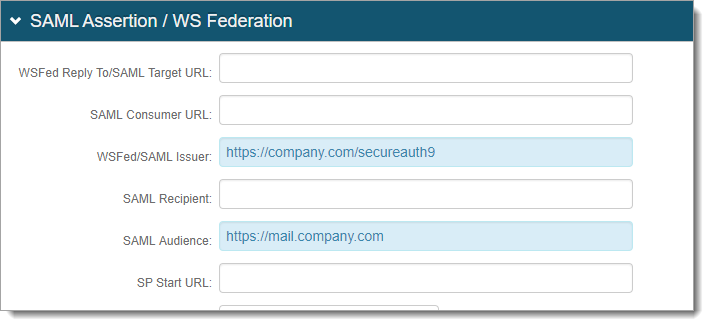
In the SAML Assertion / WS Federation section, set the following:
WSFed/SAML Issuer
Set with the Fully Qualified Domain Name (FQDN) of the Identity Platform appliance and the OWA integration realm number.
For example, https://secureauth.company.com/secureauth2.
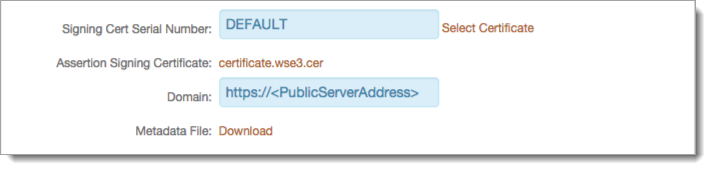
SAML Audience
Set to the base domain of the application.
For example, https://mail.companyname.com/owa/
Signing Cert Serial Number
Leave as is with the default value. Otherwise, click Select Certificate to use a third-party certificate for the SAML assertion.
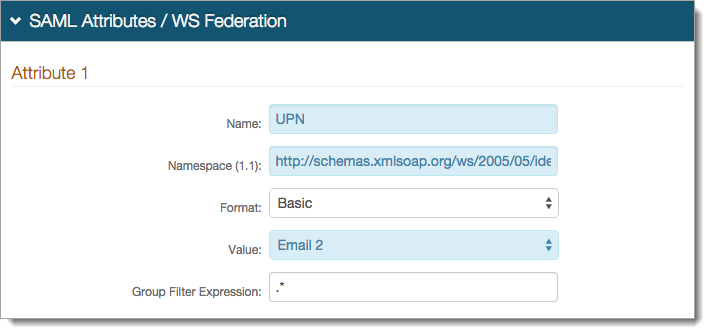
In the SAML Attributes / WS Federation section for Attribute 1, set the following:
Name
Set to UPN.
Namespace (1.1)
Set to http://schemas.xmlsoap.org/ws/2005/05/identity/claims/upn .
Value
Set to the property to which the userPrincipalName field was mapped. For example, Email 2.
Save your changes.
In the Forms Auth / SSO Token section, to optionally configure the token/cookie settings and realm for single sign-on (SSO), click the View and Configure FormsAuth keys/SSO token link.

Notice
For optional configurations, see the following guides:
To configure the token / cookie settings for this realm, see the Configure token or cookie settings topic.
To configure this realm for SSO, see the SecureAuth IdP Single Sign-on Configuration topic.
To configure this realm for Windows Desktop SSO, see the Windows desktop SSO configuration topic.
Save your changes.
Step B: Update the Identity Platform appliance
Find the contents of the WSFedSignOut.zip file.
In the bin directory for the OWA realm, replace the existing SecureAuthIdentityModel.dll file with updated .dll file.
Replace the existing WSFedSignOut.aspx.vb and WSFedSignOut.aspx with the updated files.
Step C: Set up ADFS authentication
Set up ADFS authentication using the code in the block below as an example:
$ecpUrl="https://mail.company.com/ecp/"
$owaUrl="https://mail.company.com/owa/"
$uris="@($ecpUrl,$owaUrl)"
$saURL="https://company.com/secureauth9"
$saCert="E3FE6A933D8154A13T3BFE381F99ABBF58812EF1"
#thumbprint of SA Signing Cert or thumprint of ADFS signing cert#

Set-OrganizationConfig
-ADFSIssuer $saURL -AdfsSignCertificateThumbprints $sacert -AdfsAudienceUris
$uris

Get-EcpVirtualDirectory |
Set-EcpVirtualDirectory -AdfsAuthentication $true -BasicAuthentication $false
-DigestAuthentication $false -FormsAuthentication $false -WindowsAuthentication
$false #-LiveIdAuthentication $false

Get-OwaVirtualDirectory |
Set-OwaVirtualDirectory -AdfsAuthentication $true -BasicAuthentication $false
-DigestAuthentication $false -FormsAuthentication $false -WindowsAuthentication
$false #-LiveIdAuthentication $false
Step D: Outlook Web Access configuration
Using the URL Rewrite tool, make the following configurations to redirect URLs to the Identity Platform.
URL Rewrite - Logout Rule 1
In the Match URL section, set the following:
Requested URL
Set to Matches the Pattern.
Using
Set to Regular Expressions.
Pattern
Set to
^owa/logoff\.owa$Ignore case
Select this check box.
In the Action section, set the following:
Action type
Set to Redirect.
Redirect URL
Set to
https://company.com/secureauth9/wsfedsignout.aspx?wa=wsignout1.0&wreply=https://mail.company.com/owa/?wa=wsignoutcleanup1.0Append query string
Select this check box.
Redirect type
Set to Permanent (301).

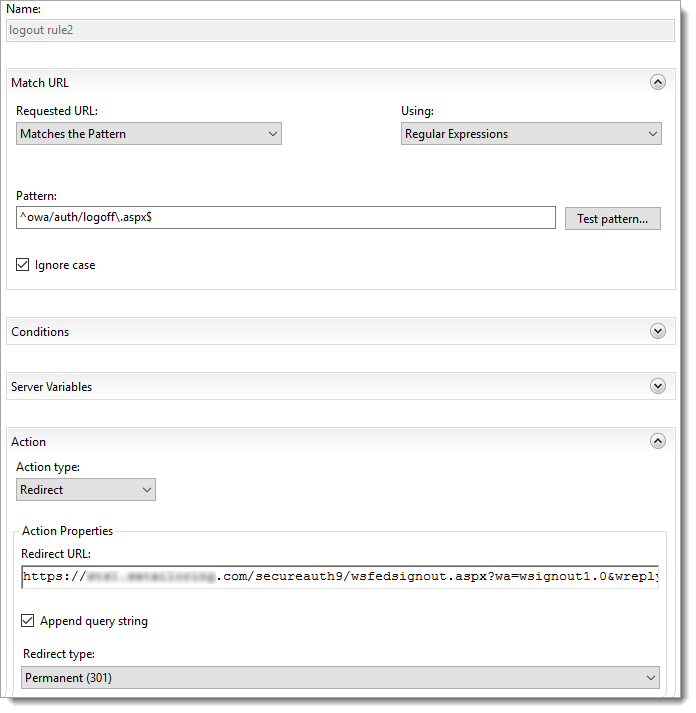
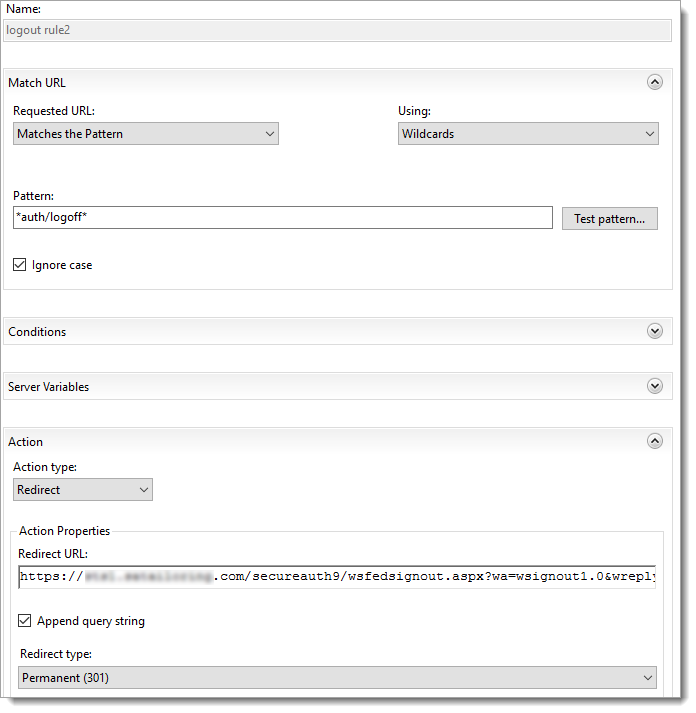
URL Rewrite - Logout Rule 2
In the Match URL section, set the following:
Requested URL
Set to Matches the Pattern.
Using
Set to Regular Expressions.
Pattern
Set to
^owa/auth/logoff\.owa$Ignore case
Select this check box.
In the Action section, set the following:
Action type
Set to Redirect.
Redirect URL
Set to
https://company.com/secureauth9/wsfedsignout.aspx?wa=wsignout1.0&wreply=https://mail.company.com/owa/?wa=wsignoutcleanup1.0Append query string
Select this check box.
Redirect type
Set to Permanent (301).
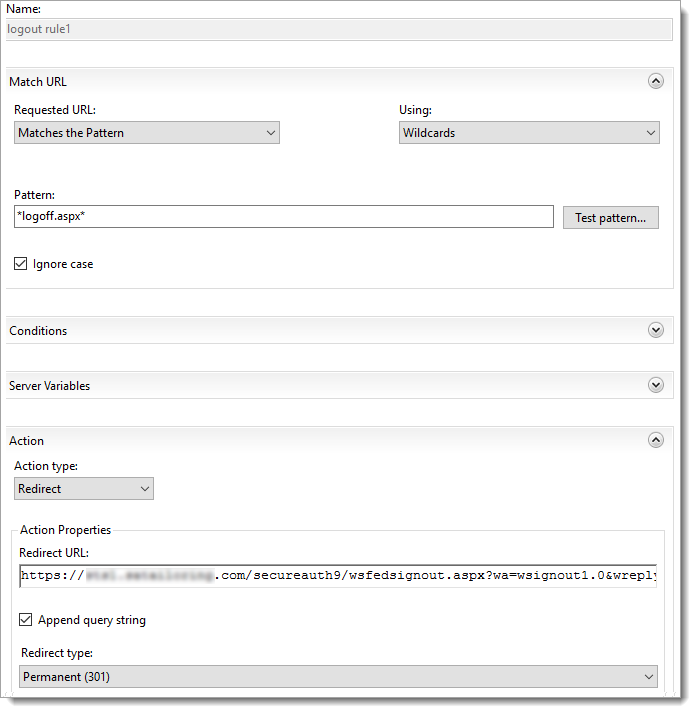
Enhanced Client or Proxy (ECP) URL Rewrite - Logout Rule 1
In the Match URL section, set the following:
Requested URL
Set to Matches the Pattern.
Using
Set to Wildcards.
Pattern
Set to
*logoff.aspx*Ignore case
Select this check box.
In the Action section, set the following:
Action type
Set to Redirect.
Redirect URL
Set to
https://company.com/secureauth9/wsfedsignout.aspx?wa=wsignout1.0&wreply=https://mail.company.com/owa/?wa=wsignoutcleanup1.0Append query string
Select this check box.
Redirect type
Set to Permanent (301).
Enhanced Client or Proxy (ECP) URL Rewrite - Logout Rule 2
In the Match URL section, set the following:
Requested URL
Set to Matches the Pattern.
Using
Set to Wildcards.
Pattern
Set to
*auth/logoff.aspx*Ignore case
Select this check box.
In the Action section, set the following:
Action type
Set to Redirect.
Redirect URL
Set to
https://company.com/secureauth9/wsfedsignout.aspx?wa=wsignout1.0&wreply=https://mail.company.com/owa/?wa=wsignoutcleanup1.0Append query string
Select this check box.
Redirect type
Set to Permanent (301).
Known issues
There might be issues if the code pasted from the certificate window into thumbprint="" , replacing the content between the quotation marks.
This issue shows up in the Event Viewer, as Error 1003, MSExchange Front End HTTP Proxy - ID4175.
To resolve this issue, delete the entire thumbprint, including the quotation marks. Manually retype the thumbprint value, including the quotation marks. To learn more see this article about thumbprint values.
If the code is copied from a PDF or some other format, it could include line breaks in the web.config, which breaks functionality.
Manually remove any line breaks on all code if not copying directly from this web page.
Tips and warnings
Set up the Identity Platform workflows as they normally would be.
To use the Windows Desktop SSO, the WindowsSSO.aspx must be set and coded as the default document to keep the referral string.
If Desktop SSO is redirecting external users to another realm, you will need code to strip out "?403;https://<SecureAuth-FQDN>/SAOWARealm" . To learn more about enabling Windows Desktop SSO for the Identity Platform realms, see the Windows desktop SSO configuration topic.
Be sure to include the trailing slash "/" when setting URLs in the web.config files and the Identity Platform.