Citrix NetScaler AGEE 11.0 Integration Guide
Introduction
Use this guide to enable Multi-Factor Authentication to Citrix NetScaler AGEE 11.0 for SSO to backend resources.
Prerequisites
1. Have Citrix NetScaler 11.0 with valid, appropriate license.
2. Have NS platform license and separate AG license for Access Gateway (AG) functionality.
Refer to detailed Citrix license information.
3. Ensure that the Citrix NetScaler server has a valid identity certificate installed.
An SSL Certificate can be purchased from SSL certificate providers (Entrust, VeriSign, GoDaddy, etc.).
4. Contact SecureAuth Support to download the b64.zip file. You will use the b64.xslt code in the transformation engine steps to send customized user information within SAML assertions.
IMPORTANT: Refer to the external article Encrypted SAML Assertion Support When NetScaler is Used as Service Provider for mandatory security measures that should be implemented for all SAML integrations that send sensitive data such as passwords with the assertion.
5. Create a New Realm in the SecureAuth IdP Web Admin for the Citrix NetScaler integration.
6. Configure the following tabs in the Web Admin before configuring the Post Authentication tab:
Overview – the description of the realm and SMTP connections must be defined
Data – an enterprise directory must be integrated with SecureAuth IdP
Workflow – the way in which users will access this application must be defined
Multi-Factor Methods – the Multi-Factor Authentication methods that will be used to access this page (if any) must be defined
SecureAuth IdP Configuration Steps
Workflow tab
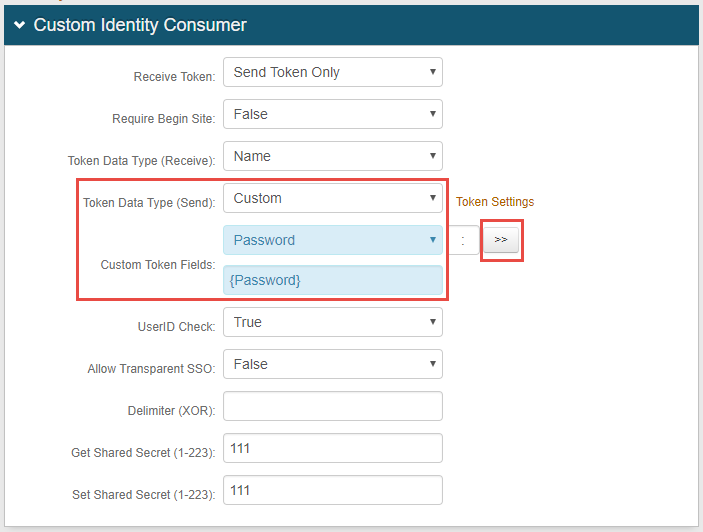 |
1. Select Custom from the Token Data Type (Send) dropdown.
2. Select Password from the Custom Token Fields dropdown.
3. Click the >> button, and {Password} auto-populates in the open field.
4. Click Save.
Post Authentication tab
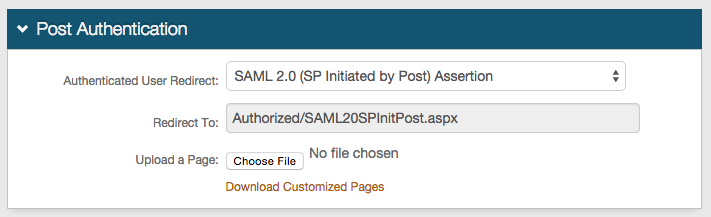 |
5. Select SAML 2.0 (SP Initiated by Post) Assertion from the Authenticated User Redirect dropdown.
6. Set the Redirect To field to Authorized/SAML20SPInitPost.aspx
User ID Mapping
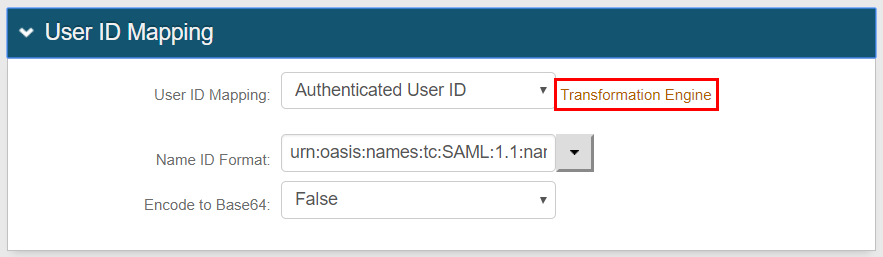 |
7. Select Authenticated User ID from the User ID Mapping dropdown (default).
8. Select False from the Encode to Base64 dropdown.
9. Click Save.
10. Click Transformation Engine.
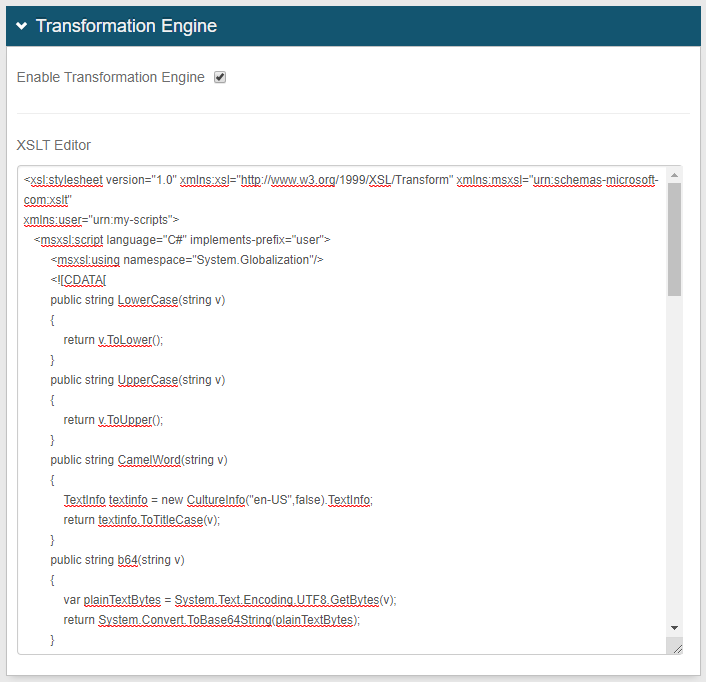 |
11. Copy the b64.xslt code from the file you downloaded in the Prerequisites step.
12. Click Enable Transformation Engine.
13. Paste the b64.xslt code in the XSLT Editor box. (Refer to Transformation Engine Guide for more information.)
14. Click Save and return to the Post Authentication page.
SAML Assertion / WS-Federation
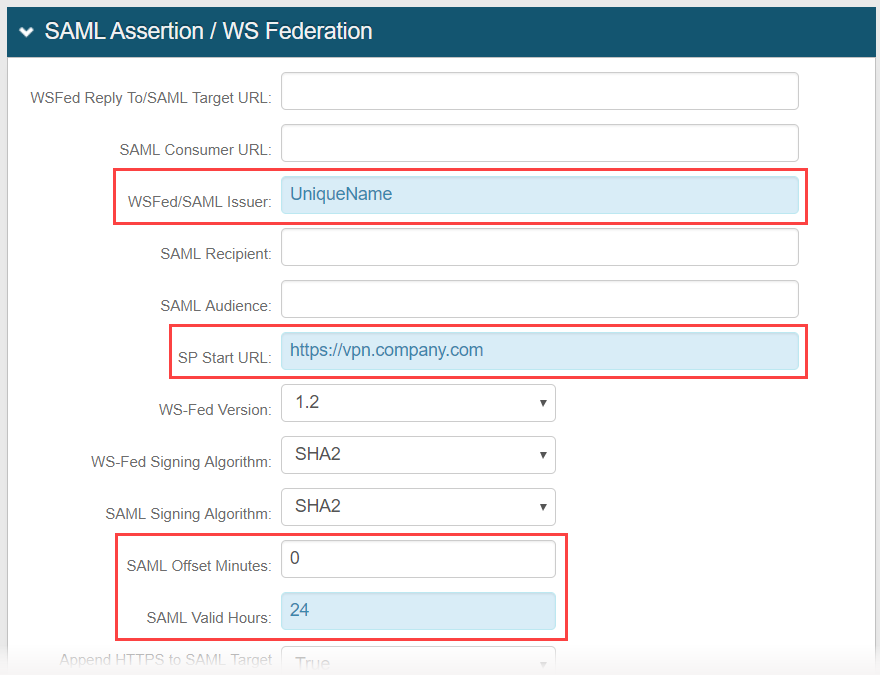 |
15. Set the WSFed/SAML Issuer to a Unique Name that is shared with NetScaler.
The WSFed/SAML Issuer value must match exactly on the NetScaler side and on the SecureAuth IdP side.
16. Provide the SP Start URL to enable SSO and to redirect users appropriately to access Citrix NetScaler AGEE.
This would be the Citrix NetScaler VPN domain URL.
17. Set the SAML Offset Minutes to make up for time differences between devices.
18. Set the SAML Valid Hours to limit for how long the SAML assertion is valid.
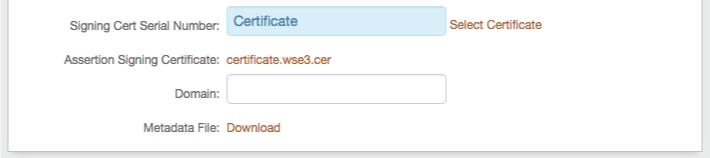 |
19. Select the certificate to be used to sign the SAML assertion, which is the same certificate that will be uploaded to the NetScaler SAML Authentication Server.
20. Export this certificate and store it either on a local PC or on the NetScaler appliance.
SAML Attributes / WS Federation
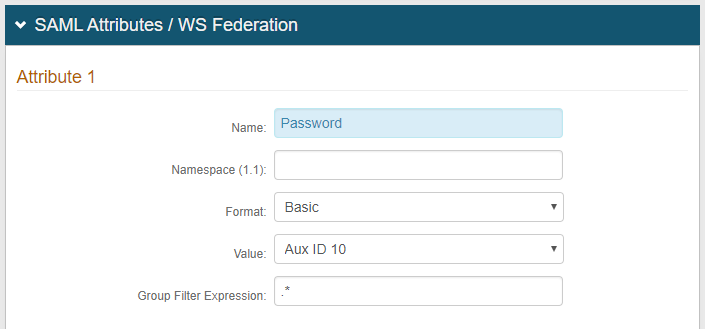 |
21. Add a SAML Attribute with the Name Password.
22. Leave Namespace (1.1) empty.
23. Keep Format as Basic.
24. Select Aux ID 10 as the Value.
NOTE: Be sure Aux ID 10 is not already being used on this realm.
25. Click Save.
NetScaler Configuration Steps
Create SAML Server
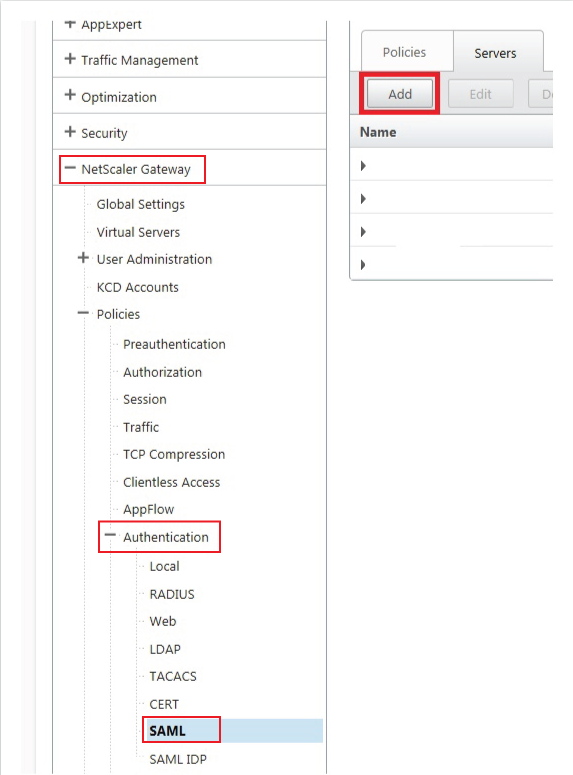 |
1. On the NetScaler admin console, select NetScaler Gateway under Configuration, and expand Policies.
2. Select SAML under Authentication, and select the Servers tab.
3. Click Add.
Authentication SAML Server
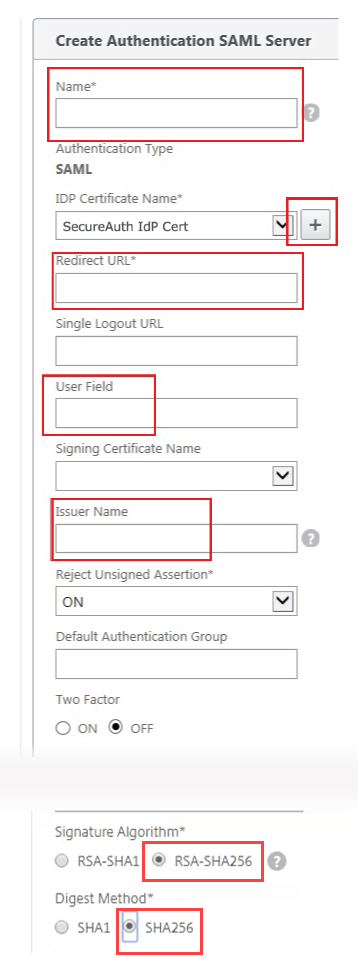 |
4. Provide a Name for the SAML Authentication Server.
5. Click + in the IDP Certificate Name section to install the certificate from the SecureAuth IdP Web Admin (steps 13 - 14).
6. (In new window) Provide a Certificate-Key Pair Name.
7. (In new window) Select the certificate from the SecureAuth IdP Web Admin (in Base64 format) for the Certificate File Name.
8. (In new window) Click Install.
The Certificate now appears in the previous window under IDP Certificate Name.
9. Set the Redirect URL to the Fully Qualified Domain Name (FQDN) of the SecureAuth IdP appliance, followed by the NetScaler-integrated realm (configured above) – for example https://secureauth.company.com/secureauth2/secureauth.aspx
10. Set the User Field to NameID.
11. Set the Issuer Name to the same Unique Name set in the SecureAuth IdP Web Admin (step 9).
12. Select RSA-SHA256 as the Signature Algorithm and SHA256 as the Digest Method.
13. Click OK.
Create SAML Authentication Policy
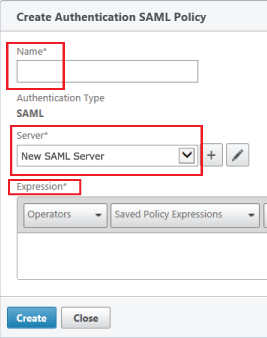 |
13. Provide a Name for the Authentication SAML Policy.
14. Select the newly created SAML Authentication Server (steps 1 - 12) from the Server dropdown.
15. Set the Expression to ns_true
16. Click Create.
Create Traffic Profile
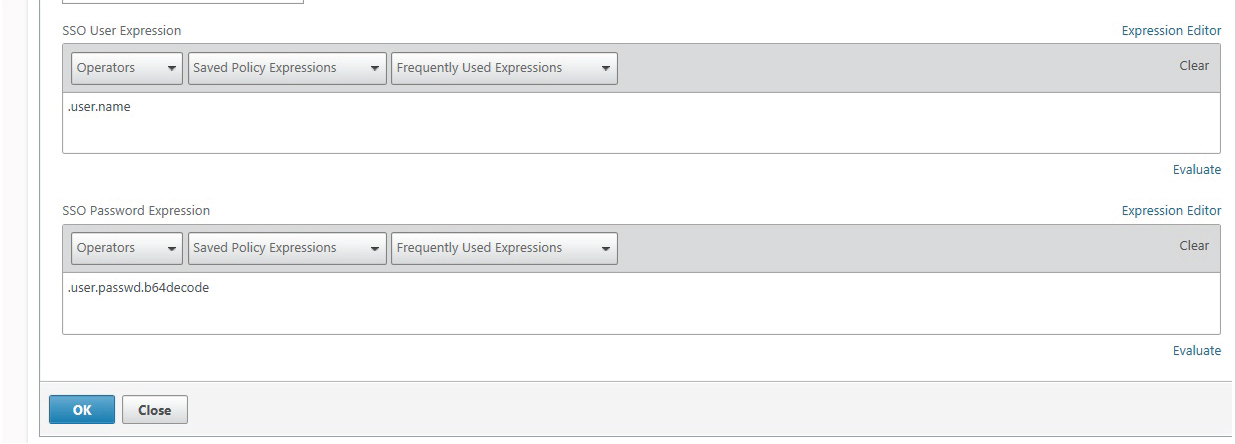 |
The Traffic Profile extracts the username and password from the SAML response and is used for SSO to backend servers, such as XenApp or StoreFront.
This profile is assigned to the configured NetScaler VIP, and must appear as the screenshot; however, creating SSO expressions for username and password require CLI commands that are listed in the following steps.
17. For now, create a new Traffic Profile that does not include these expressions.
Create Traffic Policy
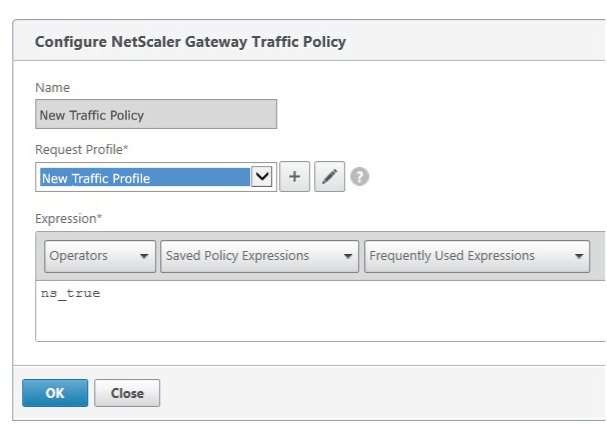 |
18. Provide a Name for the new Traffic Policy.
19. Select the newly created Traffic Profile (step 17) from the Request Profile dropdown.
20. Set the Expression to ns_true
Creating the SSO Expressions needed for the Traffic Profile is currently unavailable via the GUI, so CLI is required to create them.
SecureAuth recommends seeking help from either a Citrix Admin or Citrix Technical Support for issues executing the commands.
21. Execute the following command: set vpn trafficAction test_profile -userExpression http.req.user.name -passwdExpression http.req.user.passwd
22. Once this command is executed successfully, the SSO expressions are set in the Traffic Profile (step 17).
23. Assign this newly created Traffic Policy to the NetScaler VIP.