Oracle Access Manager (SP-initiated) integration guide
Introduction
Use this guide to enable Multi-Factor Authentication and Single Sign-on (SSO) access via SAML to Oracle Access Manager (OAM).
Prerequisites
1. Hardware and software requirements:
Oracle Server(s) installed and configured
Latest version of Oracle Access Manager (OAM) running on Oracle Server(s)
SecureAuth IdP appliance(s) installed and running version 9.1 or greater, with a realm ready for the OAM integration
2. By default, the Service Provider engine is disabled, and must be enabled, before the metadata on Oracle can be accessed. For information, refer to: https://blogs.oracle.com/dcarru/using-test-sp-app-in-oif-sp
3. A user with the same name as the user who is logging on must first exist in "myrealm" which resides on the OAM-embedded LDAP server. For information, refer to: http://omnine.blogspot.com/2016/08/dualshield-integrates-with-oracle.html
SecureAuth IdP configuration steps
1. Log on the SecureAuth IdP Web Admin console and find the new realm to be used for the OAM integration.
Data tab
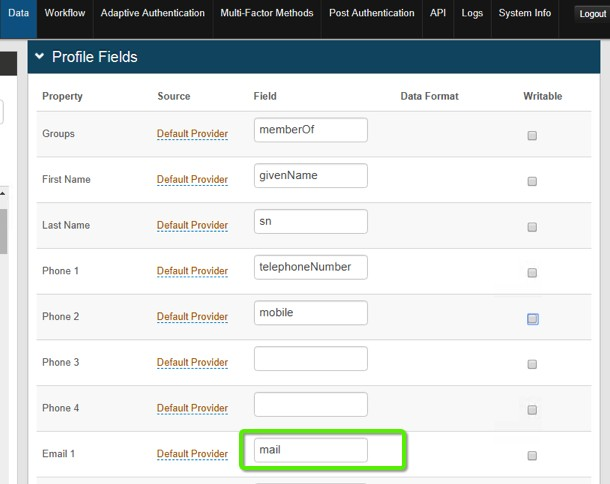
2. In the Profile Fields section, define an attribute (for example Email 1) and specify the OAM ID attribute.
In this case, it is mail (email address) as shown below.
 |
Post Authentication tab
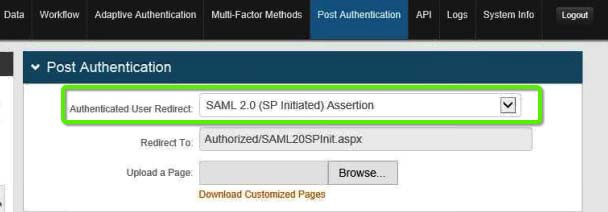
3. In the Post Authentication section, at the Authenticated User Redirect field, select SAML 2.0 (SP Initiated) Assertion from the dropdown.
 |
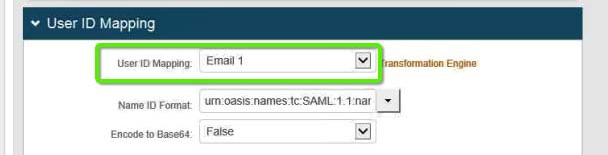
4. In the User ID Mapping section, provide the following values for these fields:
a. User ID Mapping: Select the SecureAuth IdP property that corresponds to the directory field containing the OAM username – for example:Email 1
b. Name ID Format: Selecturn:oasis:names:tc:SAML:1.1:nameid-format:unspecified
c. Encode to Base64: SelectFalse
The image below shows an example of these assignments.
 |
5. In the SAML Assertion / WS Federation section, provide the following values for these fields:
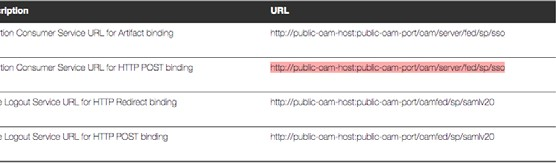
a. SAML Consumer URL: Paste OAM's Assertion Consumer Service (ACS) Location URL for HTTP POST Binding into this field.
The ACS value can be obtained from the OAM Service Provider metadata:
 |
b. Extract the Assertion Consumer Service URL for HTTP POST Binding value and paste it in the SAML Consumer URL field.
 |
This value in SecureAuth IdP (from the image shown above) appears as in the image shown below:
 |
c. WSFed / SAML Issuer: Set this field to a unique issuer name value.
An example of these assignments is shown below.
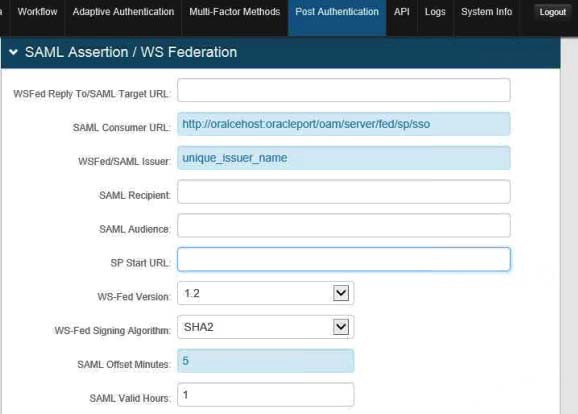 |
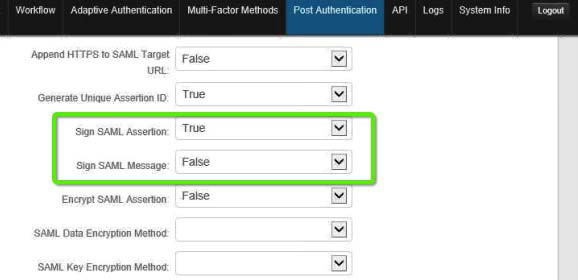
6. Scroll down this section and provide the following values:
a. Sign SAML Assertion: Set this field toTrue
b. Sign SAML Message: Set this field toFalse
7. Other fields can be set as required for your specific requirements as shown in the image below.
 |
8. Leave the Signing Cert Serial Number as the default value, unless there is a third-party certificate being used for the SAML assertion.
9. If using a third-party certificate, click Select Certificate and choose the appropriate certificate.
10. Provide the Domain FQDN in order to download the metadata file. This file is used later in the OAM Configuration.
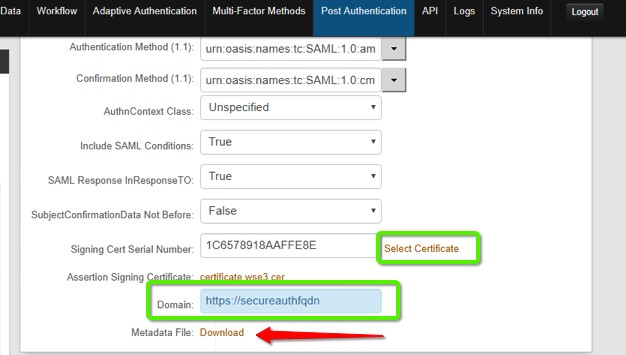 |
11. Click the Download link next to Metadata File to save the XML metadata. This file is used in step 3 in the OAM Configuration Steps.
OAM configuration steps
Follow these steps to configure OAM to communicate with SecureAuth IdP.
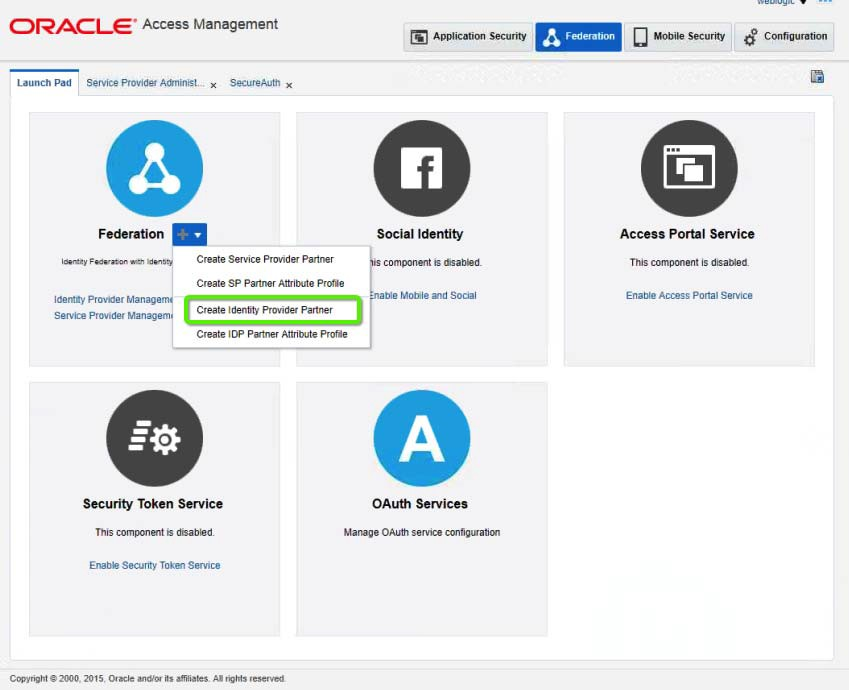
1. Enter the Oracle Access Management site.
2. On the OAM Launch Pad, click to select the Federation tab, and select Create Identity Provider Partner from the dropdown list as shown below.
 |
The Create Identity Provider Partner page appears as in the image below.
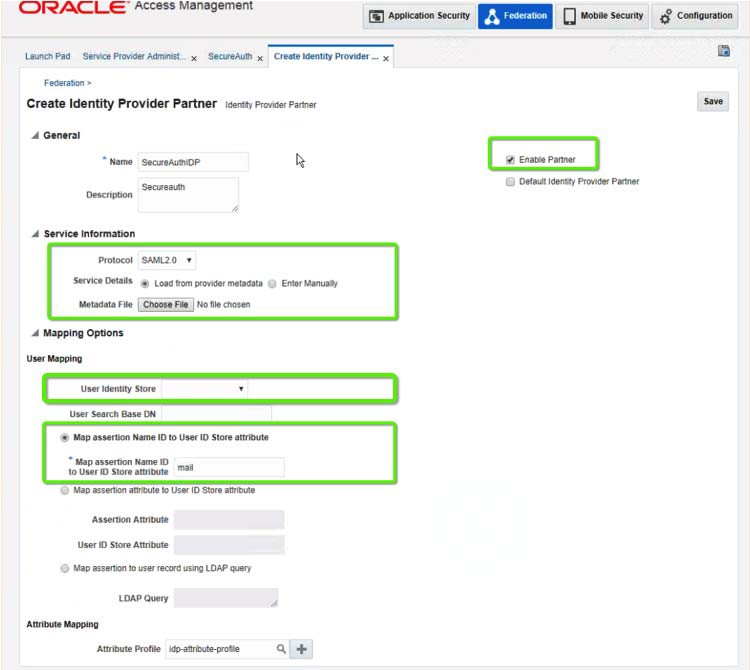 |
3. Use the information in the image above to help orient you for the next steps:
a. Expand the General section, and at the Name field, select the name of the SecureAuth IdP realm you are using.
b. Check the Enable Partner check box.
c. Expand the Service Information section and provide these values:
Fields | Description/Recommendations |
Protocol | Select SAML2.0 from the pick list. |
Service Details | Click to select the Load from provider metadata radio button. |
4. At Metadata File, click Choose File and select the metadata file you generated in step 11 of the SecureAuth IdP Configuration Steps.
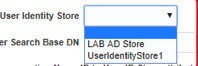
5. Expand the Mapping Options section and provide the following values:
Fields | Description/Recommendations | |
User Identity Store | Select the desired identity store for the user mapping.
| |
Map Assertion Name | Click the Map Assertion Name ID to User Store attribute radio button then enter the required map value. |
6. Click Save to store the settings you have made.
OAM Debug Logging (optional)
Once you have configured the system, you should debug the log in as required. For addition information on performing this operation, refer to this document: https://docs.oracle.com/middleware/1213/wls/SECMG/saml_debug.htm#SEC- MG531
To configure SAML debugging using the WebLogic Server Administration Console, complete these steps:
1. If you have not already done so, in the Change Center of the WebLogic Server Administration Console, click Lock & Edit (refer to UsetheChangeCenter).
2. In the left pane of the console, expand Environment and select Servers.
3. On the Summary of Servers page, click the server on which you want to enable or disable debugging to open the settings page for that server.
4. Click Debug.
5. Expand weblogic.
6. Expand security.
7. Enable SAML debugging as follows:
To enable the SAML 2.0 debug scope which encompasses all the SAML 2.0 attributes, select saml2, then click Enable.
To enable one or more individual SAML 2.0 debug attributes, expand saml2, expand the scope of the required attribute, select the required individual SAML 2.0 attribute, then click Enable.
For example, expand saml2, expand credmap, and select the DebugSecuritySAML2Credmap attribute to debug SAML 2.0 credential mapping provider processing.
For a description of each registered SAML debug attribute, see About SAML Debug Scopes and Attributes.
8. To activate these changes in the Change Center of the WebLogic Server Administration Console, click Activate Changes (see Use the ChangeCenter).
Changes to SAML debug scopes and attributes take effect immediately – no restart is necessary. Using the WebLogic Server Administration Console to enable or disable SAML debugging is dynamic and can be used while the server is running.
For more information, refer to Define debug settings in the Oracle WebLogic Server Administration Console Online Help.
 |