WS-Trust Request Blocking Configuration Guide
Introduction
Use this guide to configure the WS-Trust request blocking feature which protects Microsoft Office 365 from WS-Trust authentication requests source from IP addresses, office applications, and / or web browser user agents set up to be blocked.
You can also use this guide to configure Adaptive Authentication to block WS-Trust requests that originate from specific countries of origin / IP addresses of malicious attackers listed in SecureAuth's threat detection service.
Either method can be used to block WS-Trust authentication requests, or you can use both methods together. When using both methods, the hierarchy for blocking WS-Trust requests is as follows:
Adaptive Authentication Analyze Engine initially stops any request that comes from a blocked IP address.
WS-Trust blocks requests based on the configured blocking rules.
A directory lookup is performed on the user ID and password in the WS-Trust token, and the end-user is blocked if a match in the directory is not found.
Prerequisites
Obtain Admin access to Office 365 integrated with SecureAuth IdP v9.1 or later – see Office 365 Integration Guide
Configure the following tabs in the Web Admin before configuring the Adaptive Authentication and Post Authentication tabs:
Overview– the description of the realm and SMTP connections must be defined
Data– an enterprise directory must be integrated with SecureAuth IdP
Workflow– the way in which users will access this application must be defined
Multi-Factor Methods– the Multi-Factor Authentication methods that will be used to access this page (if any) must be defined
SecureAuth IdP Web Admin Configuration
If you wish to use only Adaptive Authentication for IP blocking and not use WS-Trust request blocking, then go to the Adaptive Authentication tab to configure Adaptive Authentication for IP blocking
Otherwise, proceed to Post Authentication steps below
Adaptive Authentication (OPTIONAL)
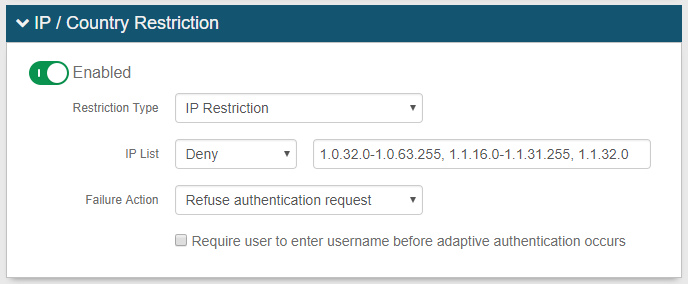 |
A1. In the IP / Country Restriction section, toggle the switch to Enabled to use this feature which analyzes IP addresses / country codes to determine how to handle end-user requests
A2. From the Restriction Type dropdown, select IP Restriction to restrict access by IP address(es), or select Country Restriction to restrict access by country code(s)
A3. From the IP List / Country List dropdown, select Allow to grant the list of entities (provided in step A4) access to the realm, or select Deny to prevent the list of entities from accessing the realm
A4. Provide the list of IP addresses / country codes that can / cannot access the realm, based on the action defined in step A3 – see IP Notation format and Country Code format
A5. From the Failure Action dropdown, select the action to implement when the end-user attempts to gain access to a realm via a restricted IP address / country code – see Failure Action selections and results
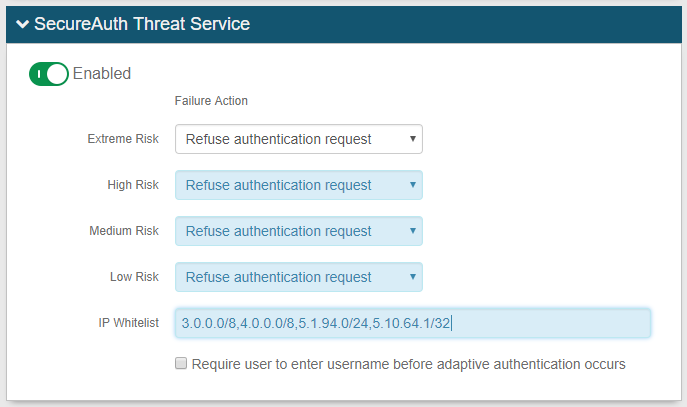 |
A6. In the SecureAuth Threat Service section, toggle the switch to use this feature which determines how to handle end-user requests based on an IP address evaluation and risk threshold level
A7. Under Failure Action, define the threshold for each threat intelligence level (Extreme Risk, High Risk, Medium Risk, Low Risk) by making a selection from each the following dropdowns to specify the action to implement based on risk factors and IP address evaluation – see Failure Action selections and results
Extreme Risk
High Risk
Medium Risk
Low Risk
A8. Define the IP Whitelist to specify which IP addresses are allowed realm access – see IP Notation format
Tip
Warning
Click Save once the configurations have been completed and before leaving the Adaptive Authentication page to avoid losing changes
Post Authentication
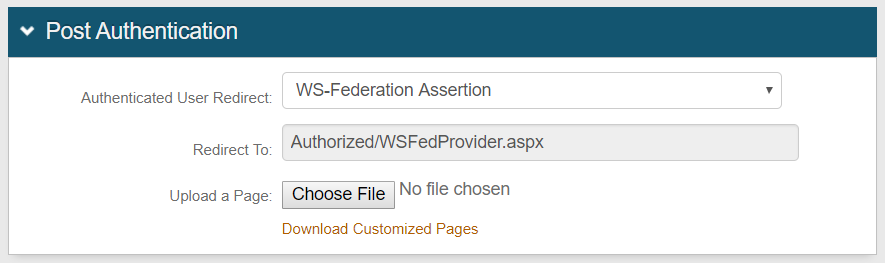 |
1. On the Post Authentication tab, WS-Federation Assertion is selected from the Authenticated User Redirect dropdown which makes the WS-Trust options appear
 |
2. In the WS-Trust Request Blocking section, click View and Configure WS-Trust request blocking rules
WS-Trust Request Blocking
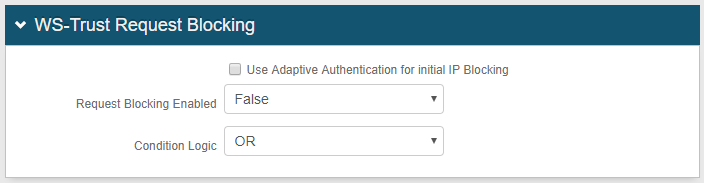 |
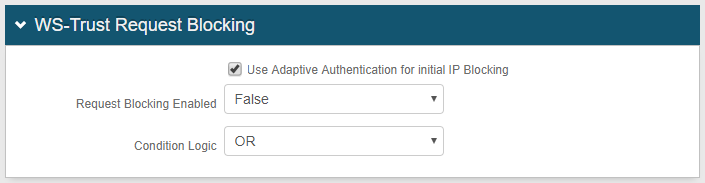
3. Configure settings for the Use Adaptive Authentication for initial IP Blocking checkbox and Request Blocking Enabled dropdown based on how you want to use WS-Trust request blocking:
OPTION A: Use only Adaptive Authentication for IP blocking and not use WS-Trust request blocking
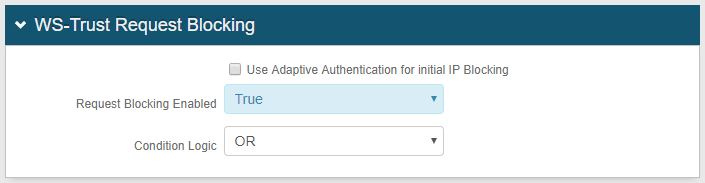
OPTION B: Use only WS-Trust request blocking and not use Adaptive Authentication for IP blocking
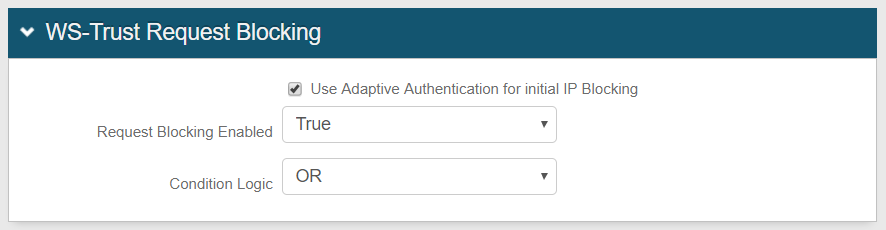
OPTION C: Use both WS-Trust request blocking and Adaptive Authentication for IP blocking
 |
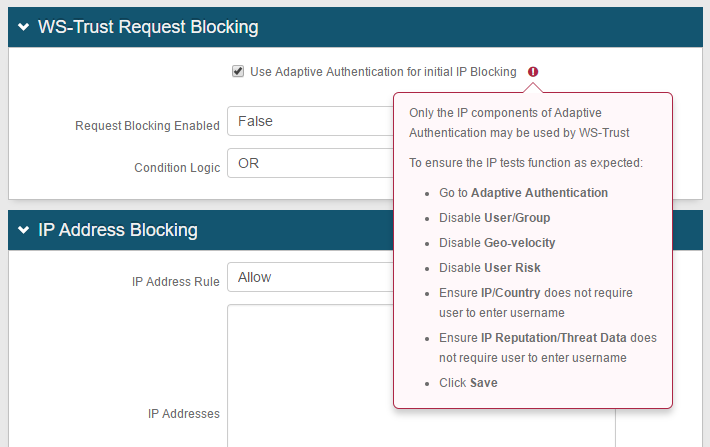
A9. Check the Use Adaptive Authentication for initial IP Blocking box
Warning
If the warning icon appears, then Adaptive Authentication settings must be modified in order to use this feature
The warning icon appears if Adaptive Authentication is currently configured to use any of these settings:
IP / Country Restriction with a username entry required before adaptive authentication occurs
SecureAuth Threat Service with a username entry required before adaptive authentication occurs
User / Group Restriction
Geo-velocity
User Risk
NOTE: You must first disable any conflicting, enabled option on the Adaptive Authentication tab before returning to this section to enable this functionality
A10. Set Request Blocking Enabled to False
Notice
NOTE: Steps 4 - 10 below can be skipped
Warning
Click Save once the configuration is complete and before leaving the WS-Trust Request Blocking rules page to avoid losing changes
 |
C1. Follow steps A1 - A8 in the Adaptive Authentication IP Blocking section above
C2. Enable Use Adaptive Authentication for initial IP Blocking
Warning
If the warning icon appears, then Adaptive Authentication settings must be modified in order to use this feature
The warning icon appears if Adaptive Authentication is currently configured to use any of these settings:
IP / Country Restriction with a username entry required before adaptive authentication occurs
SecureAuth Threat Service with a username entry required before adaptive authentication occurs
User / Group Restriction
Geo-velocity
User Risk
NOTE: You must first disable any conflicting, enabled option on the Adaptive Authentication tab before returning to this section to enable this functionality
C3. Set Request Blocking Enabled to True
C4. Continue to step 4 below to configure the Condition Logic
4. Select the Condition Logic option that will specify how to handle IP addresses based on rules configured in the IP Address Blocking, Application Blocking, and User Agent Blocking sections:
Select OR to block a request that matches at least one of the conditions specified in the configured rules | IP Address Blocking OR Application Blocking OR User Agent Blocking |
Select AND to block a request that matches ALL the conditions specified in the configured rules | IP Address Blocking AND Application Blocking AND User Agent Blocking |
IP Address Blocking
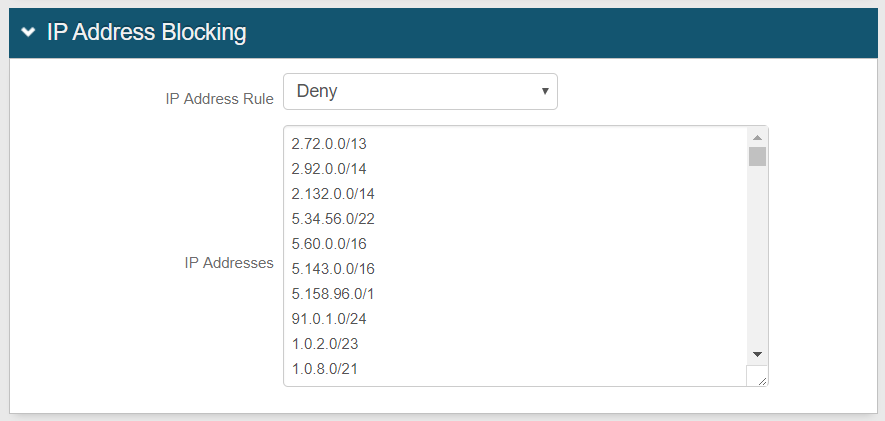 |
5. In the IP Address Blocking section, select either Allow or Deny from the IP Address Rule dropdown to dictate how the rule handles given IP addresses in the search process when a request is made
6. Enter all IP Addresses – one entry per line – to be included in the search
Enter an asterisk ( * ) to allow / deny all IP addresses
An asterisk can also be used as a wild card – e.g. 5.143.*.*
Warning
If Allow is selected but no IP Addresses are defined, then all IP addresses will be blocked from reaching the WS-Trust endpoint, and users will not be able to log on their WS-Trust-enabled clients
Application Blocking
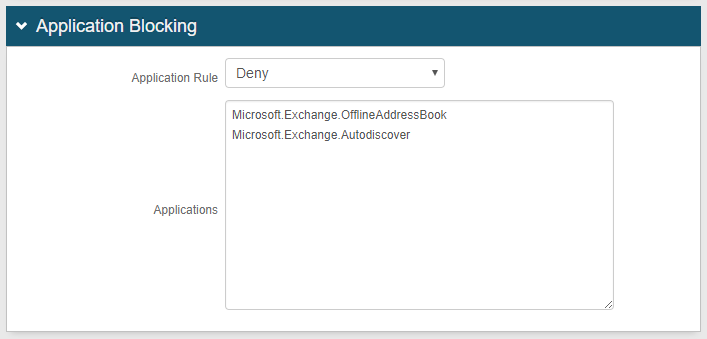 |
7. In the Application Blocking section, select either Allow or Deny from the Application Rule dropdown to dictate how the rule handles given applications using the X-MS-Client-Application request header in the search process when a request is made
8. Enter all Applications – one entry per line – to be included in the search
A match is determined if the request header value contains any of the applications listed
Enter an asterisk ( * ) to allow / deny all applications
User Agent Blocking
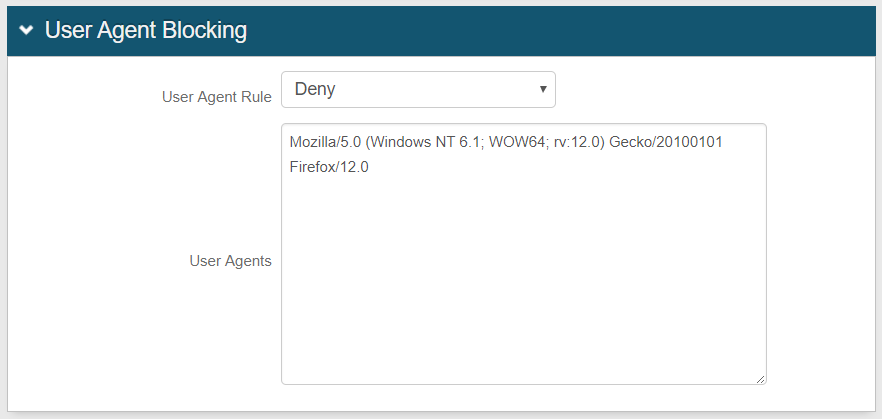 |
9. In the Application Blocking section, select either Allow or Deny from the User Agent Rule dropdown to dictate how the rule handles given applications using the X-MS-Client-User-Agent request header in the search process when a request is made
10. Enter all User Agents – one entry per line – to be included in the search
A match is determined if the request header value contains any of the user agents listed
Enter an asterisk ( * ) to allow / deny all user agents
Warning
Click Save once the configuration is complete and before leaving the WS-Trust Request Blocking rules page to avoid losing changes