Drupal (SP-initiated) Integration Guide
Introduction
Use this guide to enable Multi-Factor Authentication and Single Sign-on (SSO) access via SAML to Drupal.
Notice
These instructions apply to Linux instances of Drupal only
Prerequisites
1. On the Drupal host server, SimpleSAMLphp must be installed and configured – review the readme for information
2. Create a New Realm for the Drupal integration with the SecureAuth IdP Web Admin
3. Configure the following tabs on the Web Admin before configuring the Post Authentication tab:
Overview – the description of the realm and SMTP connections must be defined
Data – an enterprise directory must be integrated with SecureAuth IdP
Workflow – the way in which users will access this application must be defined
Multi-Factor Methods – the Multi-Factor Authentication methods that will be used to access this page (if any) must be defined
SecureAuth IdP Configuration Steps
Data
 |
1. In the Profile Fields section, map the directory field that contains the user's Drupal ID to the SecureAuth IdP Property
For example, use the Email 1 Property if this Property is not currently used
Warning
Click Save once the configuration is complete and before leaving the Data page to avoid losing changes
Post Authentication
Post Authentication
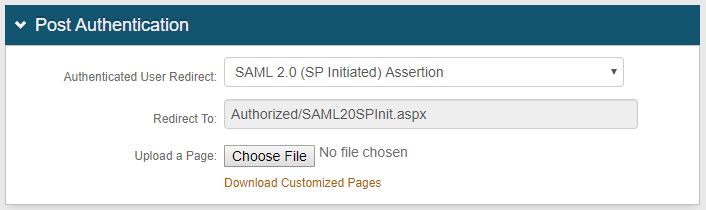 |
2. In the Post Authentication section, select SAML 2.0 (SP Initiated) Assertion from the Authenticate User Redirect dropdown
The uneditable Authorized/SAML20SPInit.aspx URL populates the Redirect To field – this content will append to the domain name and realm number on the address bar
Notice
A customized post authentication page can be uploaded, but is not required
User ID Mapping
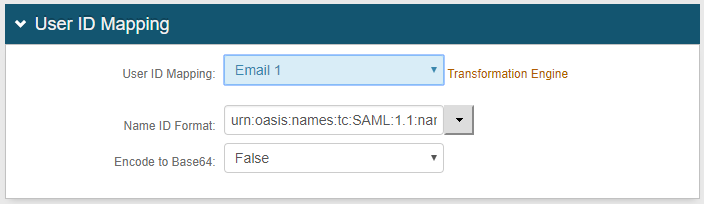 |
3. Select the SecureAuth IdP Property corresponding to the directory Field that contains the Drupal username
For this example, select Email 1 from the User ID Mapping dropdown
4. Select urn:oasis:names:tc:SAML:1.1:nameid-format:unspecified from the Name ID Format dropdown (default)
5. Select False from the Encode to Base64 dropdown
SAML Assertion / WS Federation
 |
6. Set the SAML Consumer URL to https://drupalserver/simplesaml/module.php/saml/sp/saml2-acs.php/default-sp
This is the setting made in Drupal Configuration Step 5 below
7. Set the WSFed/SAML Issuer to https://secureauthidp
This setting should match the Entity ID value from Drupal Configuration Step 6a below
8. Set the SAML Audience to https://drupalserver/simplesaml/module.php/saml/sp/metadata.php/default-sp
This setting should match the Entity ID value from Drupal Configuration Step 3 below
9. Set SP Start URL to https://drupalserver/saml_login
10. Leave the Signing Cert Serial Number as the default value, unless a third-party certificate is used for the SAML assertion
If using a third-party certificate, click Select Certificate and choose the appropriate certificate
11. OPTIONAL: Provide the Domain URL
12. Click certificate.wse3.cer to download the SecureAuth IdP certificate
SAML Attributes / WS Federation
 |
13. Under Attribute 1, set the Name to eduPersonPrincipalName
14. Select Authenticated User ID from the Value dropdown
15. Under Attribute 2, set the Name to mail
16. Select Email 1 from the Value dropdown
Warning
Click Save once the configuration is complete and before leaving the Post Authentication page to avoid losing changes
Drupal Configuration Steps
 |
1. On a new browser tab, navigate to https://drupalserver/simplesaml
2. Select the Federation tab
3. Make note of your Drupal Entity ID
4. Click Show metadata
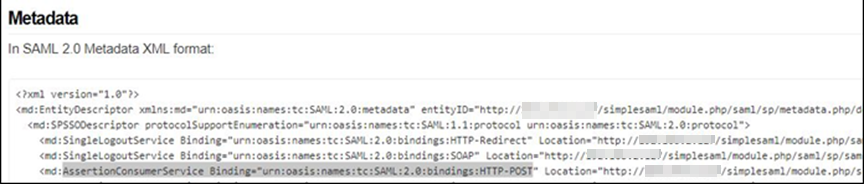 |
5. Under Metadata, make note of the full URL for AssertionConsumerService Binding="urn:oasis:names:tc:SAML:2.0:bindings:HTTP-POST"
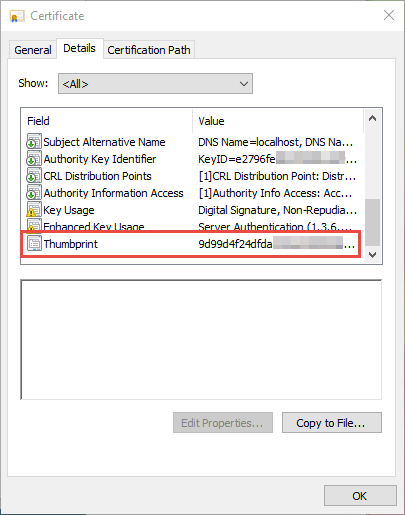
6. On the server hosting Drupal/SimpleSAMLphp, make the following edits on the /var/simplesamlphp/metadata/saml20-idp-remote.php file to include your SecureAuth IdP instance:
a. Enter $metadata[' https://secureauthidp']
b. Change 'en' to 'SecureAuth IdP'
c. Change 'SingleSignOnService' to 'https://secureauthidp/SecureAuth#/secureauth.aspx' – in which '#' is replaced by your SecureAuth IdP's realm number
d. Change 'SingleLogoutService' to ' https://secureauthidp/SecureAuth#/logout.aspx ' – in which '#' is replaced by your SecureAuth IdP's realm number
e. Change 'certFingerprint' to 'thumbprint' from SecureAuth IdP Configuration Step 12c
7. Save the saml20-idp-remote.php file
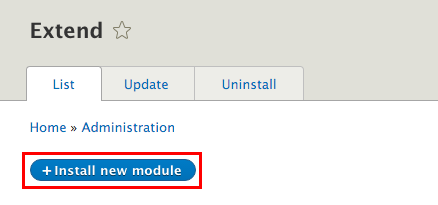 |
8. Log on the Drupal Admin dashboard
9. Click the Extend tab
10. Click + Install new module
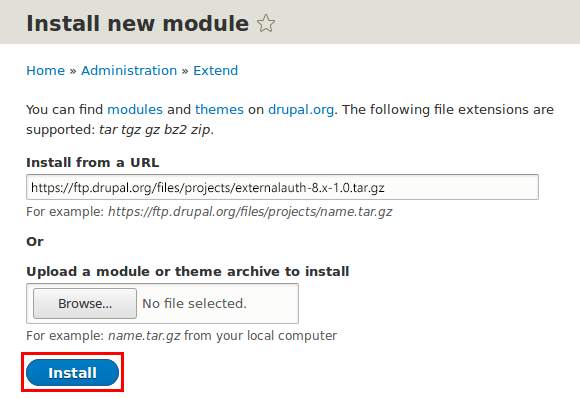 |
11. Enter https://ftp.drupal.org/files/projects/externalauth-8.x-1.0.tar.gz in theInstall from a URL text box
12. Click Install – the message "Installation was completed successfully." appears
13. Click the Install another module link
14. Enter https://ftp.drupal.org/files/projects/simplesamlphp_auth-8.x-3.0-rc2.tar.gz in Install from a URL
15. Click Install – the success message appears
 |
16. Click the Administration pages link
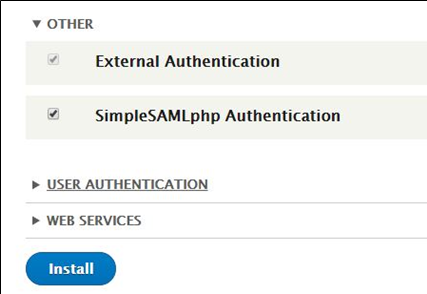
17. Select the Extend tab
18. Select the External Authentication box
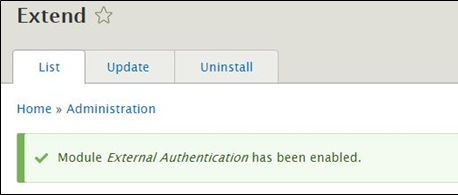
19. Click Install – the message "Module External Authentication has been enabled." appears
20. Select the SimpleSAMLphp Authentication box
21. Click Install – the message "Module SimpleSAMLphp Authentication has been enabled." appears

Notice
If an error message appears, review the simplesamlphp_auth readme file to verify that simplesamlphp_auth module has been successfully installed and configured
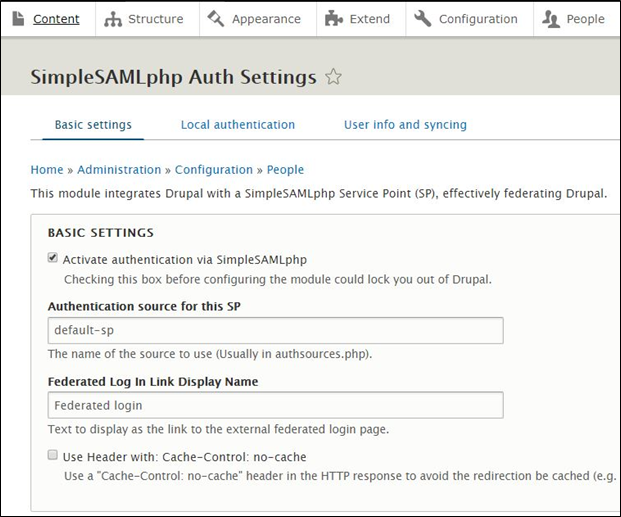 |
22. Select the Configuration tab
23. Click the SimpleSAMLphp Auth Settings link
24. Select the Activate authentication via SimpleSAMLphp box
25. Direct users to log on via https://drupalserver/saml_login