Mobile Login Requests (Push Notifications) Registration Method for Multi-Factor Authentication
Introduction
Use this guide to configure and enroll the SecureAuth Authenticate app on mobile devices to use Push Notifications as a Multi-Factor Authentication registration method.
SecureAuth IdP supports three (3) types of Push options for Multi-Factor Authentication: Push Notification (alert), Push-to-Accept, and Symbol-to-Accept.
The Push Notification alert message is sent directly to the app on a mobile device and includes a one-time passcode (OTP) to use during the Multi-Factor Authentication workflow. Push-to-Accept and Symbol-to-Accept send a login request to the app on a mobile device that prompts the end-user to Accept or Deny access.
To use any of these Push options, the Push Notifications functionality must be enabled in all realms designated to offer the option, and end-users must enroll the Authenticate app on mobile device(s) to receive these notifications before utilizing the Multi-Factor Authentication registration method during login.
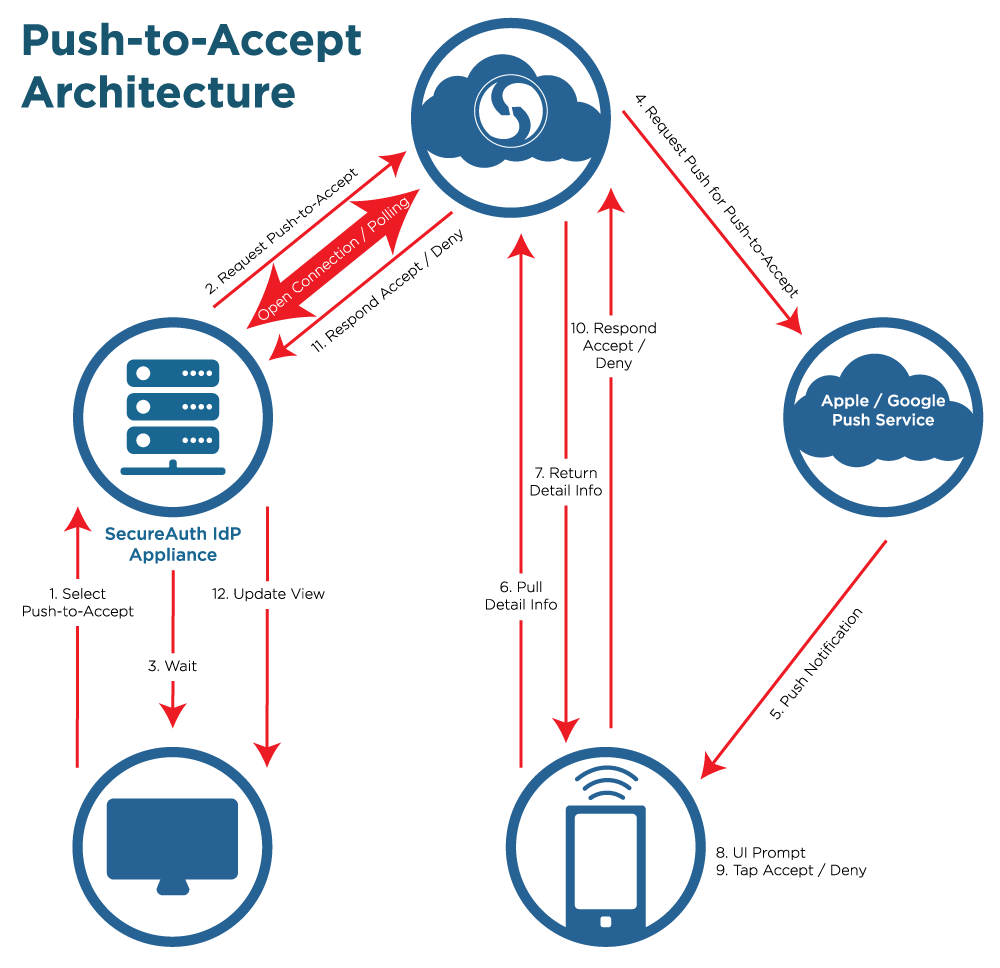
When end-user Push Notification requests are submitted, SecureAuth IdP builds a tunnel using Apple APN and Google GCM services to distribute custom messages to the app enrolled on mobile devices.
Prerequisites
1. Download the SecureAuth IdP Mobile OTP App from the Google Play Store or Apple App Store
Device | Download URL |
|---|---|
Android | https://play.google.com/store/apps/details?id=secureauth.android.token |
iOS |
NOTE: See SecureAuth Compatibility Guide for a list of supported, compatible mobile devices
2. Configure the SecureAuth App Enrollment Realm on which end-users can enroll the app on their device for Push Notification
3. Create a New Realm or access existing realm(s) on the SecureAuth IdP Web Admin on which the Push Notification will be applied (Realm A in the SecureAuth IdP Configuration Steps)
4. (OPTIONAL) Create a New Realm or access an existing realm on the SecureAuth IdP Web Admin that is configured for the Account Management page (help desk) to let an administrator revoke the usage of a device on which the app was enrolled for Push Notifications (Realm B in the SecureAuth IdP Configuration Steps)
5. (OPTIONAL) Create a New Realm or access an existing realm on the SecureAuth IdP Web Admin that is configured for the Self-service Account Update (end-user self service) to enable end-users to self-revoke their device on which the app was enrolled for Push Notifications (Realm C in the SecureAuth IdP Configuration Steps)
6. Configure the following tabs on the Web Admin before configuring Push Notifications (and Account Management Page and Self-service Account Update):
Overview – the description of the realm and SMTP connections must be defined
Data – an enterprise directory must be integrated with SecureAuth IdP
Workflow – the way in which users will access the target must be defined
Multi-Factor Methods – other Multi-Factor Authentication methods that will be used to access the target (if any) must be defined
Post Authentication – the target resource or post authentication action must be defined (see Realm B and Realm C for specific Post Authentication configurations for Account Management Page and Self-service Account Update)
Logs – the logs that will be enabled or disabled for this realm must be defined
SecureAuth IdP Configuration Steps
Realm A
Data
 |
Notice
This step is for LDAP data stores only (AD and others)
If using a different directory (e.g. SQL), then the Property needs to be configured as a stored procedure in the data store
NOTE: For SQL, ASP.net, and Oracle data stores, only the Plain Binary Data Format is supported (configured in the Data tab); and for ODBC data stores, Push is not supported
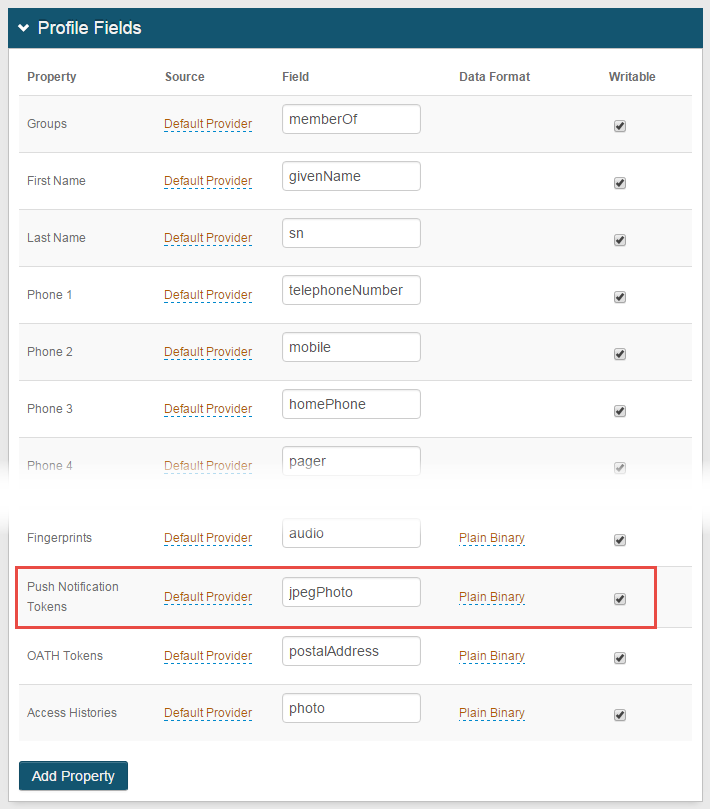
1. In the Membership Connection Settings section, map a directory field to the Push Notification Tokens Property
In typical AD deployments, the Data Format is Plain Binary and the jpegPhoto directory field is utilized
2. Check Writable
Warning
The Push Notification Tokens Property can be stored as Plain Binary or in JSON format, and has distinct requirements for the LDAP directory attribute mapped to the Property based on the Data Format selection
For Plain Binary, these requirements must be met for the directory field that contains the Push Notification Token:
Length: 4096 minimum
Data Type: Octet string (bytes)
Multi-valued
For JSON, these requirements must be met for the directory field that contains the Push Notification Token:
Length: 4096 minimum
Data Type: DirectoryString
Multi-valued
Warning
Click Save once the configurations have been completed and before leaving the Data page to avoid losing changes
Multi-Factor Methods
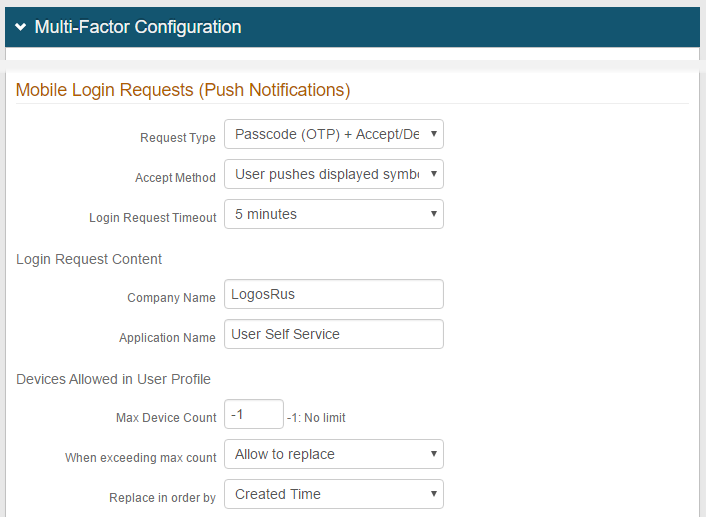 |
3. In the Multi-Factor Configuration section, under Mobile Login Requests (Push Notifications), select Passcode (OTP), Accept / Deny, or Passcode (OTP) + Accept / Deny from the Request Type dropdown
Passcode (OTP): Enable Push Notifications to enrolled apps on mobile devices
Accept / Deny: Enable Push-to-Accept / Symbol-to-Accept requests to enrolled apps on mobile devices
Passcode (OTP) + Accept / Deny: Enable Push Notifications and Push-to-Accept / Symbol-to-Accept requests to enrolled apps on mobile devices (both options appear on client-side login page)
4. If Accept / Deny or Passcode (OTP) + Accept / Deny is selected in step 3, then execute steps 'a', 'b', 'c' and 'd'
a. Select the Accept Method for end-users to use when the login request notification appears – User pushes "Accept" button or User pushes displayed symbol
b. Set the Login Request Timeout to determine the number of minutes during which the Push-to-Accept / Symbol-to-Accept request is valid
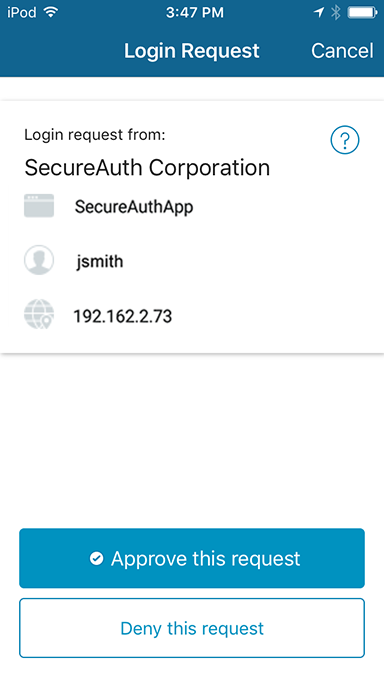
c. Set the Company Name, which appears on the Push-to-Accept / Symbol-to-Accept request
d. Set the Application Name to a descriptive name / phrase, which appears on the Push-to-Accept / Symbol-to-Accept request
5. Set the Device Max Count to -1 if there is no limit to the number of devices that can have the app enrolled for Push Notifications
To establish a limit, set the maximum number of devices with the app enrolled for Push Notifications
6. If a max count is set, select Allow to replace from the When exceeding max count dropdown if end users can replace existing devices that have the app enrolled with newer devices
7. If a max count is set and Allow to replace is selected in step 6, then select Created Time from the Replace in order by dropdown to replace the oldest device on which the app was enrolled with the newest one
Select Last Access Time to replace the least recently used device on which the app was enrolled with the newest one
Warning
Click Save once the configurations have been completed and before leaving the Multi-Factor Methods page to avoid losing changes
Realm B
Note
These are optional configuration steps to enable administrator (help desk) revocation of devices on which the app is enrolled for Push Notifications
This realm must be set up for the Account Management page post authentication action
Refer to Account Management page configuration for more information
Data
1. Follow steps 1-2 in the Data configuration steps of Realm A
Notice
The directory attribute used for Push Notification Tokens (e.g. jpegPhoto) must be the same across all SecureAuth IdP realms utilizing Push Notifications / Push-to-Accept or Symbol-to-Accept Login Requests to ensure consistency
Post Authentication
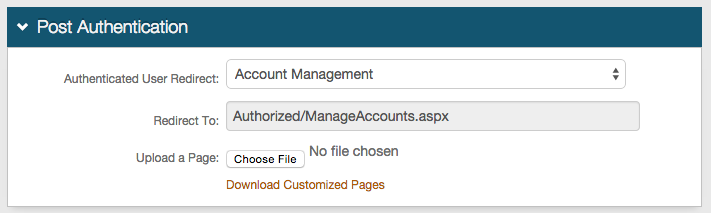 |
2. In the Post Authentication section, select Account Management from the Authenticated User Redirect dropdown
Warning
Click Save once the configurations have been completed and before leaving the Post Authentication page to avoid losing changes
Identity Management
 |
3. Click Configure help desk page to enable or disable help desk functions
Help Desk
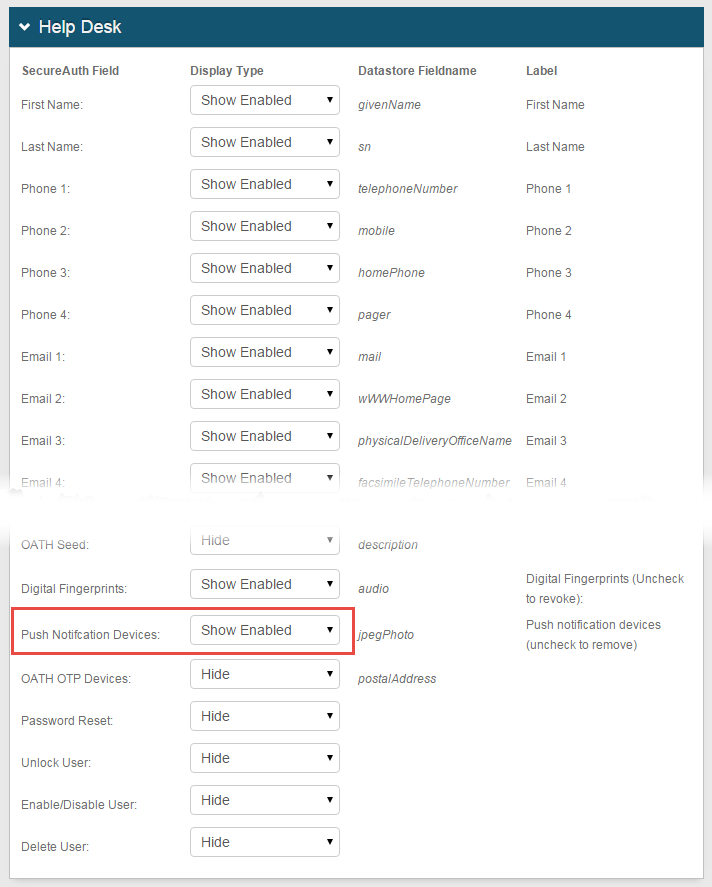 |
4. Select Show Enabled from the Push Notification Devices dropdown to show this function on the help desk page and enable administrative revocation of devices with the app enrolled for Push Notifications
Warning
Click Save once the configurations have been completed and before leaving the Help Desk page to avoid losing changes
Realm C
Note
These are optional configuration steps to enable end-user self-service revocation of devices that have the app enrolled for Push Notifications
This realm must be set up for the Self-service Account Update post authentication action
Refer to Self-service Account Update page configuration for more information
Data
1. Follow steps 1-2 in the Data configuration steps of Realm A
Notice
The directory attribute used for Push Notification Tokens (e.g. jpegPhoto) must be the same across all SecureAuth IdP realms utilizing Push Notifications / Push-to-Accept or Symbol-to-Accept Login Requests to ensure consistency
Post Authentication
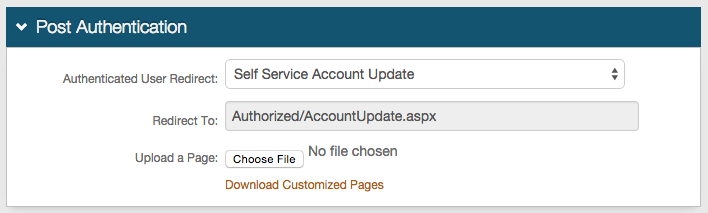 |
2. Select Self Service Account Update from the Authenticated User Redirect dropdown in the Post Authentication tab in the Web Admin
Warning
Click Save once the configurations have been completed and before leaving the Post Authentication page to avoid losing changes
Identity Management
 |
3. Click Configure self service page to enable or disable self-service functions
Self Service
|
4. Select Show Enabled from the Push Notification Devices dropdown to show this function on the help desk page and enable self-revocation of devices on which the app is enrolled for Push Notifications
Warning
Click Save once the configurations have been completed and before leaving the Self-service page to avoid losing changes
End-user Experience
Notice
End-users must enroll the app on their mobile devices (Authenticate App) in the Multi-Factor App Enrollment Realm to use Push Notification and / or Push-to-Accept / Symbol-to-Accept as Multi-Factor Authentication methods
Note
NOTE: Workflows for Authenticate App versions 5.0 and 4.x differ due to architectural changes in the app
Refer to the sample images for the version of the app installed – v5.0 or v4.x – for the specified type of Push Notification
Notice
When the end-user is presented the page of Multi-Factor Authentication methods from which to choose, the Multi-Factor Authentication method that was last selected and used in a successful login attempt persists as the default method for the next login in each device / browser
Passcode (OTP) Request Type (Push Notification)
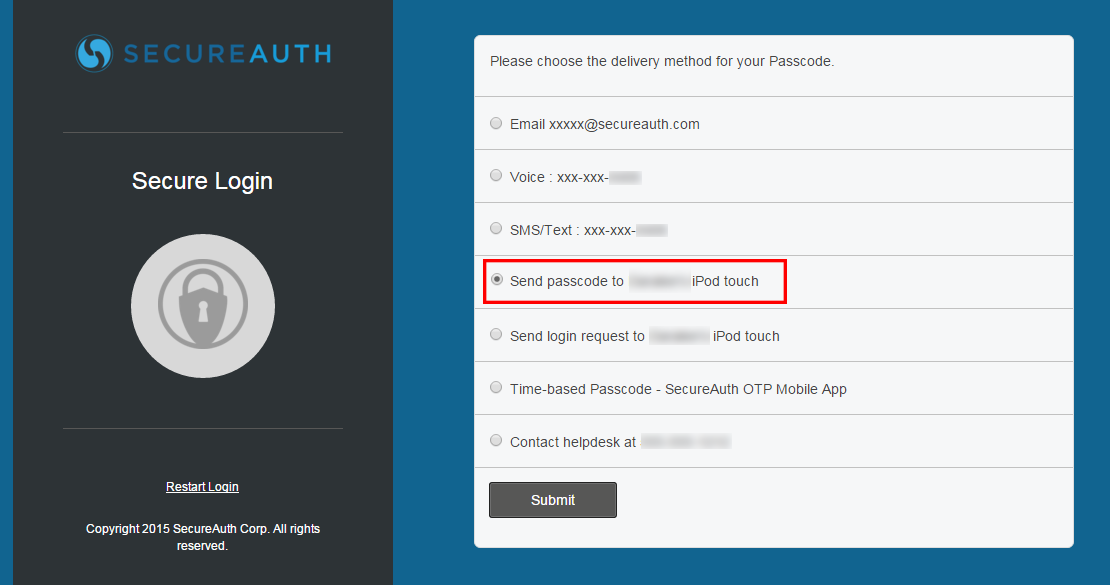 |
1. When logging on a SecureAuth IdP realm in which the Passcode (OTP) Push Notification login request type is enabled, the Push Notification choice appears in the Multi-Factor Authentication methods list
2. Select Send passcode and click Submit
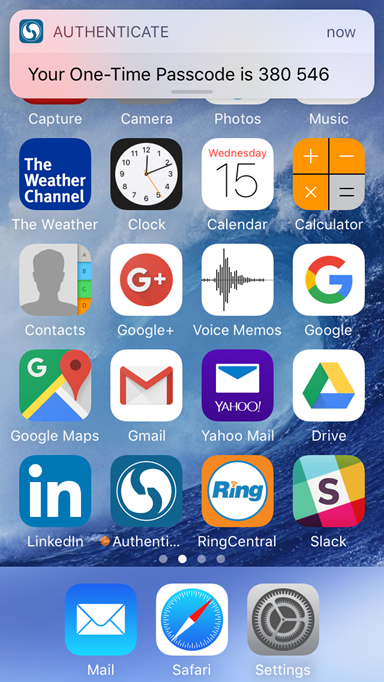
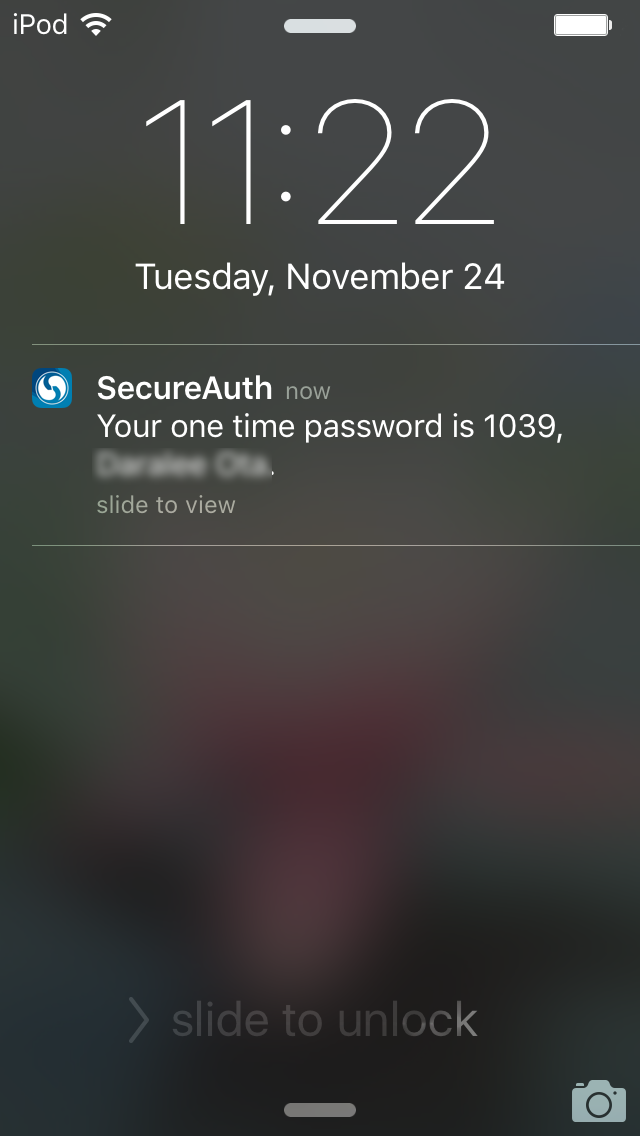
3. A passcode Push Notification is delivered to the app on the enrolled device, displayed on the home screen, with the OTP
Accept / Deny Request Type (Push-to-Accept)
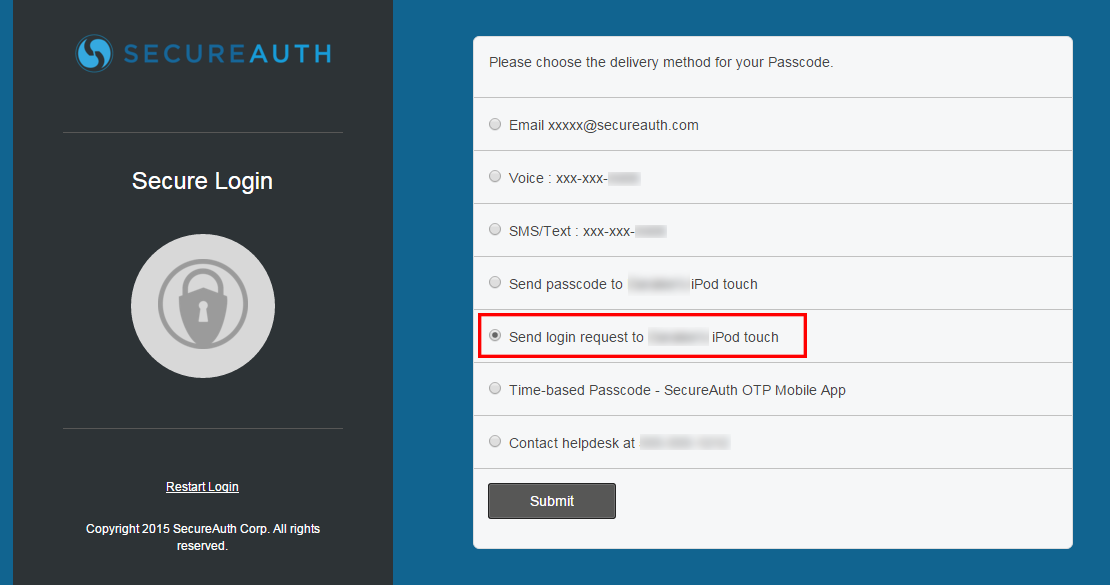 |
1. When logging on a SecureAuth IdP realm in which the Accept / Deny Push Notification login request type is enabled, the Push-to-Accept choice appears in the Multi-Factor Authentication methods list
2. Select Send login request and click Submit
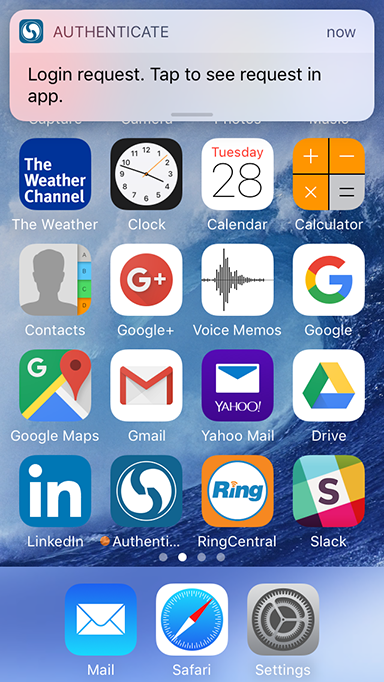
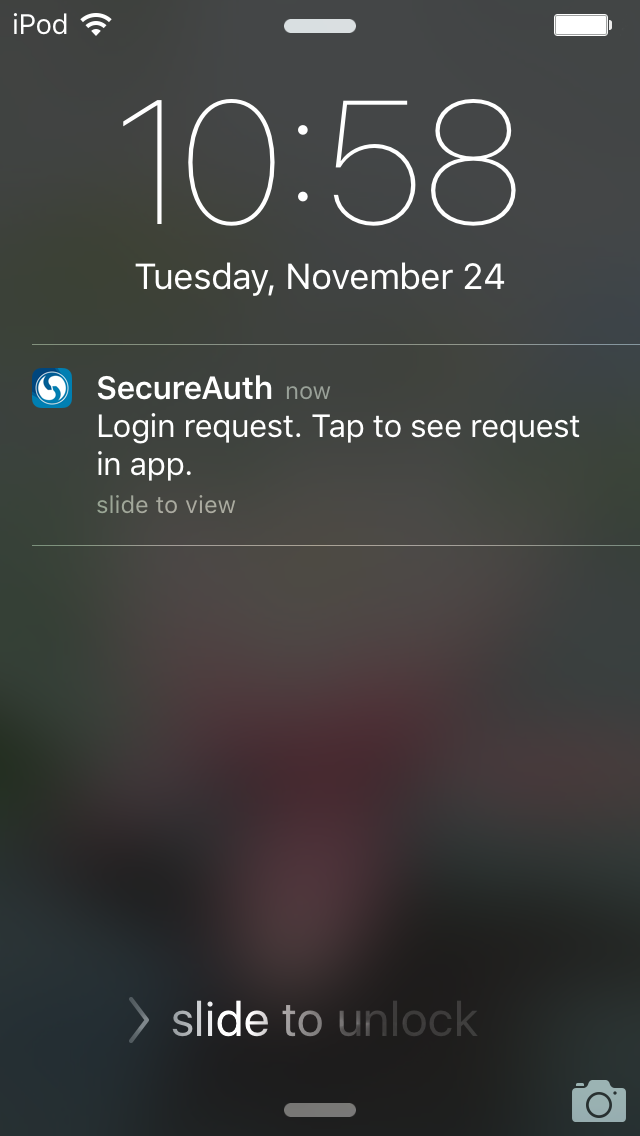
3. A Push-to-Accept request is delivered to the enrolled app on the device, ready for the end-user's approval or denial response on the app
Notice
If the end-user does not respond to the request within the configured time period
"The request has expired" message appears on the app
"The login request is no longer valid" message appears on the realm page along with the link "Please click here to use an alternate verification method"
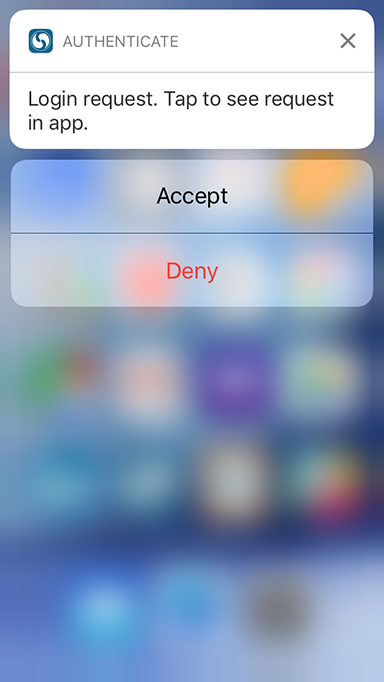
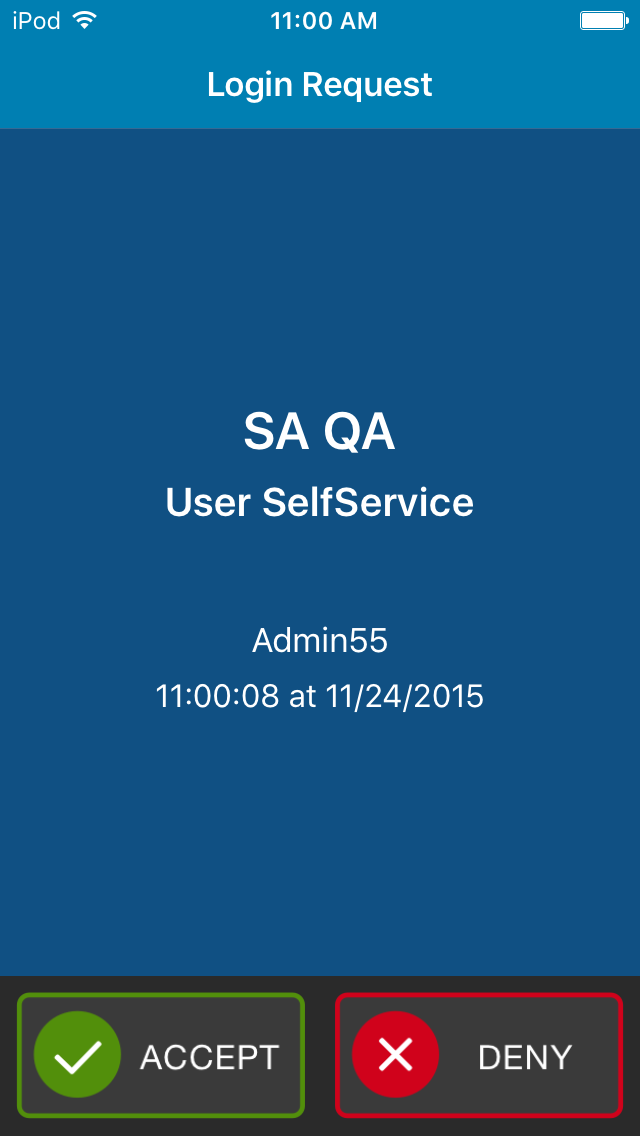
4. Tap (or swipe) to access the Accept and Deny options on the next screen
 |
5. Tap Accept to obtain secure access to the realm
 |
6. The application alerts the end-user that the Multi-Factor Authentication method has been accepted
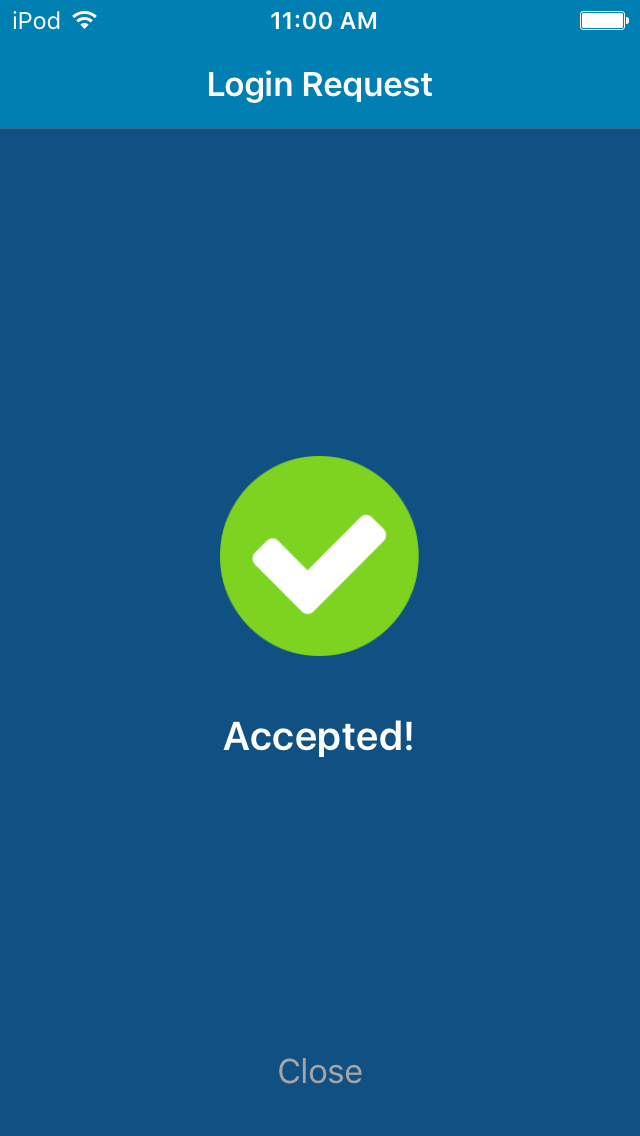 |
The expiration message appears if an Accept or Deny action is not taken within the configured time period
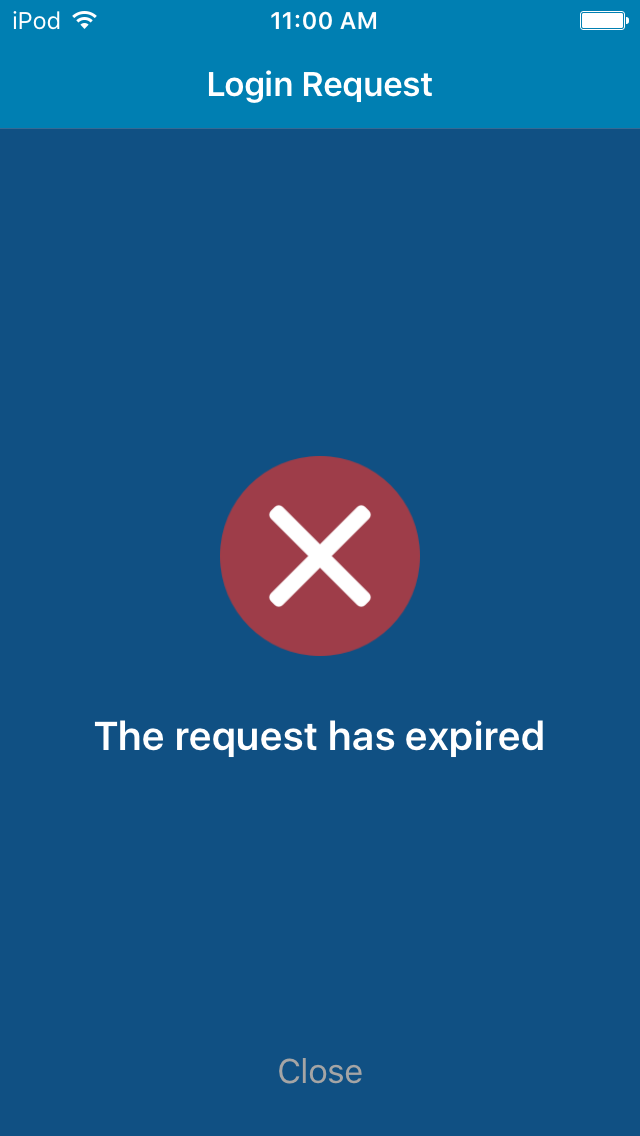 |
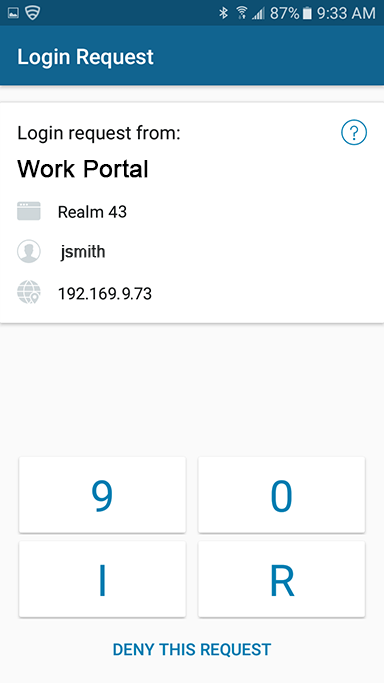
Accept / Deny Request Type (Symbol-to-Accept)
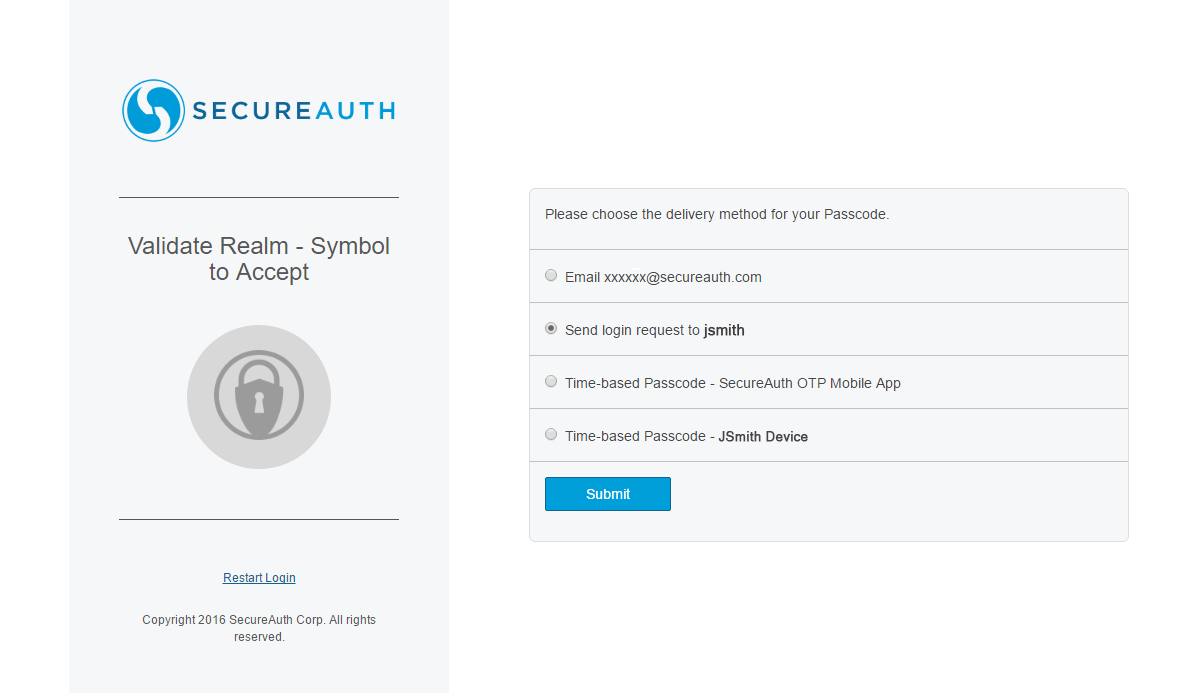 |
1. When logging on a SecureAuth IdP realm in which the Accept / Deny Push Notification login request type is enabled, the Symbol-to-Accept choice appears in the Multi-Factor Authentication methods list
2. Select Send login request and click Submit
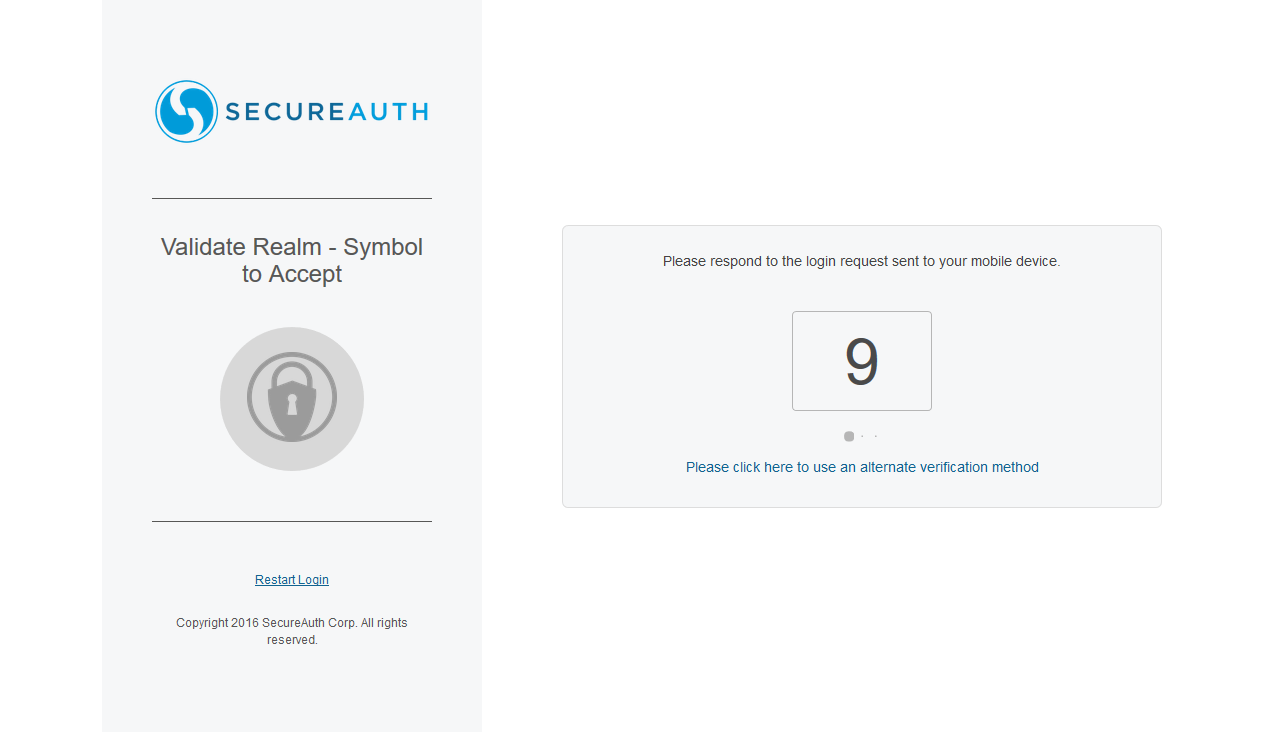 |
3. A symbol is presented on the next page, and the login request is simultaneously delivered to the enrolled app on the mobile device, ready for the end-user's approval or denial response on the app
Notice
If the end-user does not respond to the request within the configured time period
"The request has expired" message appears on the app
"The login request is no longer valid" message appears on the realm page along with the link "Please click here to use an alternate verification method"