Configure SSL Termination Point Functionality
Introduction
This document explains how to configure the secure socket layer (SSL) termination functionality in SecureAuth IdP to help prevent a man-in-the-middle attack (a.k.a. MitM, MiM attack, or MitMA) against the SecureAuth IdP infrastructure. A MitM attack on SSL can occur when an attacker impersonates a client and / or server and either eavesdrops or alters communications between them.
To safeguard against a MitM attack, an SSL termination point can be configured on the Web Admin, and a certificate used for authentication before encrypted data is sent from a client computer to the web server via an SSL connection. The SSL termination acts as the endpoint for the SSL connection, intercepting encrypted traffic received by the web server and freeing the web server to perform other tasks such as loading web pages.
Applies to
SecureAuth IdP Version | OS Version |
|---|---|
7.x+ |
|
SecureAuth IdP Configuration Steps
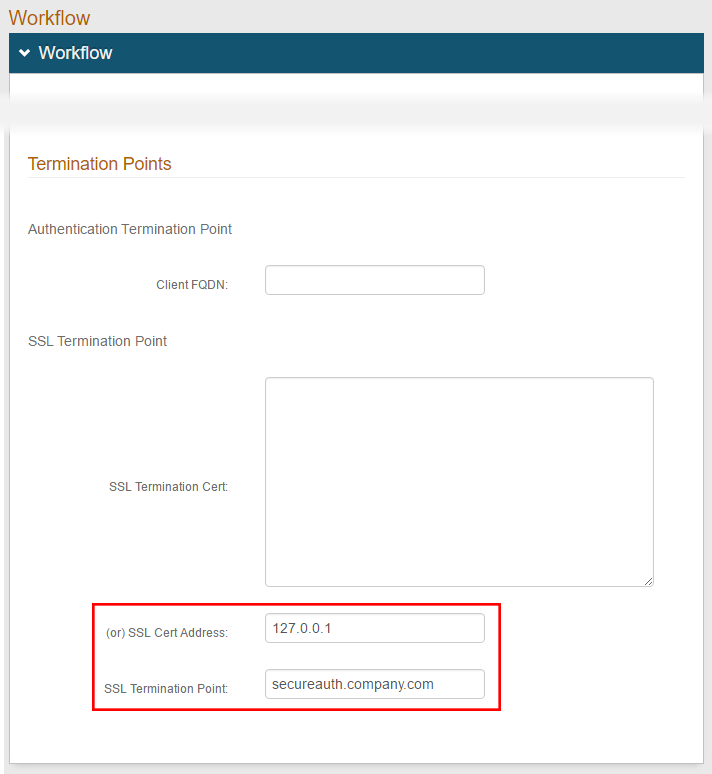
Based on the environment setup, the SSL termination point functionality can be configured in one of two ways in the Workflow section on the Workflow tab
Method 1 requires an entry in the (or) SSL Cert Address field to identify the server on which the SSL certificate resides and an entry in the SSL Termination Point field to specify where SSL (TCP / 443) traffic will terminate
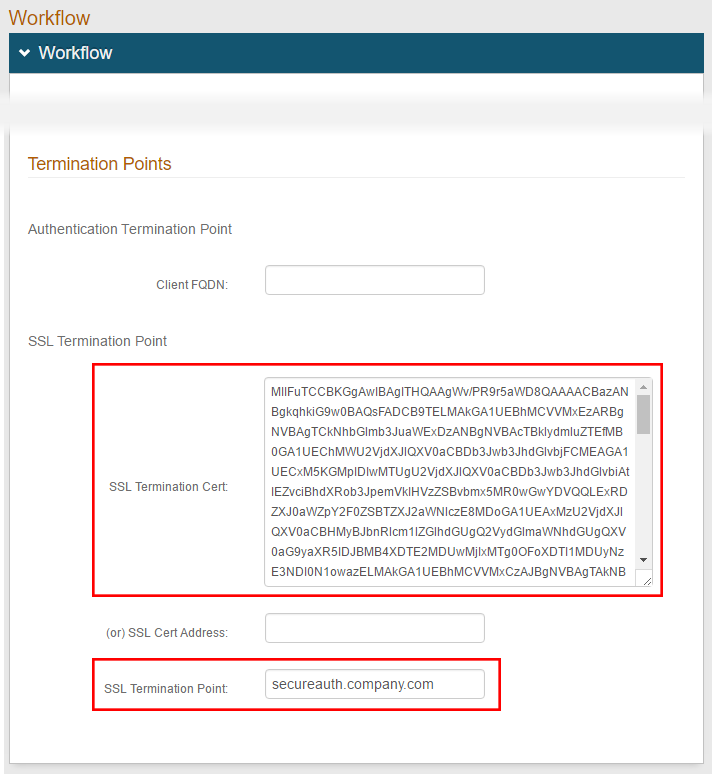
Method 2 requires inserting the SecureAuth IdP SSL / TLS certificate BLOB – in Base64 format – into the SSL Termination Cert field and an entry in the SSL Termination Point field to specify where SSL (TCP / 443) traffic will terminate
Note
In most environments, Method 1 would be used since the least amount of maintenance is involved
Method 2 is usually used when there are restrictions in the production environment that interfere with certificate usage
Version 9.0.1+
Method 1
1. In the Workflow section, under Termination Points, enter the IPv4 address of the server with the SSL certificate to be used for authentication in the (or) SSL Cert Address field
If communicating directly with a SecureAuth IdP server, enter 127.0.0.1
If using a load balancer with SSL traffic terminating to it, enter the IPv4 address of the load balancer
If using a load balancer which only passes traffic, enter 127.0.0.1
2. Enter the Fully Qualified Domain Name (FQDN) of the SSL Termination Point – e.g. secureauth.company.com
 |
Method 2
1. Export the SSL certificate from the SSL server in the Base64 format
2. Open the certificate in a text editor (e.g. Windows Notepad) and copy the contents to the clipboard
3. In the Workflow section, under Termination Points, paste the certificate BLOB into the SSL Termination Cert field
4. Enter either the Fully Qualified Domain Name (FQDN) or the IPv4 address of the SecureAuth IdP server in the SSL Termination Point field
If the SecureAuth IdP server is located behind a load balancer such as a F5 or Microsoft Network Load Balancer, then instead enter the FQDN or IPv4 address of the load balancer
 |
Warning
Click Save once the configuration has been completed and before leaving the Workflow page to avoid losing changes
Notice
If SecureAuth generates a "404-SecureAuth was unable to find a matching SSL certificate. Please contact helpdesk to check server settings." message, then the SSL termination configuration may need to be re-configured.
Review all settings and then make another attempt to use the SSL termination point. In some rare cases, this error could be caused by an incorrectly configured license certificate (System Info → License Info → Cert Serial Nbr → Select Certificate).
Reference
Refer to Use X-Forwarded-For (XFF) with URL Rewrite Module for information on configuring SecureAuth IdP in load balanced environments