Passwordless Workflow Configuration Guide
Introduction
Due to numerous security breaches revealing how insecure the password as a method to protect electronic assets is, SecureAuth IdP employs modern authentication techniques and eliminates the password to provide true security to end-users logging into corporate resources.
Use this guide to create a Passwordless Workflow, composed of Secure Single Sign-on (SSO) Portals, Adaptive Authentication, and low-friction Multi-Factor Authentication methods, that is just as safe as it is user-friendly.
Prerequisites
1. Have SecureAuth IdP 9.0+
2. Create three (3) New Realms in the SecureAuth IdP Web Admin
Realm A - Passwordless Portal
Realm B - Passwordless Fingerprint Enrollment Realm
Realm C - Passwordless Mobile Enrollment Realm
3. Configure the following tabs in the Web Admin before configuring specifically for Realms A, B, and C:
Overview – the description of the realm must be defined
Data – an enterprise directory must be integrated with SecureAuth IdP
SecureAuth IdP Configuration Steps
Data
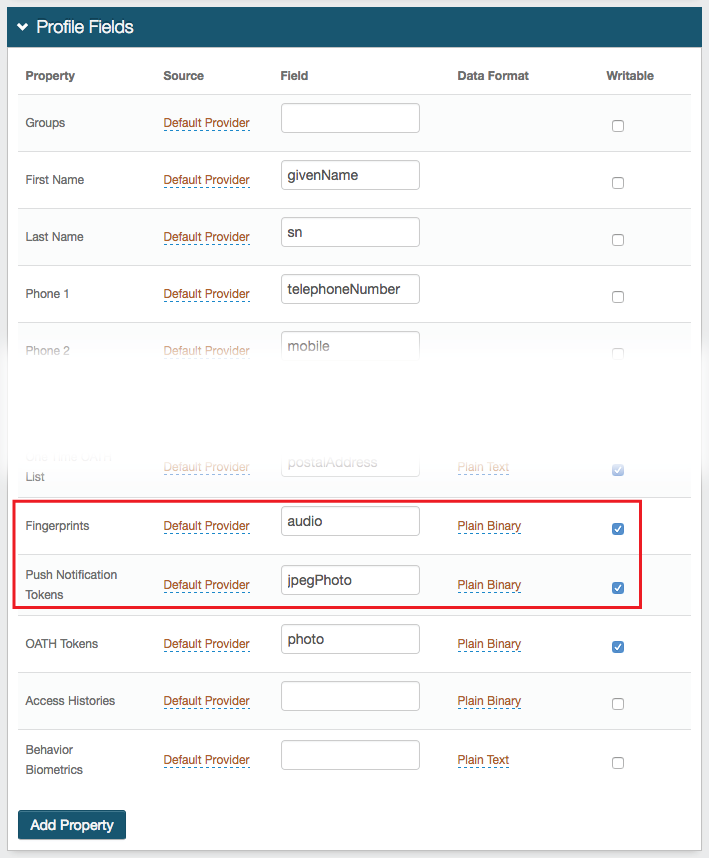 |
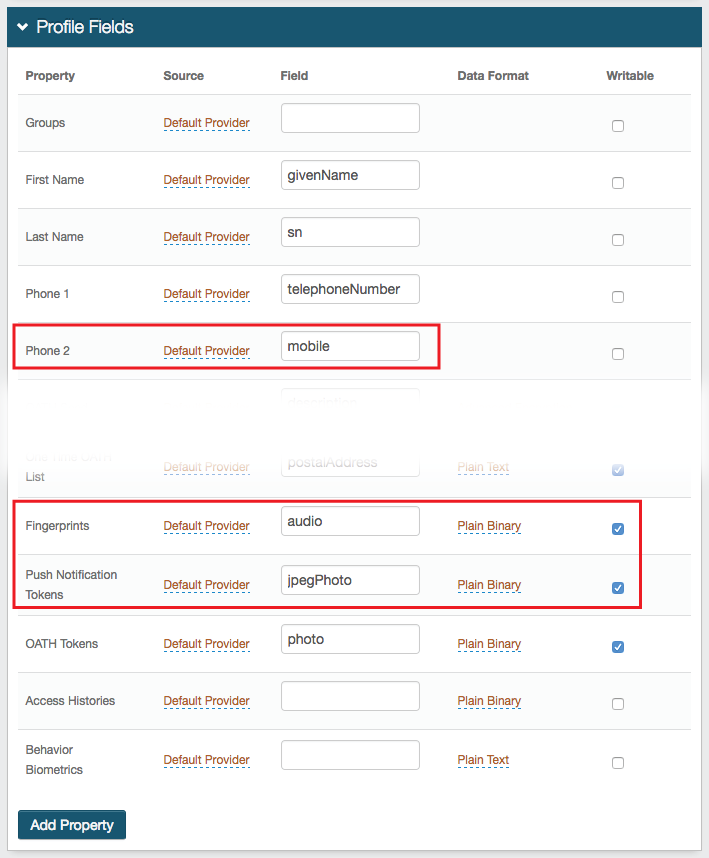
1. In the Profile Fields section, map the Fingerprints and Push Notification Tokens properties to distinct directory attributes that meet the following requirements:
The two Properties can be stored as Plain Binary or in JSON format, and has distinct requirements for the LDAP directory attribute mapped to the Property based on the Data Format selection
For Plain Binary, these requirements must be met for the directory field that contains the Fingerprint information:
Length: 8 kB minimum per Fingerprint Record; and if the Total FP Max Count is set to -1, then the size must be unlimited
Data Type: Octet string (bytes)
Multi-valued
For JSON, these requirements must be met for the directory field that contains the Fingerprint information:
Length: No limit / undefined
Data Type: DirectoryString
Multi-valued
For Plain Binary, these requirements must be met for the directory field that contains the Push Notification Token:
Length: 4096 minimum
Data Type: Octet string (bytes)
Multi-valued
For JSON, these requirements must be met for the directory field that contains the Push Notification Token:
Length: 4096 minimum
Data Type: DirectoryString
Multi-valued
In typical AD deployments, the Data Format is Plain Binary and the audio (Fingerprints) and jpegPhoto (Push) directory fields are utilized
2. Check Writable for both properties
Warning
Click Save once the configurations have been completed and before leaving the Data page to avoid losing changes
Workflow
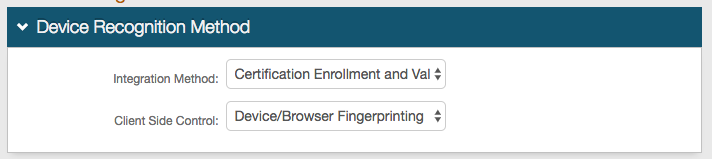 |
3. In the Device Recognition Method section, select Certification Enrollment and Validation from the Integration Method dropdown
4. Select Device / Browser Fingerprinting from the Client Side Control dropdown
Workflow
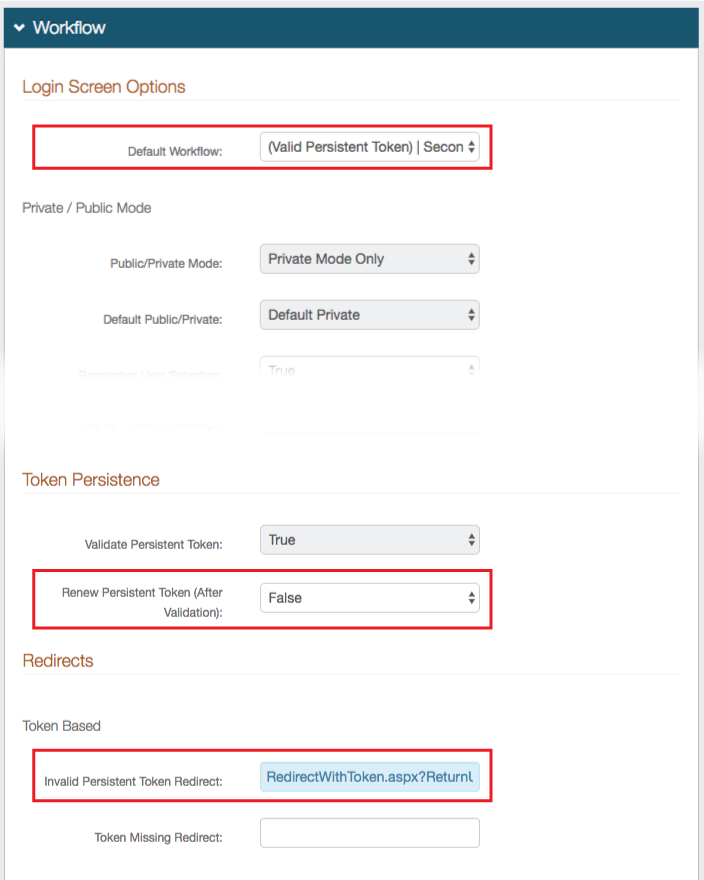 |
5. Select (Valid Persistent Token) | Second Factor from the Default Workflow dropdown
6. Select False from the Renew Persistent Token (after validation) dropdown
7. Set the Invalid Persistent Token Redirect to RedirectWithToken.aspx?ReturnURL=/<PasswordlessFingerprintEnrollmentRealm>
Notice
Replace <PasswordlessFingerprintEnrollmentRealm> with the actual realm name of the Passwordless Fingerprint Enrollment Realm (Realm B - configured below), e.g. /secureauth3
Custom Identity Consumer
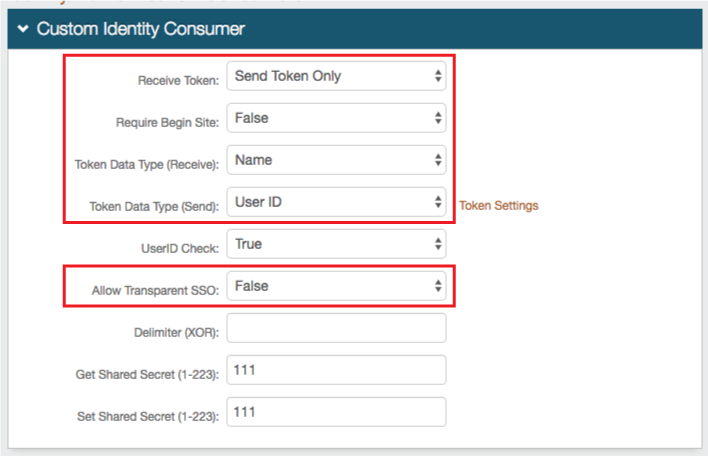 |
8. Select Send Token Only from the Receive Token dropdown
9. Select False from the Require Begin Site dropdown
10. Select Name from the Token Data Type (Receive) dropdown
11. Select User ID from the Token Data Type (Send) dropdown
12. Select False from the Allow Transparent SSO dropdown
Warning
Click Save once the configurations have been completed and before leaving the Workflow page to avoid losing changes
Adaptive Authentication
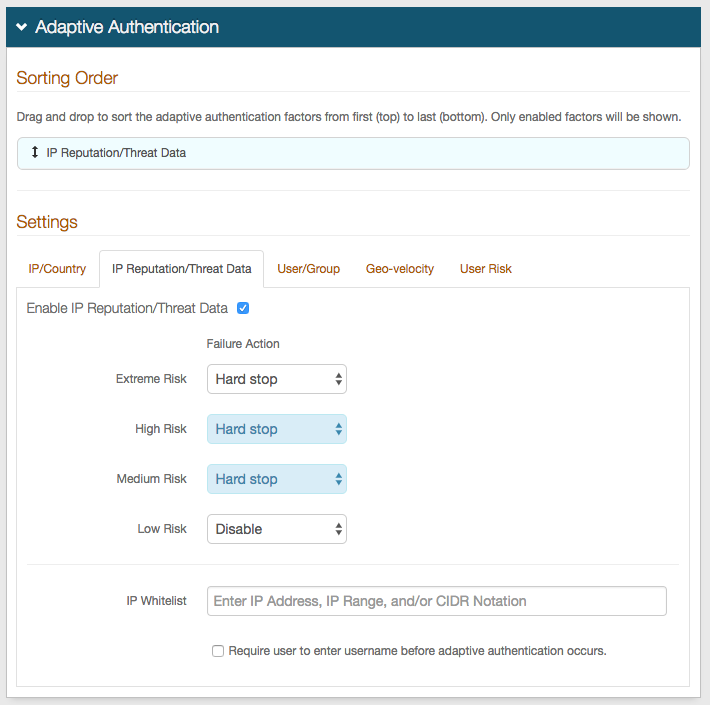 |
13. Check to Enable IP Reputation / Threat Data
14. Select Hard stop from the Failure Action dropdowns for Extreme Risk, High Risk, and Medium Risk
15. Select Disable from the Failure Action dropdown for Low Risk
Geo-velocity
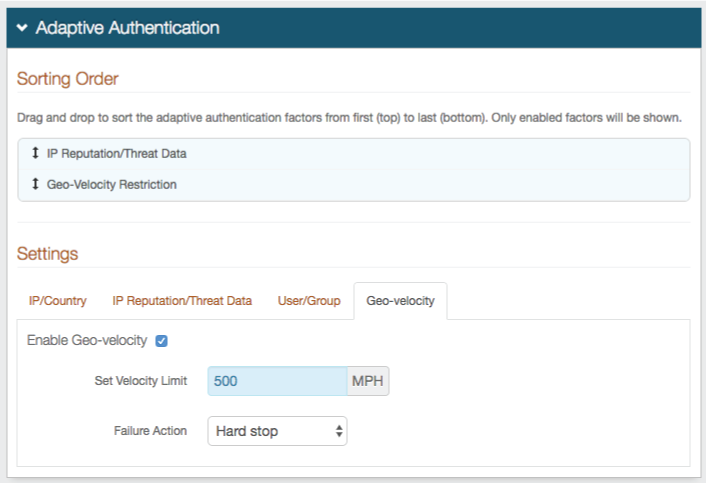 |
16. Check to Enable Geo-velocity
17. Set Velocity Limit to 500 MPH
18. Select Hard stop from the Failure Action dropdown
Warning
Click Save once the configurations have been completed and before leaving the Adaptive Authentication page to avoid losing changes
Multi-Factor Methods
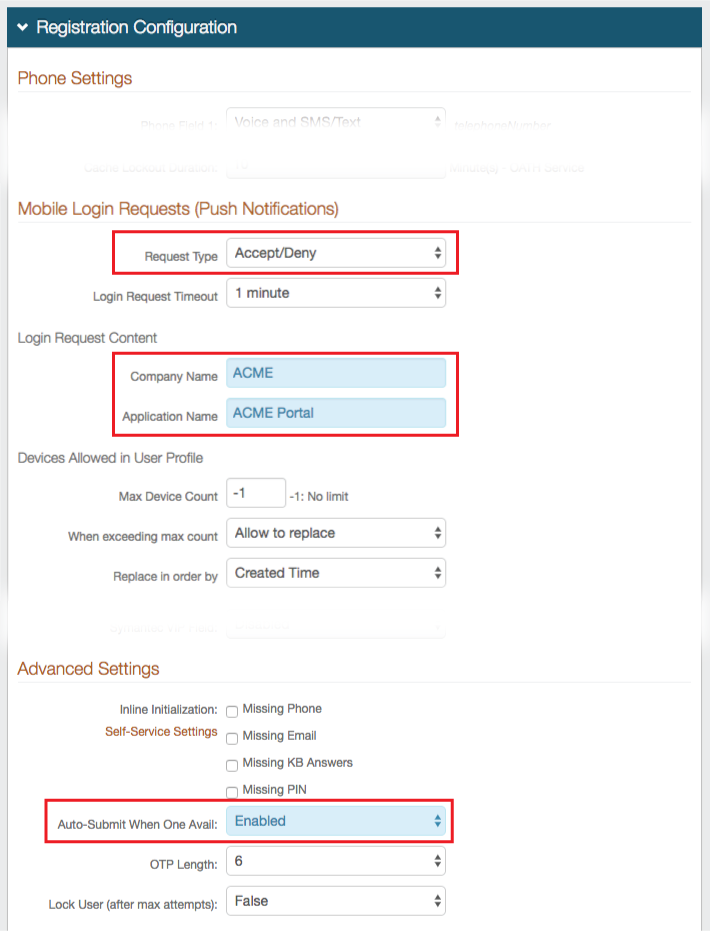 |
19. In the Registration Configuration section, under Mobile Login Requests (Push Notifications), select Accept / Deny from the Request Type dropdown
20. Set the Company Name to the name of the company, which appears on the login request
21. Set the Application Name to a friendly name to identify the Passwordless Portal, which appears on the login request
22. Under Advanced Settings, select Enabled from the Auto-Submit When One Avail dropdown
Warning
Click Save once the configurations have been completed and before leaving the Multi-Factor Methods page to avoid losing changes
Post Authentication
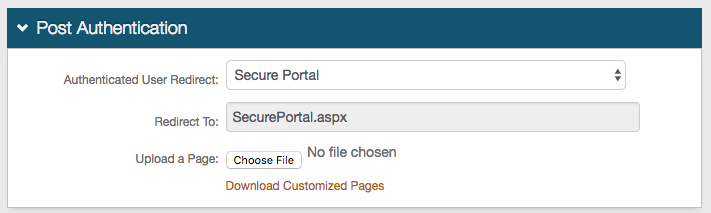 |
23. In the Post Authentication section, select Secure Portal from the Authenticated User Redirect dropdown
Warning
Click Save once the configurations have been completed and before leaving the Post Authentication page to avoid losing changes
Portal Page
 |
24. Select View and Configure the portal page
Portal Page Builder
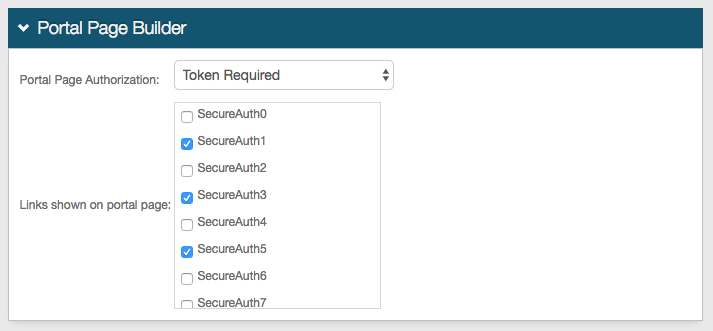 |
25. Select Token Required from the Portal Page Authorization dropdown
26. Select the SecureAuth IdP realms that appear on the Passwordless Portal page from the Links shown on portal page section
Warning
Click Save once the configurations have been completed and before leaving the Portal Page Builder page to avoid losing changes
Forms Auth / SSO Token
 |
27. Back in the Post Authentication tab, select View and Configure Forms Auth Keys / SSO Token
Machine Key
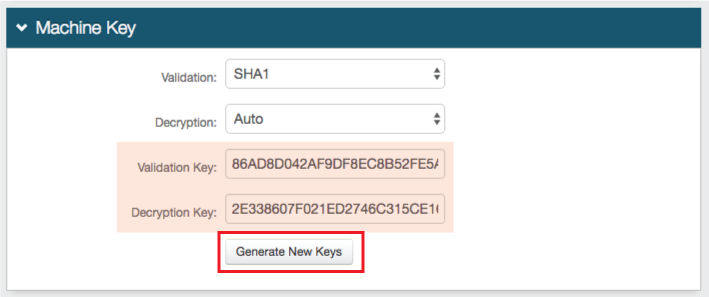 |
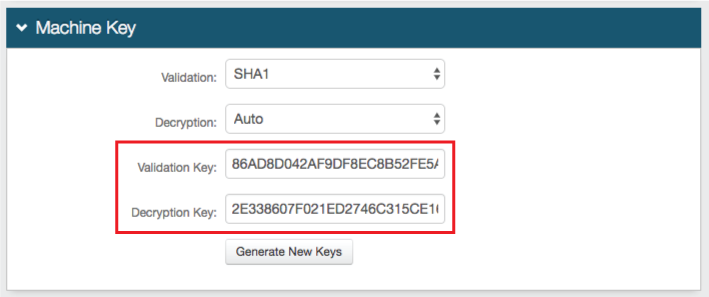
28. Click Generate New Keys, which populates the Validation Key and Decryption Key fields
Notice
Note the Validation Key and Decryption Key values as they are used in Realm B and Realm C configuration steps
Authentication Cookies
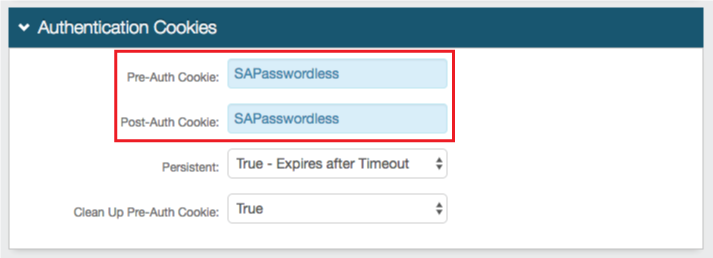 |
29. Set the Pre-Auth Cookie and Post-Auth Cookie to SAPasswordless
Warning
Click Save once the configurations have been completed and before leaving the Forms Auth page to avoid losing changes
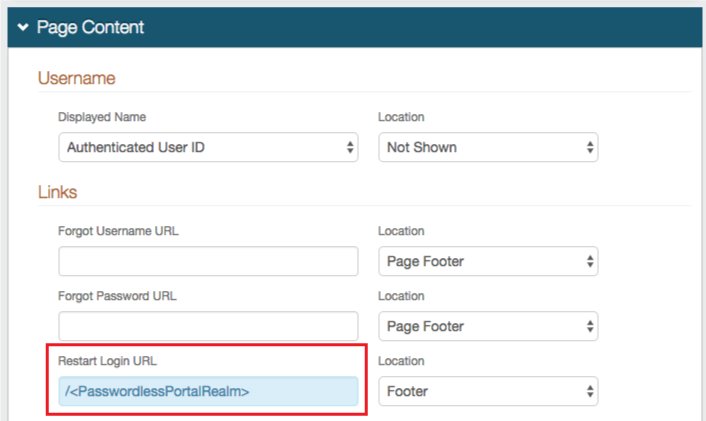 |
1. In the Page Content section, set the Restart Login URL to the Passwordless Portal Realm (Realm A - configured above), e.g. /secureauth2
Notice
If the Passwordless Portal (Realm A) and the Passwordless Fingerprint Enrollment Portal (Realm B - current) are on the same appliance (i.e. have the same domain), then only the realm name is required (e.g. /secureauth2); if the two realms are on different appliances, then the full domain is required (e.g. https://secureauth.company.com/secureauth2)
Warning
Click Save once the configurations have been completed and before leaving the Overview page to avoid losing changes
 |
2. In the Profile Fields section, map a Phone property (e.g. Phone 2 to the directory attribute that contains the user's mobile telephone number
3. Map the Fingerprints and Push Notification Tokens properties to distinct directory attributes that meet the following requirements:
The two Properties can be stored as Plain Binary or in JSON format, and has distinct requirements for the LDAP directory attribute mapped to the Property based on the Data Format selection
For Plain Binary, these requirements must be met for the directory field that contains the Fingerprint information:
Length: 8 kB minimum per Fingerprint Record; and if the Total FP Max Count is set to -1, then the size must be unlimited
Data Type: Octet string (bytes)
Multi-valued
For JSON, these requirements must be met for the directory field that contains the Fingerprint information:
Length: No limit / undefined
Data Type: DirectoryString
Multi-valued
For Plain Binary, these requirements must be met for the directory field that contains the Push Notification Token:
Length: 4096 minimum
Data Type: Octet string (bytes)
Multi-valued
For JSON, these requirements must be met for the directory field that contains the Push Notification Token:
Length: 4096 minimum
Data Type: DirectoryString
Multi-valued
In typical AD deployments, the Data Format is Plain Binary and the audio (Fingerprints) and jpegPhoto (Push) directory fields are utilized
4. Check Writable for the Fingerprints and Push Notification Tokens properties
Warning
Click Save once the configurations have been completed and before leaving the Data page to avoid losing changes
|
5. In the Device Recognition Method section, select Certification Enrollment and Validation from the Integration Method dropdown
6. Select Device / Browser Fingerprinting from the Client Side Control dropdown
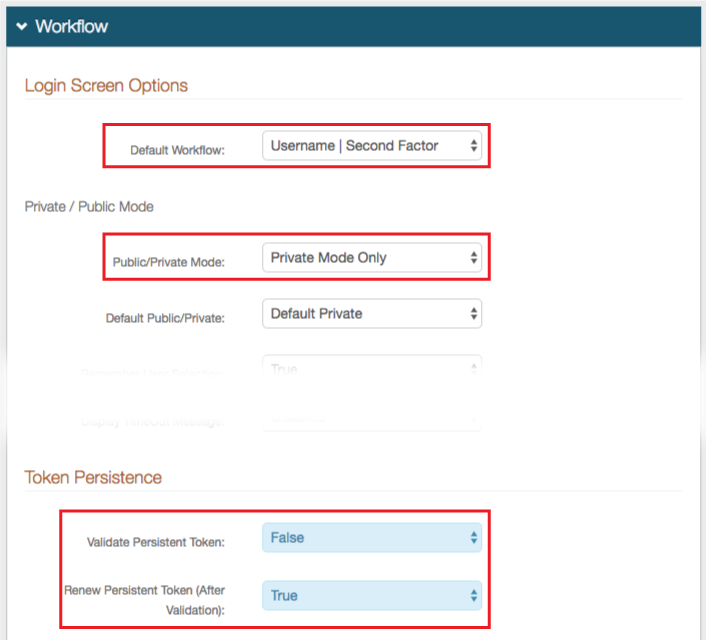 |
7. Select Username | Second Factor from the Default Workflow dropdown
8. Select Private Mode Only from the Public / Private Mode dropdown
9. Select False from the Validate Persistent Token dropdown
10. Select True from the Renew Persistent Token (after validation) dropdown
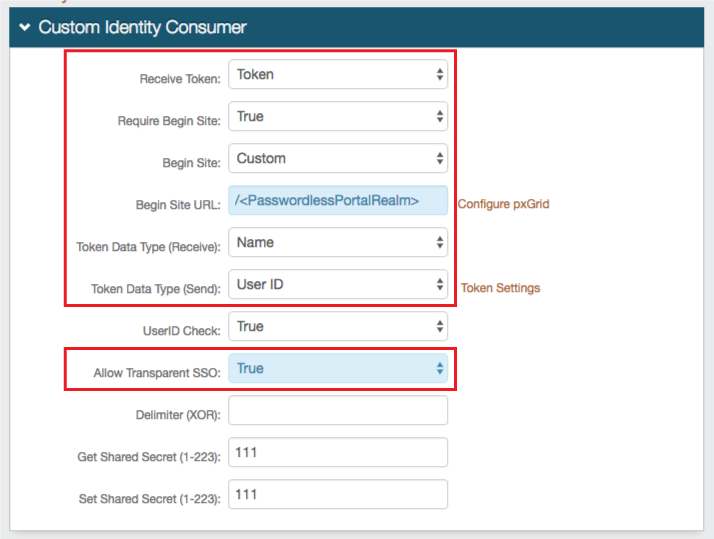 |
11. Select Token from the Receive Token dropdown
12. Select True from the Require Begin Site dropdown
13. Select Custom from the Begin Site dropdown
14. Set the Begin Site URL to the Password Portal Realm, e.g. /secureauth2
Notice
If the Passwordless Portal (Realm A) and the Passwordless Fingerprint Enrollment Portal (Realm B - current) are on the same appliance (i.e. have the same domain), then only the realm name is required (e.g. /secureauth2); if the two realms are on different appliances, then the full domain is required (e.g. https://secureauth.company.com/secureauth2)
15. Select Name from the Token Data Type (Receive) dropdown
16. Select User ID from the Token Data Type (Send) dropdown
17. Select True from the Allow Transparent SSO dropdown
Warning
Click Save once the configurations have been completed and before leaving the Workflow page to avoid losing changes
|
18. Check to Enable IP Reputation / Threat Data
19. Select Hard stop from the Failure Action dropdowns for Extreme Risk, High Risk, and Medium Risk
20. Select Disable from the Failure Action dropdown for Low Risk
|
21. Check to Enable Geo-velocity
22. Set Velocity Limit to 500 MPH
23. Select Hard stop from the Failure Action dropdown
Warning
Click Save once the configurations have been completed and before leaving the Adaptive Authentication page to avoid losing changes
 |
24. In the Registration Configuration section, Disable ALL registration methods
25. Under Phone Settings, select SMS / Text Only from the Phone Field X dropdown
Notice
Select the Phone Field that is mapped to the user's mobile phone number (step 2)
26. Select SMS / Text from the Phone / SMS Selected dropdown
27. Under Advanced Settings, select Enabled from the Auto-Submit When One Avail dropdown
28. Select 6 from the OTP Length dropdown
Warning
Click Save once the configurations have been completed and before leaving the Multi-Factor Methods page to avoid losing changes
|
29. In the Post Authentication section, select Secure Portal from the Authenticated User Redirect dropdown
Warning
Click Save once the configurations have been completed and before leaving the Post Authentication page to avoid losing changes
|
30. Select View and Configure the portal page
|
31. Select Token Required from the Portal Page Authorization dropdown
32. Select the same SecureAuth IdP realms that are selected in Realm A (step 26) from the Links shown on portal page section
Warning
Click Save once the configurations have been completed and before leaving the Portal Page Builder page to avoid losing changes
|
33. Back in the Post Authentication tab, select View and Configure Forms Auth Keys / SSO Token
 |
34. Copy and paste the values that were generated in Realm A (step 28) into the Validation Key and Decryption Key fields
Notice
The Validation Key and Decryption Key values are the same in Realms A, B, and C (Realm C configured below)
|
35. Set the Pre-Auth Cookie and Post-Auth Cookie to SAPasswordless
Warning
Click Save once the configurations have been completed and before leaving the Forms Auth page to avoid losing changes
|
1. In the Profile Fields section, map a Phone property (e.g. Phone 2 to the directory attribute that contains the user's mobile telephone number
2. Map the Fingerprints and Push Notification Tokens properties to distinct directory attributes that meet the following requirements:
The two Properties can be stored as Plain Binary or in JSON format, and has distinct requirements for the LDAP directory attribute mapped to the Property based on the Data Format selection
For Plain Binary, these requirements must be met for the directory field that contains the Fingerprint information:
Length: 8 kB minimum per Fingerprint Record; and if the Total FP Max Count is set to -1, then the size must be unlimited
Data Type: Octet string (bytes)
Multi-valued
For JSON, these requirements must be met for the directory field that contains the Fingerprint information:
Length: No limit / undefined
Data Type: DirectoryString
Multi-valued
For Plain Binary, these requirements must be met for the directory field that contains the Push Notification Token:
Length: 4096 minimum
Data Type: Octet string (bytes)
Multi-valued
For JSON, these requirements must be met for the directory field that contains the Push Notification Token:
Length: 4096 minimum
Data Type: DirectoryString
Multi-valued
In typical AD deployments, the Data Format is Plain Binary and the audio (Fingerprints) and jpegPhoto (Push) directory fields are utilized
3. Check Writable for the Fingerprints and Push Notification Tokens properties
Warning
Click Save once the configurations have been completed and before leaving the Data page to avoid losing changes
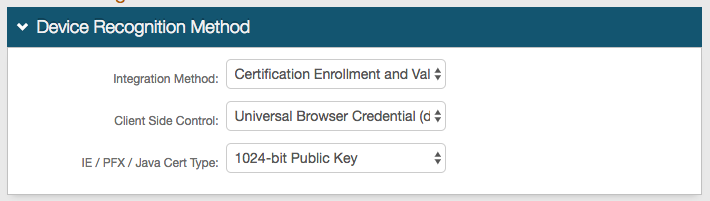 |
4. In the Device Recognition Method section, select Certification Enrollment and Validation from the Integration Method dropdown
5. Select Universal Browser Credential (deprecated) from the Client Side Control dropdown
6. Select 1024-bit Public Key from the IE / PFX / Java Cert Type dropdown
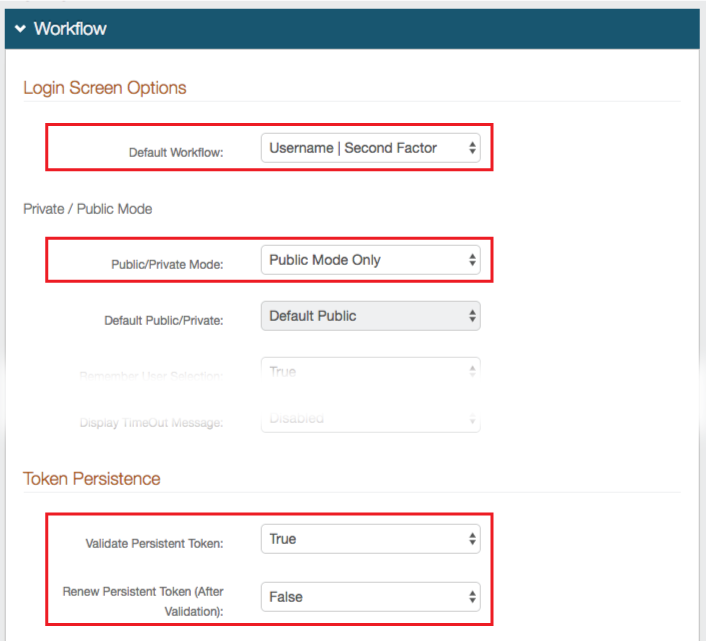 |
7. Select Username | Second Factor from the Default Workflow dropdown
8. Select Public Mode Only from the Public / Private Mode dropdown
9. Select True from the Validate Persistent Token dropdown
10. Select False from the Renew Persistent Token (after validation) dropdown
Warning
Click Save once the configurations have been completed and before leaving the Workflow page to avoid losing changes
|
11. Check to Enable IP Reputation / Threat Data
12. Select Hard stop from the Failure Action dropdowns for Extreme Risk, High Risk, and Medium Risk
13. Select Disable from the Failure Action dropdown for Low Risk
|
14. Check to Enable Geo-velocity
15. Set Velocity Limit to 500 MPH
16. Select Hard stop from the Failure Action dropdown
Warning
Click Save once the configurations have been completed and before leaving the Adaptive Authentication page to avoid losing changes
|
17. In the Registration Configuration section, Disable ALL registration methods
18. Under Phone Settings, select SMS / Text Only from the Phone Field X dropdown
Notice
Select the Phone Field that is mapped to the user's mobile phone number (step 1)
19. Select SMS / Text from the Phone / SMS Selected dropdown
20. Under Advanced Settings, select Enabled from the Auto-Submit When One Avail dropdown
21. Select 6 from the OTP Length dropdown
Warning
Click Save once the configurations have been completed and before leaving the Multi-Factor Methods page to avoid losing changes
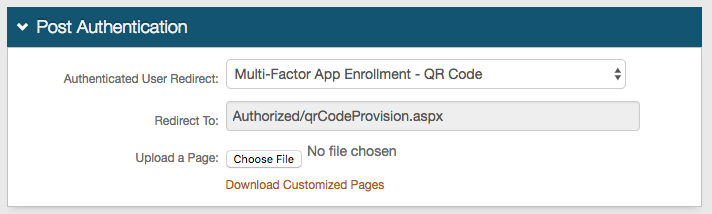 |
22. In the Post Authentication section, select Multi-Factor App Enrollment - QR Code from the Authenticated User Redirect dropdown
Refer to Multi-Factor App Enrollment (QR Code) Realm Configuration Guide (version 9.1 and 9.2) for full Post Authentication configuration steps
Warning
Click Save once the configurations have been completed and before leaving the Post Authentication page to avoid losing changes
|
23. Select View and Configure Forms Auth Keys / SSO Token
|
24. Copy and paste the values that were generated in Realm A (step 28) into the Validation Key and Decryption Key fields
Notice
The Validation Key and Decryption Key values are the same in Realms A, B, and C
|
25. Set the Pre-Auth Cookie and Post-Auth Cookie to SAPasswordless
Warning
Click Save once the configurations have been completed and before leaving the Forms Auth page to avoid losing changes
End-user Workflow Steps
Notice
Follow these end-user instructions to access the Passwordless Portal via the Passwordless workflow.
Once provisioned, end-users can log into the Passwordless Portal (Realm A) securely and without requiring multiple passwords for access to corporate resources
If accessing the Portal for the first time, then follow the Enrollment Access workflow; if the Portal has been accessed by the current device, then follow the Standard Access workflow
Enrollment Access
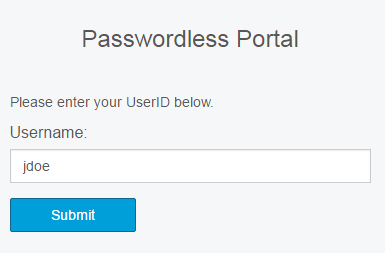 |
1. Navigate a browser to the Passwordless Portal URL (e.g. https://company.secureauth.com/secureauth2)
2. Provide the username, and click Submit
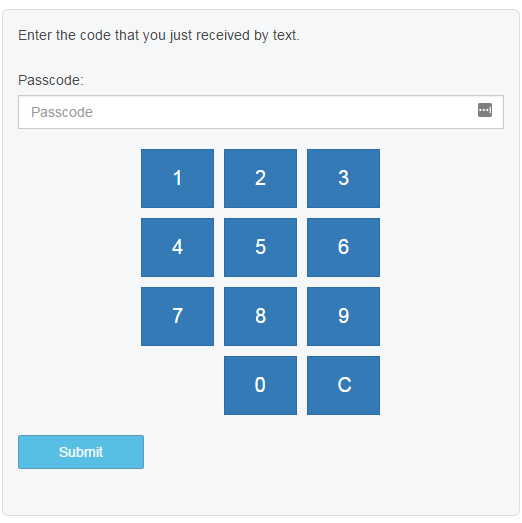 |
3. A One-time Passcode (OTP) is sent via SMS / Text to the mobile number
4. Enter in the OTP, and click Submit
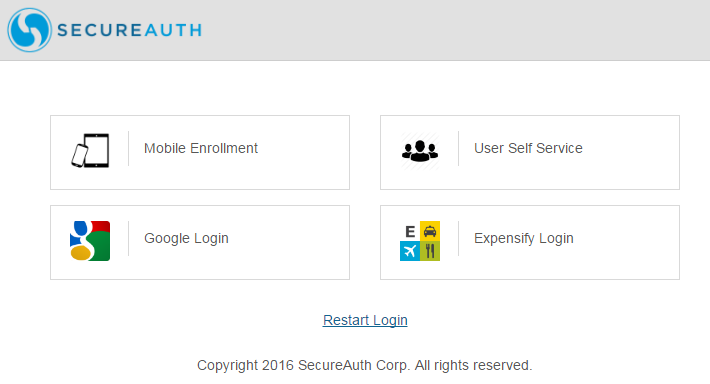 |
5. Upon validation of the OTP, the Portal Page appears, from which end-users can access associated resources / realms
Notice
Once the Enrollment Access workflow has been completed on a device, the Standard Access workflow can be used for subsequent logins
Standard Access
|
1. Navigate a browser to the Passwordless Portal URL (e.g. https://company.secureauth.com/secureauth2)
2. Provide the username, and click Submit
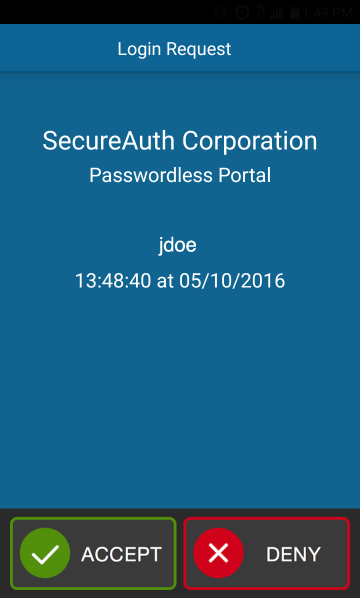 |
3. A Mobile Login Request (Push-to-Accept) is delivered to the device provisioned in Step 1 (above)
4. Tap the Accept button
|
5. Upon validation of the Login Request, the Portal Page appears, from which end-users can access associated resources / realms