Okta (SP-initiated) Integration Guide (SAML)
Introduction
Use this guide to enable Multi-Factor Authentication and Single Sign-on (SSO) access via SAML to Okta.
Prerequisites
1. Ensure there is account access to the Okta Administrator Dashboard
2. Create a New Realm in the SecureAuth IdP Web Admin for the Okta integration
3. Configure the following tabs in the Web Admin before configuring the Post Authentication tab:
Overview – the description of the realm and SMTP connections must be defined
Data – an enterprise directory must be integrated with SecureAuth IdP
Workflow – the way in which users will access this application must be defined
Multi-Factor Methods – the Multi-Factor Authentication methods that will be used to access this page (if any) must be defined
SecureAuth IdP Configuration Steps
Post Authentication
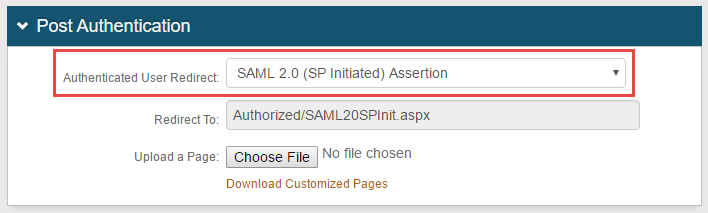 |
1. In the Post Authentication section, select SAML 2.0 (SP Initiated) Assertion from the Authenticated User Redirect dropdown 2. The unalterable URL (Authorized/SAML20SPInit.aspx) appears in the Redirect To field – this URL will append to the domain name and realm number in the address bar
SAML Assertion / WS Federation
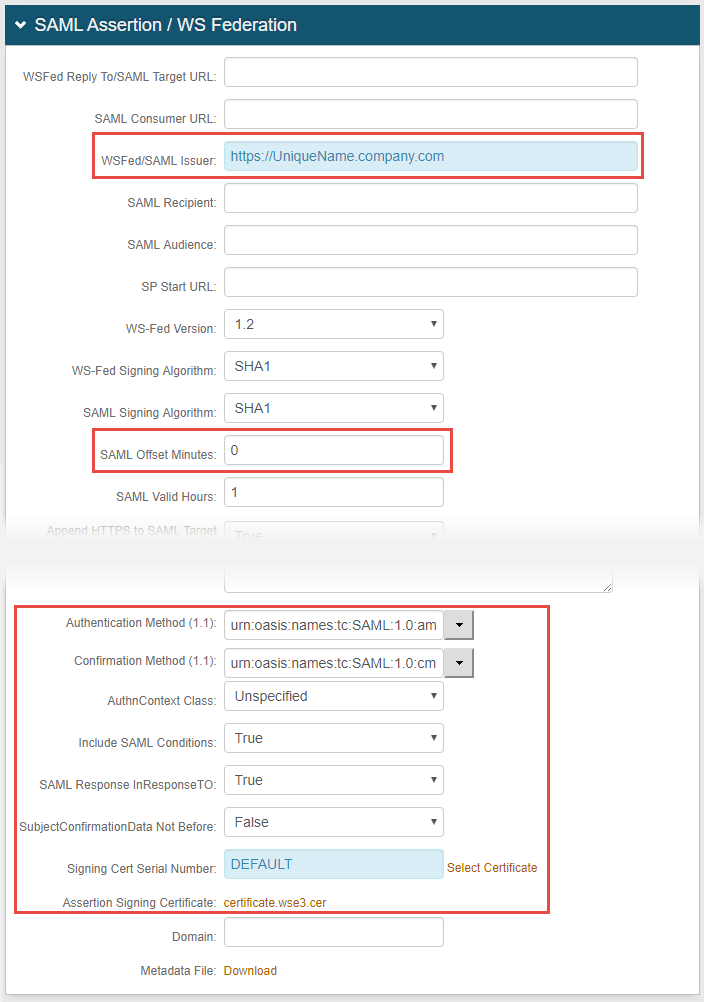 |
3. Set the WSFed/SAML Issuer to a unique name to be shared with Okta
Note
The URL in this field will be issued to Okta
4. Ensure the following settings are made
a. SAML Offset Minutes is set at 0 (zero)
b. urn:oasis:names:tc:SAML:1.0:amX509-PKI is selected from the Authentication Method (1.1) dropdown
c. urn:oasis:names:tc:SAML:1.0:cm:bearer is selected from the Authentication Method (1.1) dropdown
d. Unspecified is selected from the AuthnContextClass dropdown
e. True is selected from the Include SAML Conditions dropdown
f. True is selected from the SAML Response InResponseTO dropdown
g. False is selected from the SubjectConfirmationData Not Before dropdown
5. Leave the Signing Cert Serial Number as the default value, unless a third-party certificate is being used for the SAML assertion
If using a third-party certificate, click Select Certificate and choose the appropriate certificate
6. Click certificate.wse3.cer to download the certificate
Warning
Click Save once the configurations have been completed and before leaving the Post Authentication page to avoid losing changes
Okta Configuration Steps
Identity Providers
 |
1. On the Administrator Dashboard,select Identity Providers from the Security dropdown
2. Click Add Identity Provider
Add Identity Provider
 |
3. In the GENERAL SETTINGS section, enter the Name of the Identity Provider – e.g. SecureAuth IDP
4. For Protocol, only SAML 2.0 is supported
5. In the AUTHENTICATION SETTINGS section, use the default ldpuser.subjectNameId for the IdP username
6. Select Okta Username from the Match against dropdown
This setting indicates the Okta username field will be matched against the SecureAuth IdP username to authenticate the end-user
7. In the SAML PROTOCOL SETTINGS section, the IdP Issuer URI shows the value entered in the WSFed/SAML Issuer field in step 3 of SecureAuth IdP Configuration Steps
8. Enter the IdP Single Sign-On URL – e.g. https://companyname.com/SecureAuth#
9. Click Browse files to find and select the certificate.wse3.cer file to upload toIdP Signature Certificate
This certificate from SecureAuth IdP is used to sign the assertion
10. Under Advanced Settings, select HTTP REDIRECT from the Request Binding dropdown
This specifies the type of SAML Authentication Request Protocol binding Okta will use to send SAML AuthNRequest messages to SecureAuth IdP
11. For Request Signature, disable Sign SAML Authentication Requests
12. Select SHA-1 from the Response Signature Algorithm dropdown to specify the minimum signature algorithm when validating SAML messages and assertions issued by SecureAuth IdP
13. In Destination, input the same URL entered inIdP Single Sign-On URL for the Destination attribute to be sent in the SAML authN request – e.g. https://companyname.com/SecureAuth#
14. In Max Clock Skew, set the value for the length of time in which the assertion is valid
The difference between the current time and assertion timestamp is calculated to ensure the time difference is not more than the entered value
15. Click Add Identity Provider to save the configuration