Ellucian Banner (SP-initiated) integration guide
Introduction
Use this guide to enable Multi-Factor Authentication and Single Sign-on (SSO) access via SAML to Ellucian Banner.
Prerequisites
Ellucian Self-Service Banner (SSB) account
Admin access to SSB SSO Manager
SecureAuth IdP version 9.1 or greater, with a realm ready for the Ellucian Banner integration
SecureAuth IdP configuration steps
1. Log on to your SecureAuth IdP Admin console.
Post Authentication section
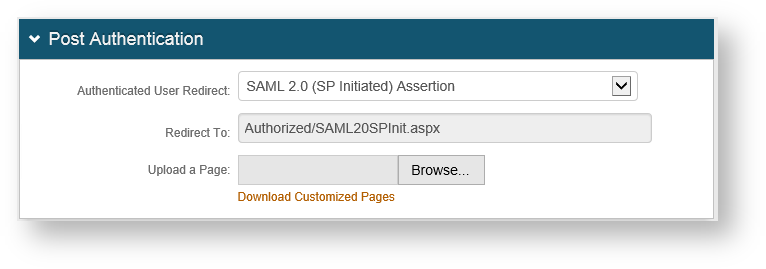
2. Go to the Post Authentication tab.
3. From the Authenticated User Redirect drop-down list, select SAML 2.0 (SP Initiated) Assertion which autopopulates the Redirect To field as shown in the following screen capture.
User ID Mapping section
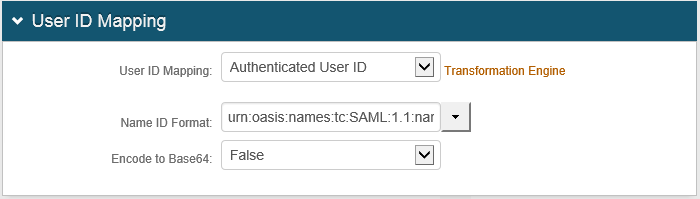
4. From the User ID Mapping drop-down list, select the SecureAuth IdP Property that corresponds to the directory field containing the SSB usernames (Authenticated User ID).
5. From the Name ID Format drop-down list, select urn:oasis:names:tc:SAML:1.1:nameid-format:unspecified.
6. From the Encode to Base64 drop-down list, select False.
An example of these settings is shown next.
 |
SAML Assertion / WS Federation section
7. In the SAML Consumer URL field, set the URL to the AssertionConsumerService Location found the SSB SP metadata (for example, https://account.banner.edu/ssomanager/saml/SSO/)
8. In the WSFed/SAML Issuer field, set the URL to the SecureAuth IdP Realm (for example, https://idp.secureauth.com/SecureAuth2).
9. In the SAML Recipient field, set the URL to the SSB ACS (similar to the URL set in the SAML Consumer URL field).
10. In the SP Start URL field, set the logon URL for SSB (for example, https://account.banner.edu/ssomanager/saml/login?relayState=)
An example of these settings is shown next.
 |
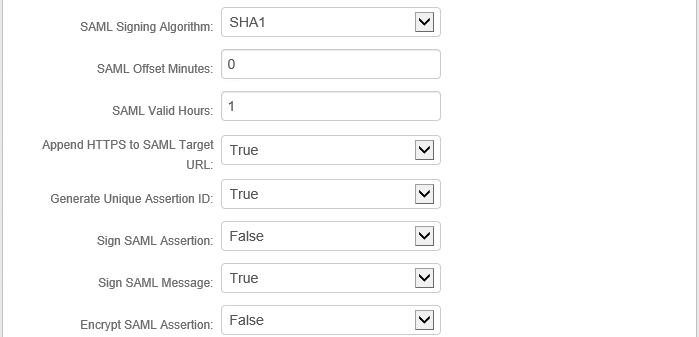
11. From the SAML Signing Algorithm list, select SHA1.
12. From the Sign SAML Assertion list, select False.
13. From the Sign SAML Message list, select True.
An example of these settings is shown next.
 |
14. Leave the Signing Cert Serial Number as the default value.
Otherwise, to use a third-party certificate for the SAML assertion, click Select Certificate and choose the appropriate certificate.
15. Click Save.
SAML Attributes / WS Federation section
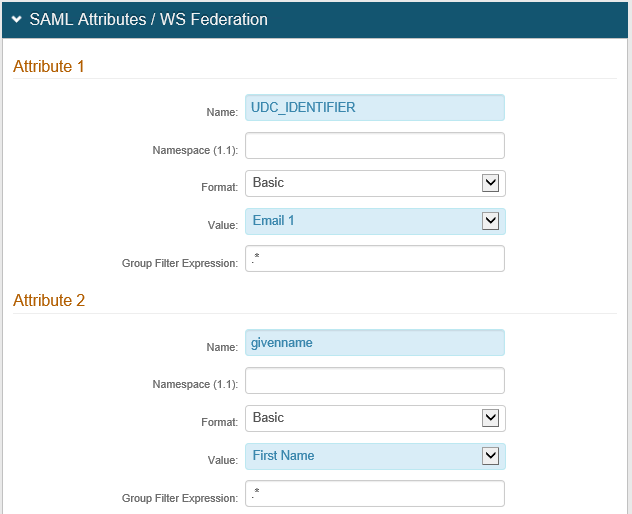
16. In the Attribute 1 section, do the following:
a. In the Name field, enter UDC_IDENTIFIER (or the corresponding value for UDC ID Key in the SSB Configuration page).
b. From the Value drop-down list, select Email 1 (or the Property containing the SSB usernames).
17. In the Attribute 2 section, do the following:
a. In the Name field, enter givenname.
b. From the Value drop-down list, select First Name.
An example of these settings is shown next.
 |
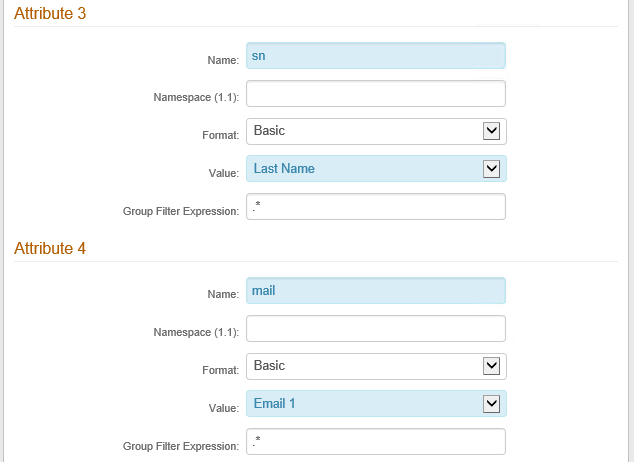
18. In the Attribute 3 section, do the following:
a. In the Name field, enter sn.
b. From the Value drop-down list, select Last Name.
19. In the Attribute 4 section, do the following:
a. In the Name field, enter mail.
b. From the Value drop-down list, select Email 1.
An example of these settings is shown next.
 |
20. Click Save.
Banner configuration steps
1. Log on to the server hosting the SSO Manager.
2. Go to the directory containing the SSOMgrCredMgmt-installer.jar file.
3. In the command prompt, execute:
java -jar SSOMgrCredMgmt-installer.jar
4. Click Next.
5. Select the Configure and Save EAR and Configure and Save SSO Client check boxes as shown in the screen capture.
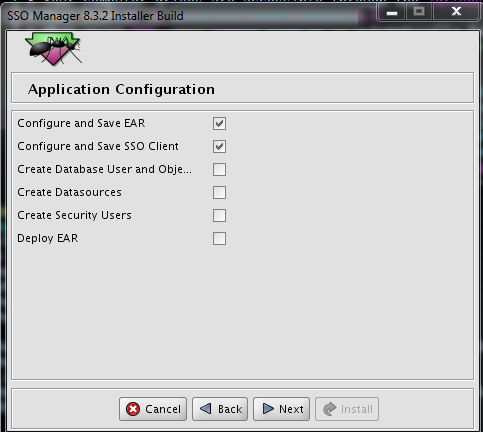 |
6. Click Next.
7. Select https.
8. In the SSOManager Host and SSOManager Port fields, enter the FQDN (for example, SSOMmanager Host: ssomgr.banner.edu; SSOManager Port: 443).
9. Click Next.
10. Enter the credentials for your SSO Manager Web Application. Click Next.
11. Select SAML 2.0. Click Next.
12. For the IDP Server Protocol, select https.
13. Enter the following information for your SecureAuth IdP environment:
a. IDP Server Entity Id: https://idp.secureauth.com/SecureAuth2
b. IDP Server Host: idp.secureauth.com
c. IDP Server Port: 443
d. IDP Server Context: SecureAuth2
e. IDP Server logout Context: SecureAuth2/logout.aspx
An example of these settings is shown next.
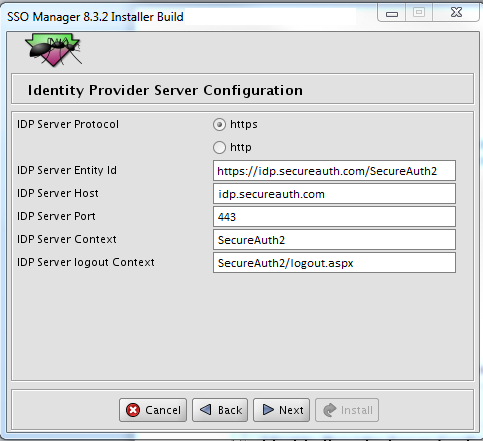 |
14. Click Next.
15. Click Select Folder and choose a location to save the Deployables.
16. From the Select Folder pop-up, click Select Folder.
17. Click Next and then click Install.
When installation completes, the message "BUILD SUCCESSFUL" displays with a Finished pop-up message.