YubiKey HOTP Device Provisioning and Multi-Factor Authentication Guide
Introduction
SecureAuth's Multi-Factor Authentication method, available in SecureAuth IdP version 9.2+, uses a YubiKey HOTP device on a Windows or Mac machine for a secure and hassle-free login access to the intended SecureAuth IdP realm.
HOTP Multi-Factor Authentication requires the YubiKey device to be configured to provide HMAC-based One-Time Password (OATH-HOTP) authentication – not OTP Multi-Factor Authentication – to access the realm.
One of the common uses for this type of Multi-Factor Authentication method is in an environment that uses Login for Endpoints.
This guide provides instructions for:
Administrators to configure SecureAuth IdP to enable YubiKey HOTP device provisioning.
Administrators to provision end-user YubiKey HOTP devices to use timed passcodes as a Multi-Factor Authentication method.
End-users to use their YubiKeys to access the Help Desk page for YubiKey HOTP device management.
Prerequisites
1. Ensure SecureAuth IdP v9.2 or later is running.
2. Create a New Realm or access an existing realm on which more than one Multi-Factor Authentication is required.
3. Configure the following tabs on the Web Admin in preparation for configuring Login for Endpoints:
Overview – the description of the realm and SMTP connections must be defined
Data – an enterprise directory must be integrated with SecureAuth IdP
Workflow – the way in which users will access the target must be defined
Multi-Factor Methods – the Multi-Factor Authentication methods that will be used to access the target must be defined
Post Authentication – the target resource or post authentication action must be defined
Logs – the logs that will be enabled or disabled for this realm must be defined
4. Ensure target end-user machines are running any of the following supported OS versions:
Supported OS Versions | |
|---|---|
Windows OS versions:
| Minimum macOS versions:
|
5. Download and install the YubiKey Personalization Tool from Yubico's website.
6. Ensure supported YubiKey device are used — refer to SecureAuth compatibility guide.
Note
IMPORTANT: If an end-user is already using a YubiKey device for YubiKey Multi-Factor Authentication on a SecureAuth IdP realm, the OATH seed and associated YubiKey device must be removed from the end-user's account in order to prevent a conflict when the end-user attempts to use a YubiKey device for HOTP authentication. (See the steps under End-user Multi-Factor Authentication in the YubiKey Multi-Factor Authentication Configuration Guide to remove the YubiKey device from the user account profile.)
NOTE: When using a YubiKey on a Mac, the device's Keyboard Setup Assistant wizard and / or the message "Your keyboard cannot be identified" may appear and can be disregarded. Refer to Yubico's How to get started with YubiKey on Mac OSes for steps on having the Mac recognize the YubiKey device.
SecureAuth IdP Configuration Steps
Data
 |
1. Create a new realm and configure a data store on the Data tab – configure the realm to let end-users enroll their YubiKey devices for using HOTP as a Multi-Factor Authentication method.
NOTE: Refer to Multi-Factor App Enrollment (URL) Realm Configuration Guide for information about configuring Timed Passcodes to enroll devices for Multi-Factor Authentication.
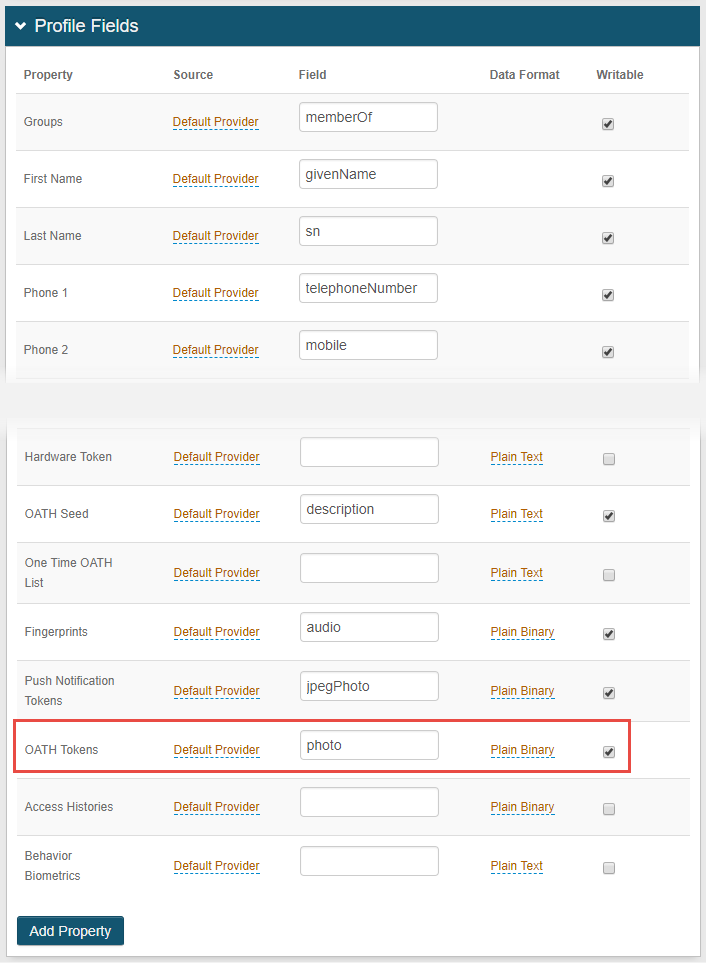
2. In the Profile Fields section, map the selected Field — example: Photo — to the 'OATH Tokens' Property.
This directory field must fulfill the following requirements:
Octet String (syntax: 2.5.5.10)
Multi-valued
Upper Range of at least 1024
3. Make this Property Writable.
Warning
Click Save once the configuration is complete and before leaving the Data page to avoid losing changes.
Workflow
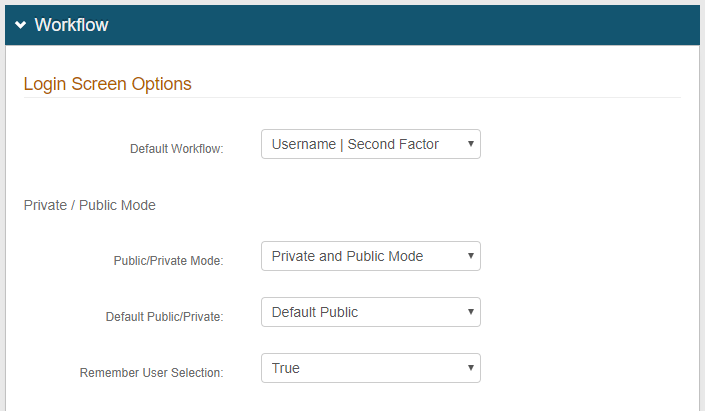 |
4. On the Workflow tab, under Login Screen Options, make a selection from the Default Workflow dropdown to specify the workflow to use.
5. Select Private and Public Mode from the Public / Private Mode dropdown.
6. Select Default Public from the Default Public / Private dropdown.
7. Select True from the Remember User Selection dropdown.
Warning
Click Save once the configuration is complete and before leaving the Workflow page to avoid losing changes.
Multi-Factor Methods
 |
8. On the Multi-Factor Methods tab, configure the Multi-Factor Authentication methods you want enabled.
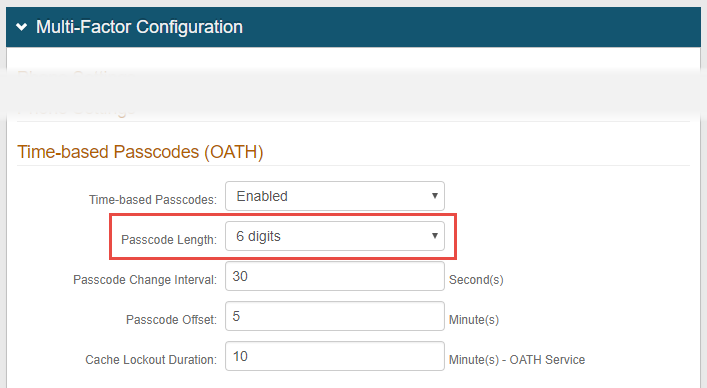
9. Under Time-based Passcodes (OATH), select Enabled from the Time-based Passcodes dropdown.
10. Select the Passcode Length the YubiKey devices will be programmed to generate — 6 digits or 8 digits.
Warning
Click Save once the configuration is complete and before leaving the Multi-Factor Methods page to avoid losing changes.
Post Authentication
Note
NOTE: Two separate Post Authentication configurations must be made on this realm:
In the first configuration (starting at step 11), Multi-Factor App Enrollment - URL is used to select and save the OATH token length.
In the second configuration (starting at step 18), Account Management is used to create the help desk page for managing the YubiKey device.
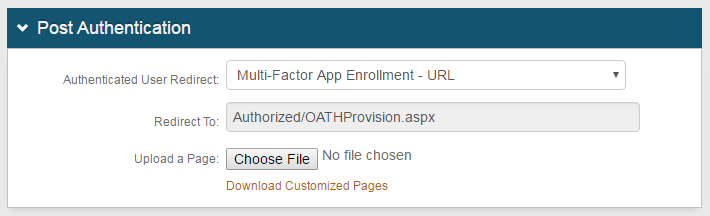 |
11. On the Post Authentication tab, in the Post Authentication section select Multi-Factor App Enrollment - URL from the Authenticated User Redirect dropdown.
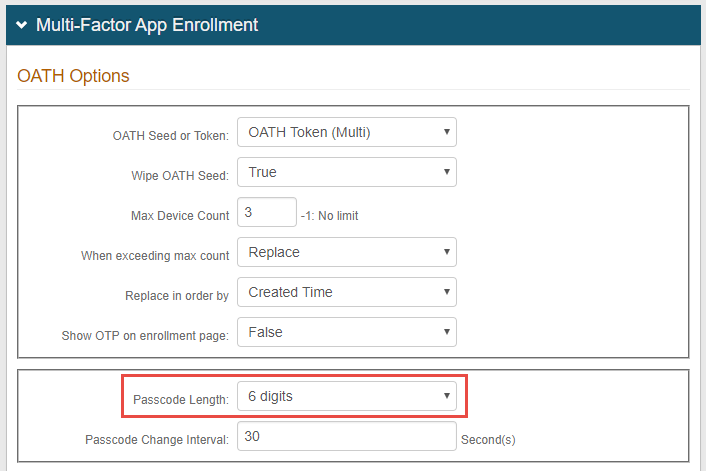 |
12. In the Multi-Factor App Enrollment section, select OATH Token (Multi) from the OATH Seed or Token dropdown.
13. Select True from the Wipe OATH Seed dropdown.
14. Set the Max Device Count for the total number of YubiKey devices each end-user is permitted to use.
15. Select Replace from the When exceeding max count dropdown to let end-users replace existing provisioned YubiKey devices with new ones after the maximum number of devices is met.
16. Select Created Time from the Replace in order by dropdown to replace the oldest OATH Token with the newest one.
17. Set the Passcode Length to the same setting configured in step 10.
Warning
Click Save once the configuration is complete and before leaving the Post Authentication page to avoid losing changes.
Post Authentication
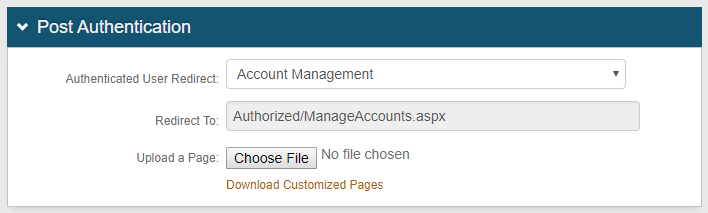 |
18. Return to the Post Authentication section and now select Account Management from the Authenticated User Redirect dropdown.
 |
19. In the Identity Management section, click Configure help desk page.
Help Desk Page
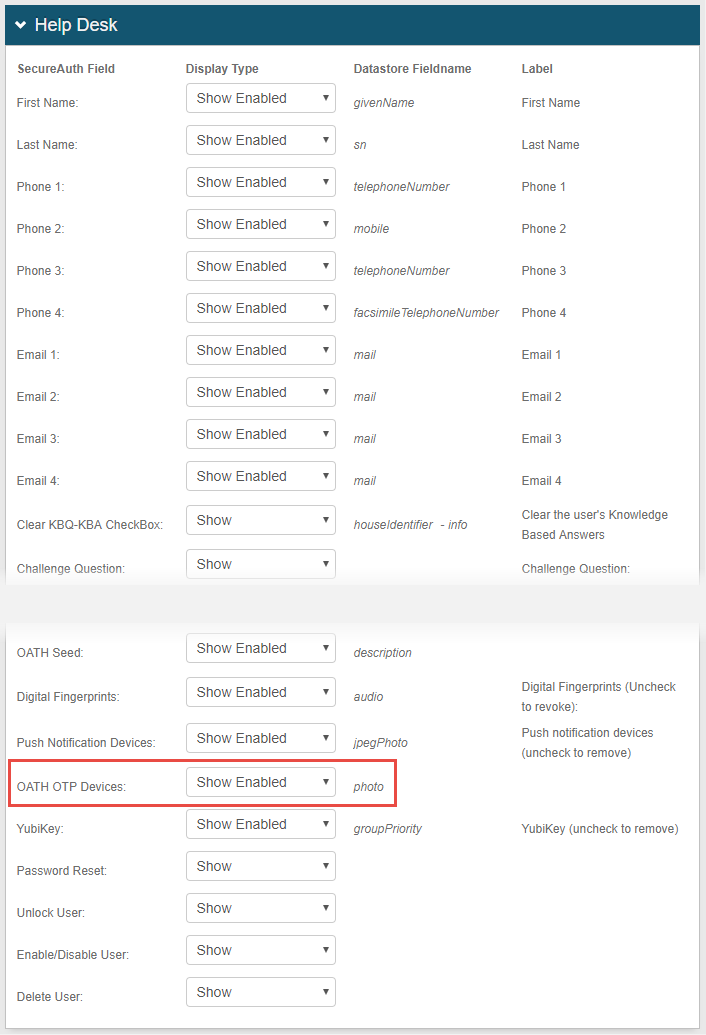 |
20. On the Help Desk configuration page, specify what will appear and can be managed on the admin Help Desk page.
Select Hide, Show Enabled, or Show Disabled for each SecureAuth IdP Field that was mapped to a Property on the Data tab.
NOTE: Be sure to select Show Enabled for OATH OTP Devices.
Warning
Click Save once the configuration is complete and before leaving the Help Desk page to avoid losing changes.
21. Return to the Post Authentication page and click Save.
Admin YubiKey HOTP Device Configuration and Provisioning Steps
YubiKey devices must be configured before they can generate HOTP passcodes. The YubiKey Personalization Tool must be used, along with a Portable Symmetric Key Container (PSKC) file that contains secret keys in plain value format, to provision the YubiKey devices.
YubiKey HOTP Device Configuration and PSKC File Creation
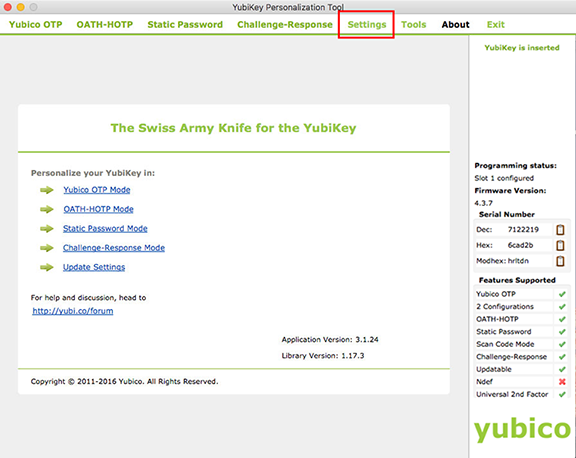 |
1. With the YubiKey Personalization Tool started, and the YubiKey device inserted in the machine, click Settings on the toolbar.
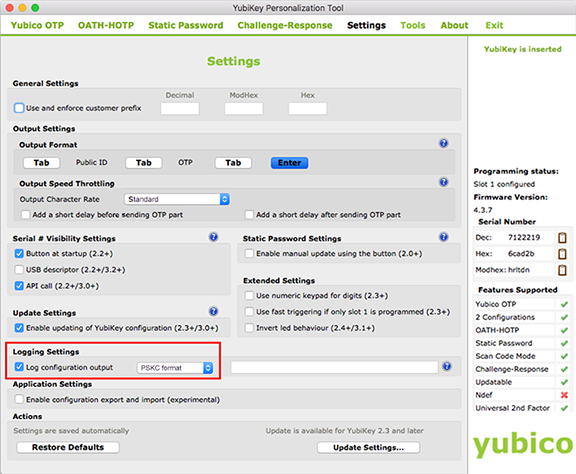 |
2. Under Logging Settings, check Log configuration output and select PSKC format.
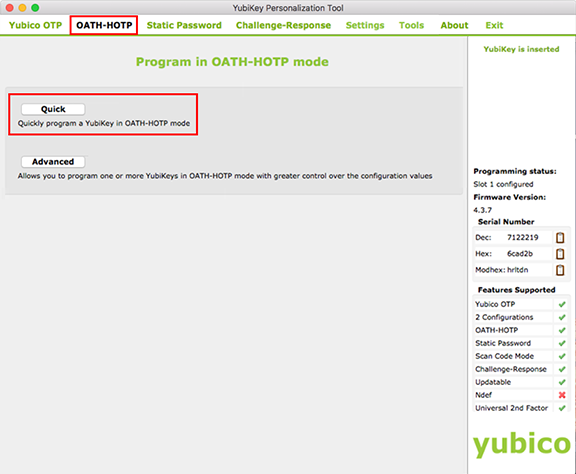 |
3. Click OATH-HOTP on the toolbar.
4. Click Quick to select that mode.
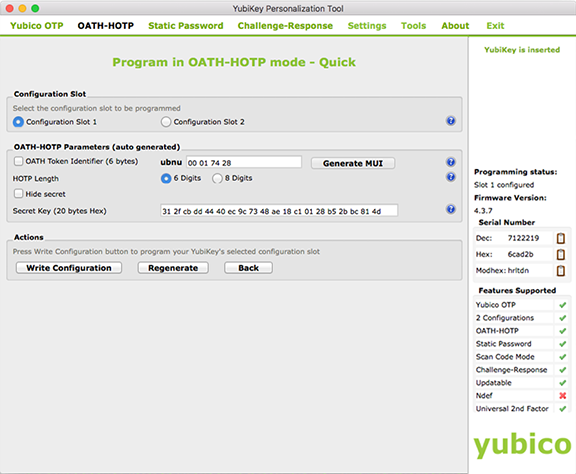 |
5. Under Configuration Slot, select the method you want the end-user to use for generating the YubiKey HOTP passcode:
If Configuration Slot 1 is selected, the user will tap the YubiKey to generate the passcode.
NOTE: While this selection is pre-configured for OTP, it will be easier for the end-user to use the YubiKey.
If Configuration Slot 2 is selected, the user will press the YubiKey to generate the passcode.
NOTE: While this selection is pre-configured for HOTP, it may be a little difficult for the end-user to use the YubiKey, since this option requires the user to press and hold the YubiKey for a few seconds until the passcode appears. A light press on the YubiKey will generate a string of characters, but not a passcode.
6. Under OATH-HOTP Parameters, select the HOTP Length configured on the Multi-Factor Methods tab of the Web Admin — 6 Digits or 8 Digits.
7. Uncheck both OATH Token Identifier and Hide secret.
8. Click Regenerate to populate the Secret Key field with a new, auto-generated, secret key in Hexadecimal format.
9. Click Write Configuration – a dialog box appears:
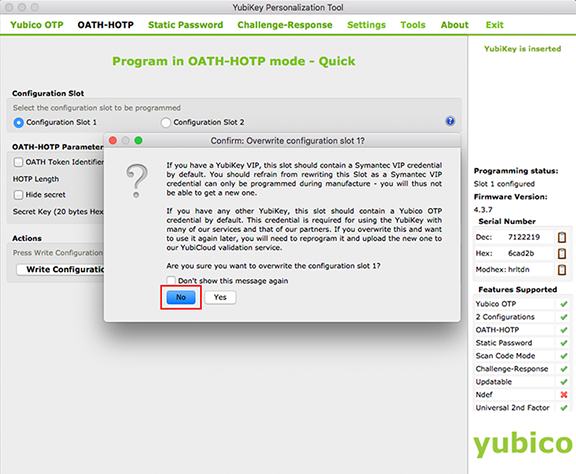
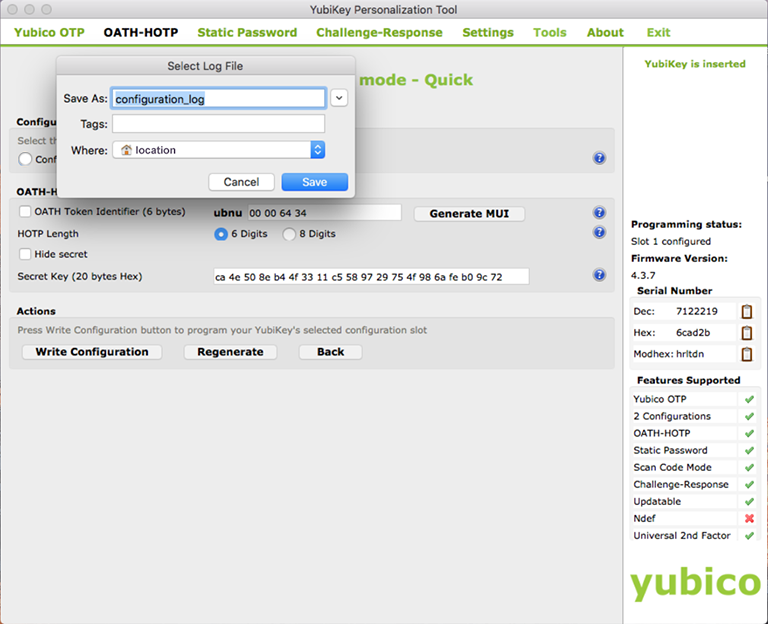
10. Save the configuration in the PSKC file named configuration_log.csv by default.
Note
The PSKC file contains the device serial number in the <SerialNo> field, and corresponding secret key converted to a plain value in the <Secret><PlainValue> field. This information must be entered for the end-user on the SecureAuth IdP YubiKey HOTP provisioning realm, as described in the YubiKey HOTP Provisioning Steps in the next set of instructions.
NOTE: Each time a YubiKey device configured, its serial number and secret key are stored in the same configuration_log.csv file, regardless of the session in which the device was configured. If a given device is re-configured, a new entry for the device appears in the PSKC file, with the newest configuration at the end of the file.
IMPORTANT: When provisioning YubiKey devices, it is important to use the latest entry for a given device in the PSKC file.
YubiKey HOTP Provisioning Steps
Follow the workflow set up on the YubiKey HOTP provisioning realm to provision a YubiKey device for HOTP authentication — the steps in this document may differ from the configuration used in your organization.
You will need the following information:
Device ID stamped on the YubiKey device and obtained from the PSKC file under <SerialNo>
Secret key for the YubiKey device obtained from the PSKC file under <Secret><PlainValue>
 |
1. With the end-user's YubiKey device inserted in their machine, select the private computer option, enter your administrator username, and click Submit.
Wait for a moment as SecureAuth IdP checks the browser for a user credential.
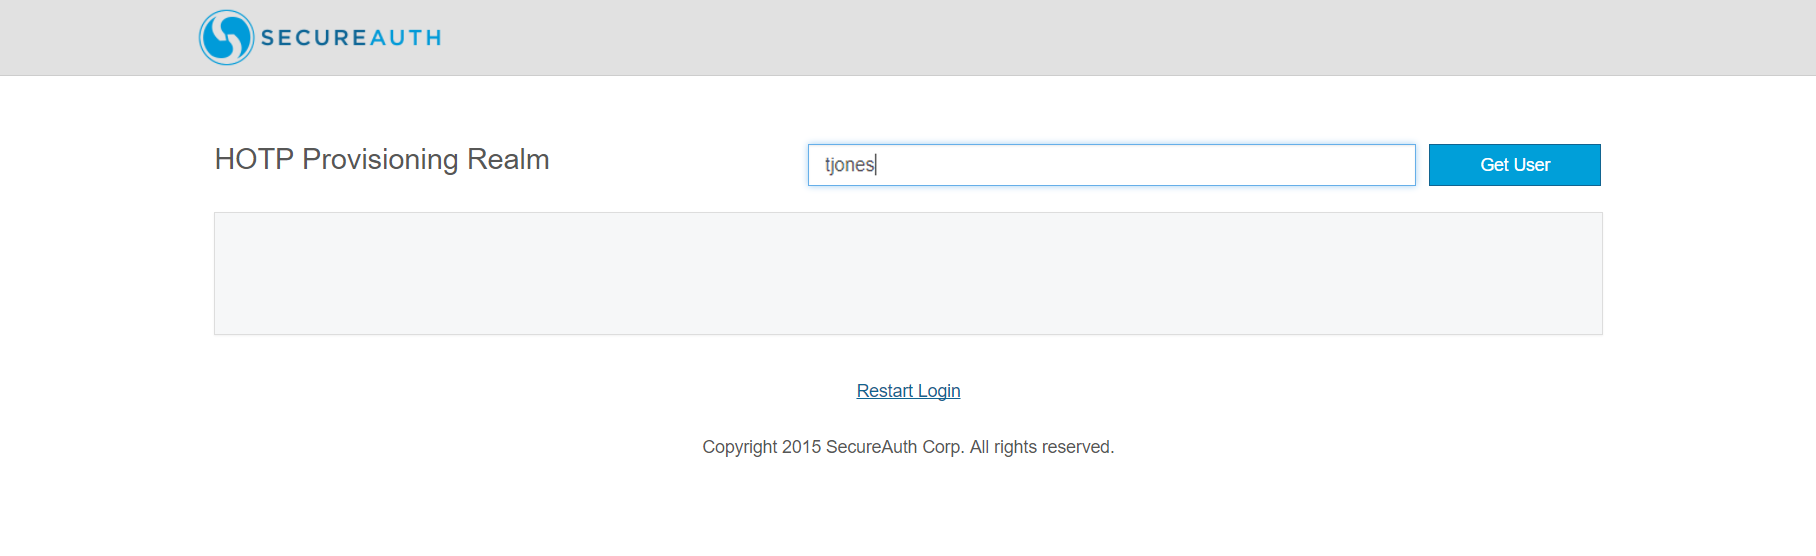 |
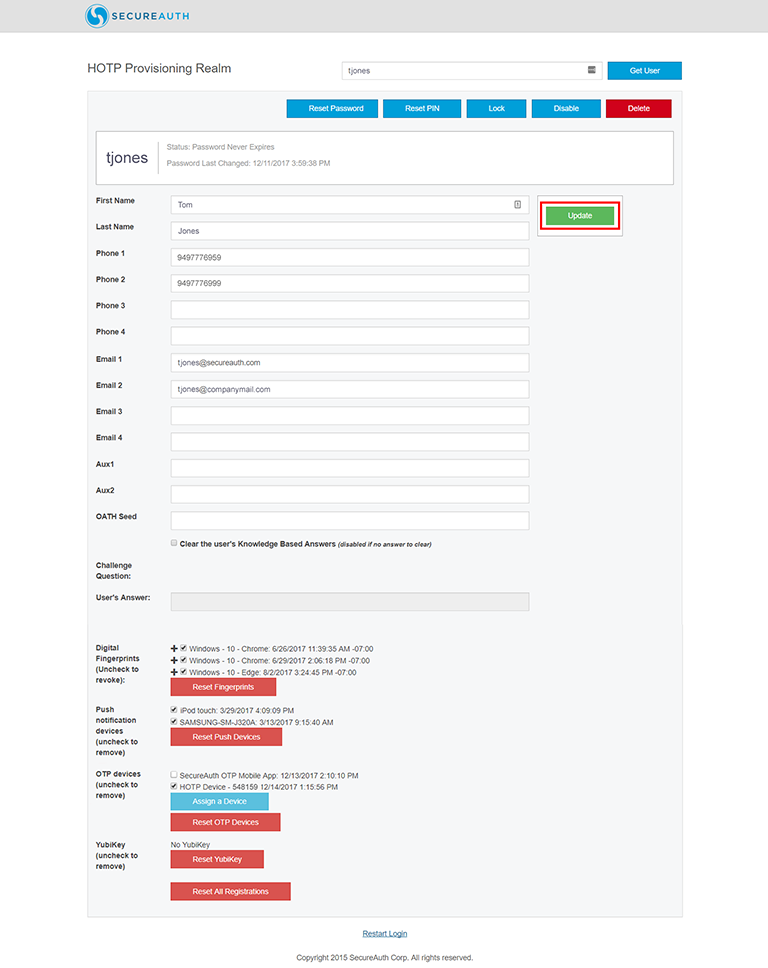
2. Enter the username of the account to be updated so that it will include a provisioned YubiKey HOTP device, and click Get User.
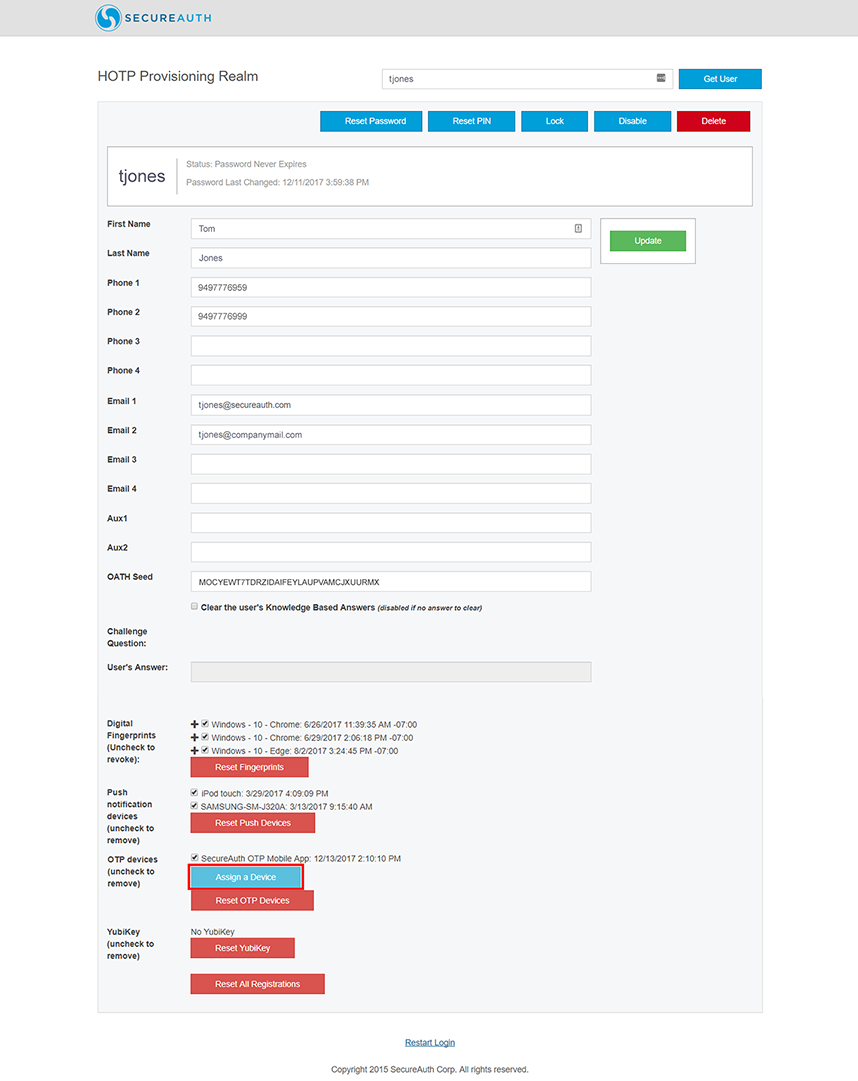 |
3. Under OTP devices, click Assign a Device.
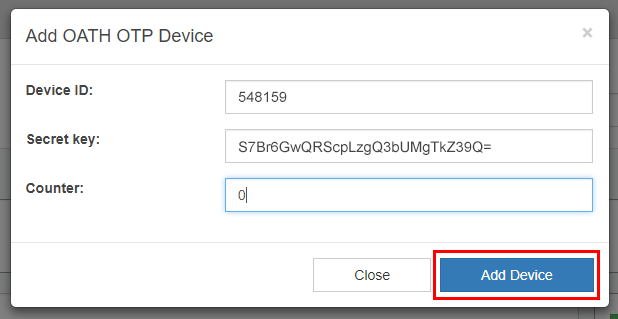 |
4. In the Add OATH OTP Device window, enter the Device ID stamped on the YubiKey device and also found under <SerialNo> in the PSKC file.
5. Copy the value from the <Secret><PlainValue> in the PSKC file, and paste it in the Secret key field.
NOTE: If more than one entry appears in the PSKC file for this YubiKey, be sure to use the latest plain value saved for this device.
6. Enter 0 for the Counter number.
7. Click Add Device.
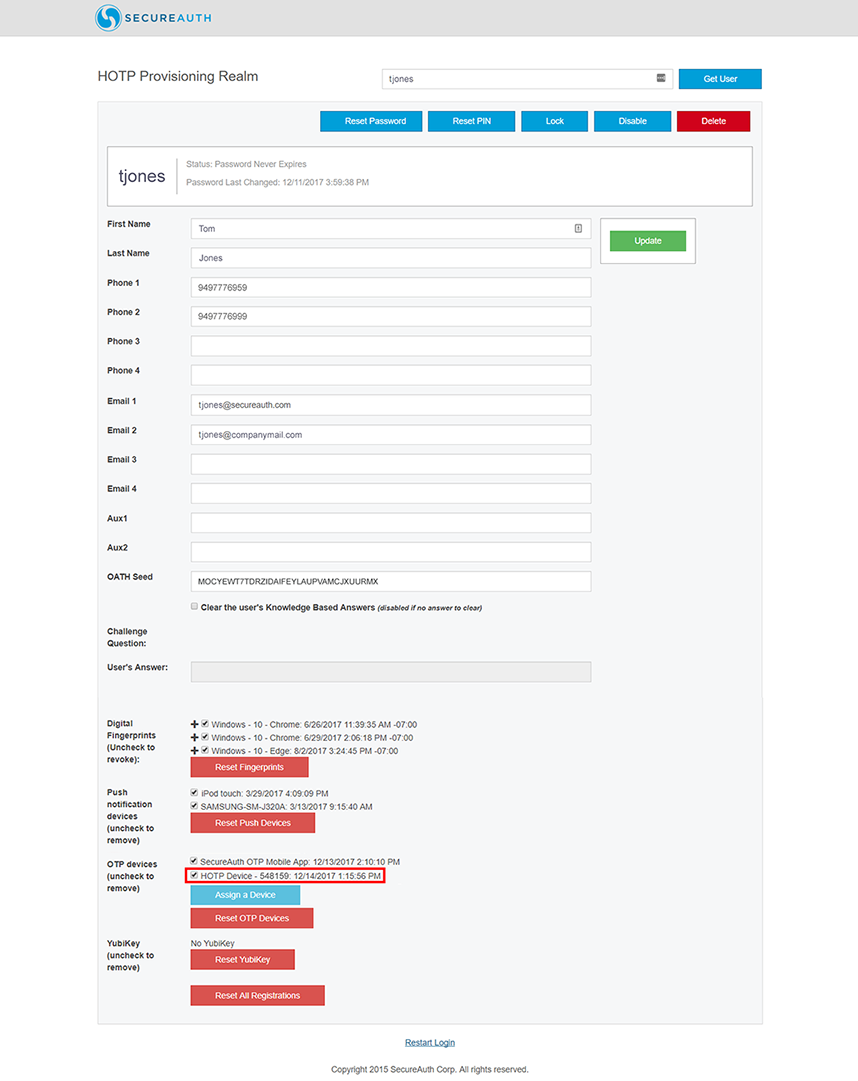 |
8. The new HOTP Device appears under OTP devices and includes the Device ID number, and date and time the device was added to the user account.
NOTE: To remove the YubiKey HOTP Device from the account, uncheck the mark in the corresponding box, and click the green Update button.
End-user YubiKey HOTP Multi-Factor Authentication Steps
Use the provisioned YubiKey HOTP device as a Multi-Factor Authentication method and follow the workflow to access the intended realm — the steps in this document may differ from the configuration used in your organization.
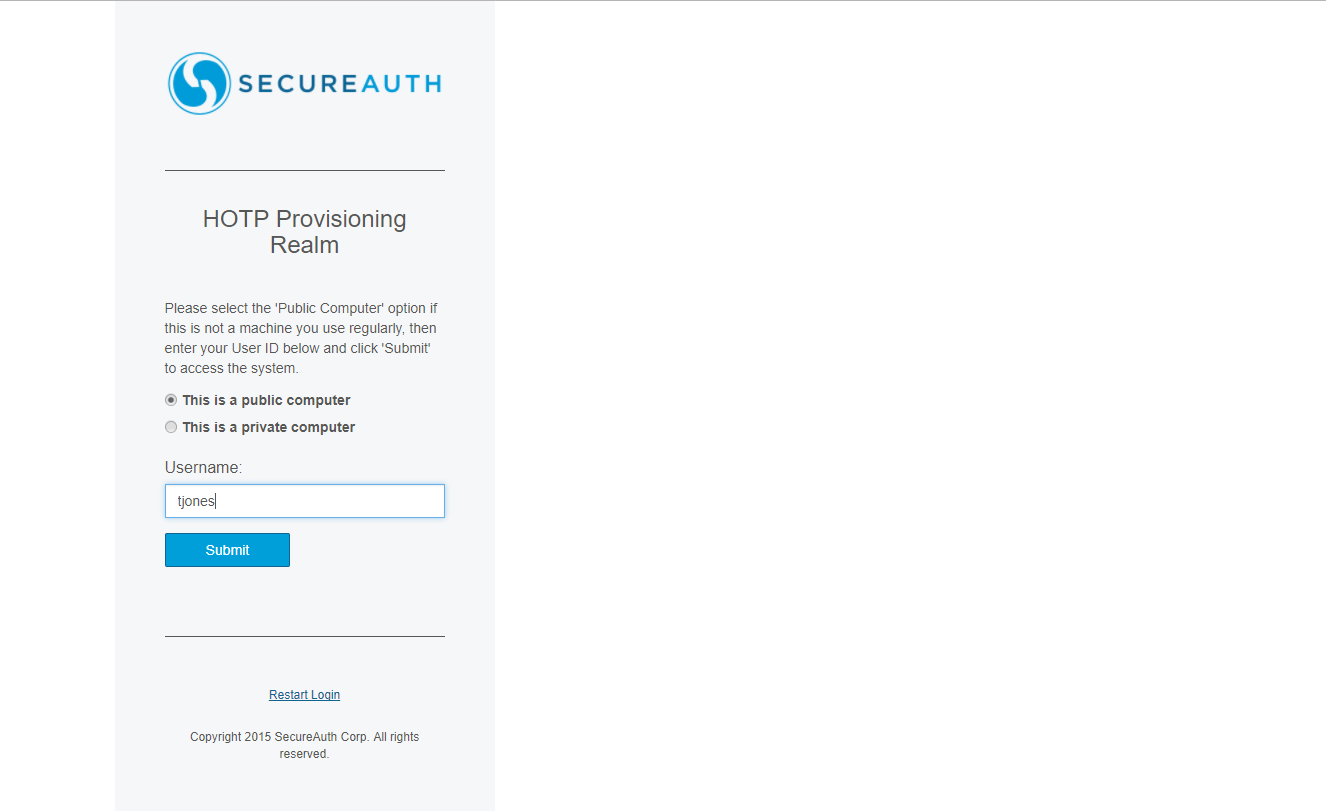 |
1. With the YubiKey device inserted in your machine, select the public computer option, enter your username, and click Submit.
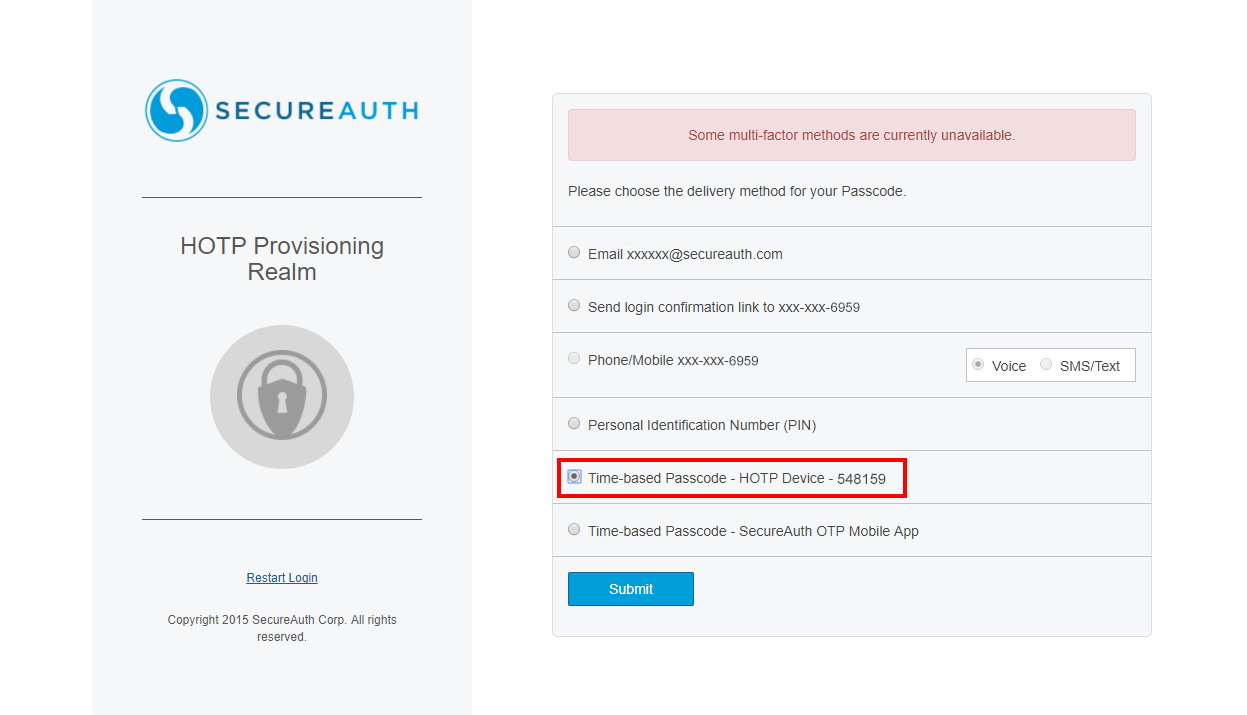 |
2. Select the Time-based Passcode option corresponding to the HOTP Device, and click Submit.
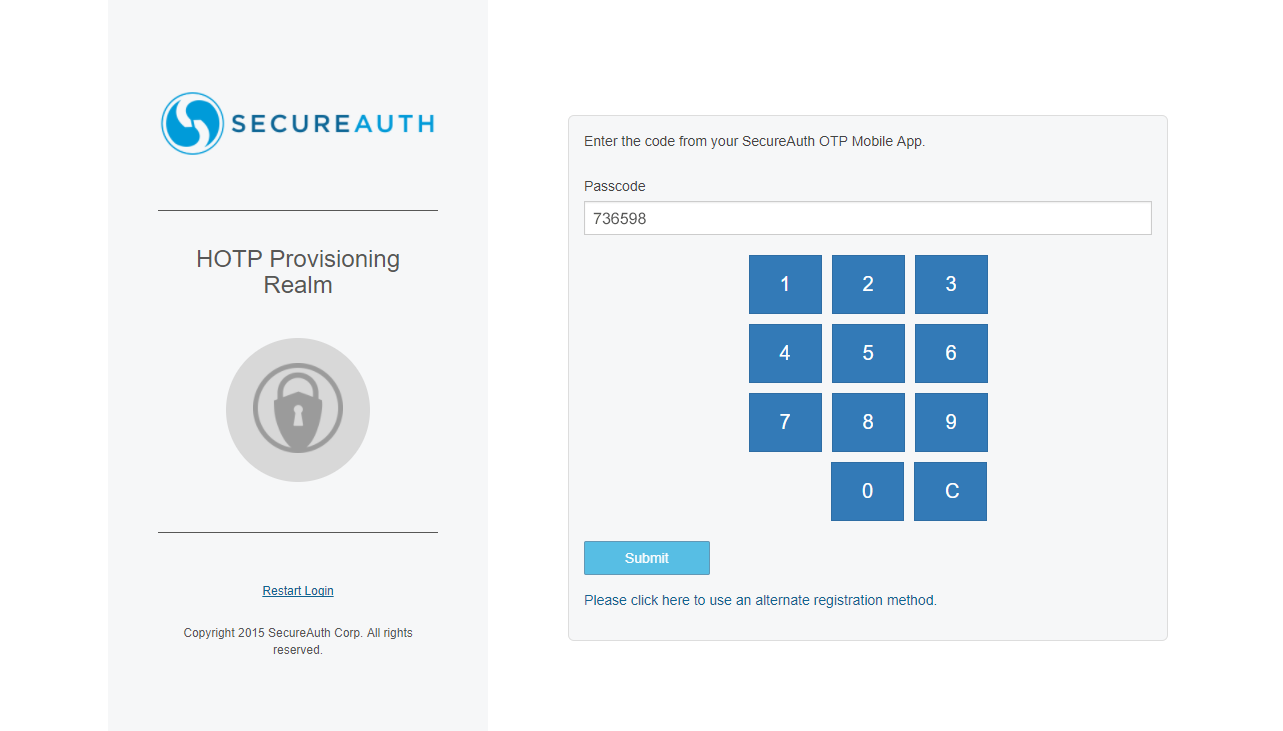 |
3. Press / tap the YubiKey device to populate the Passcode field.
|
4. The intended page appears without needing to click Submit to access it.
 |
5. In this scenario, your account can be updated by retrieving the Help Desk page, then editing it, and clicking Update to save your changes.