UserExchange Web Service Custom Application Integration Guide
Use this guide to enable Multi-Factor Authentication and Single Sign-on (SSO) access via encryption and web service to customer-controlled web applications.
End users will be redirected (via browser) to SecureAuth IdP for authentication upon attempting access into the application without an internal session token or an encrypted string from SecureAuth.
SecureAuth IdP will then authenticate the end user, and send the encrypted authenticated User ID in a cookie, query string, or the header (options represented as token in Custom Application Configuration Steps) to the application following a successful authentication.
The application will detect the encrypted string, extract it, and then contact the SecureAuth IdP web service to retrieve the User ID in plaintext.
The application then uses the User ID to create an internal session token and to authorize the user into the application.
Prerequisites
SecureAuth IdP 9.2 or later
Have a custom web application and modification access
Create a New Realm for the custom application integration in the SecureAuth IdP Web Admin
Configure the following tabs in the Web Admin before configuring the Post Authentication tab:
Overview – the description of the realm and SMTP connections must be defined
Data – an enterprise directory must be integrated with SecureAuth IdP
Workflow – the way in which users will access this application must be defined
Multi-Factor Methods – the Multi-Factor Authentication methods that will be used to access this page (if any) must be defined
Custom Application Configuration Steps
Change the application's Login Page to look for some type of internal session token.
This will alert the application to allow access to end users if it is present (bypassing additional authentication).
If there is no internal session token, have the Login Page look to see if there is a Token Name, eu (the cookie, query string, or header from SecureAuth IdP).
If there is no eu token, enable the redirection to the SecureAuth IdP URL, along with the ReturnURL as a query string.
Example redirect URL:
https://secureauth.company.com/secureauth2/?ReturnURL=https://app.company.comThe SecureAuth IdP URL will be the Fully Qualified Domain Name (FQDN) of the SecureAuth IdP appliance, followed by the SecureAuth IdP custom application-integrated realm like
https://secureauth.company.com/secureauth2.The ReturnURL will typically be the FQDN of the custom application.
If there is an eu token, extract the value inside of the token.
Make a web service call to retrieve the Authenticated User ID value by passing in the value of the eu token as input parameter to the function.
A copy of the web service is located at the FQDN of the SecureAuth IdP appliance, followed by
/SecureAuthWS/UserService.asmx, e.g.https://secureauth.company.com/SecureAuthWS/UserService.asmxA copy of the WSDL for development is located at the FQDN of the SecureAuth IdP appliance, followed by
/SecureAuthWS/UserService.asmx?WSDL, e.g.https://secureauth.company.com/SecureAuthWS/UserService.asmx?WSDLThe GetUserIDWithTimeCheck takes two input parameters, EncryptedUserString and ValiditySeconds.
This will only return the Decrypted Authenticated User ID as a String if the token was generated within the validity time frame (e.g. 5 - 10 seconds).
Generate an internal session token, and take the Decrypted Authenticated User ID String and log the user into the application.
(OPTIONAL) Clear the value inside the eu token so that it cannot be reused.
SecureAuth IdP Configuration Steps
In the Advanced Settings, make the following configurations.
Select the Data tab.
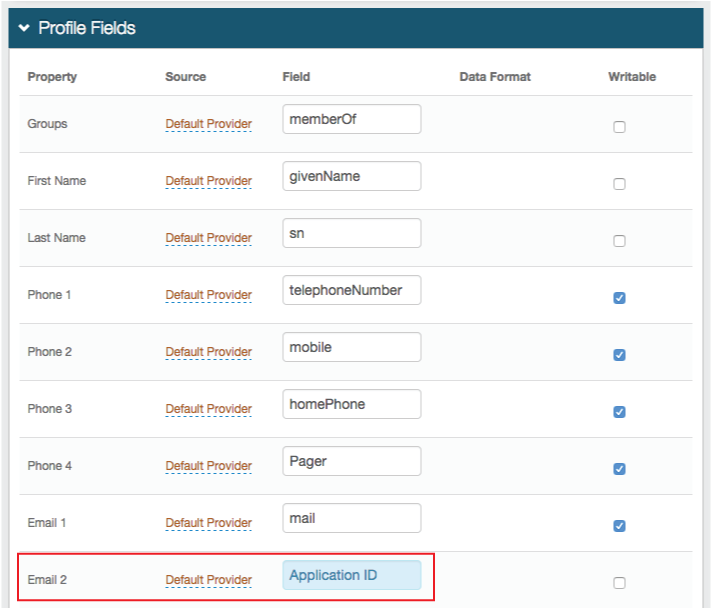
In the Profile Fields section, map the directory field that contains the user's Application ID to the SecureAuth IdP Property.
For example, add the Application ID to the Email 2 Property if it is not already contained somewhere else
Save your changes.
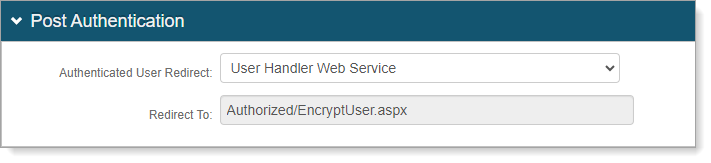
Select the Post Authentication tab.
In the Post Authentication section, set Authenticated User Redirect to User Handler Web Service.
An unalterable URL will be auto-populated in the Redirect To field, which will append to the domain name and realm number in the address bar (Authorized/EncryptUser.aspx).
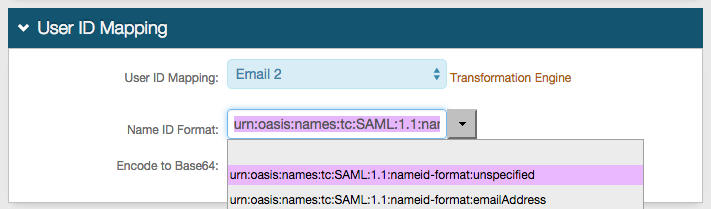
In the User ID Mapping section, set the SecureAuth IdP Property that corresponds to the directory field that contains the Application ID (Email 2).
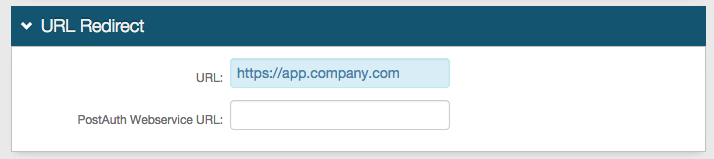
In the URL Redirect section, set the URL to the application URL to where the end user will be redirected upon successful authentication, e.g. https://app.company.com.
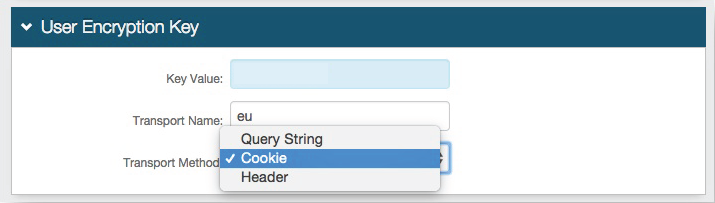
In the User Encryption Key section, set the following configurations.
Key Value
Leave this field blank. If there is a value present in the field, remove it.
Transport Name
If needed, set it to a different name other than eu.
If you change the Transport Name then it will need to be changed in the application as well.
Modify the Custom Application Configuration Steps to replace the eu value with the new Transport Name value.
Transport Method
Set how the Authenticated User ID will be transported (Query String, Cookie, or Header).
Save your changes.
Forms Auth / SSO Token
Optionally, in the Forms Auth / SSO Token section, click the View and Configure FormsAuth keys/SSO token link to configure the token/cookie settings and configure this realm for SSO.
 |
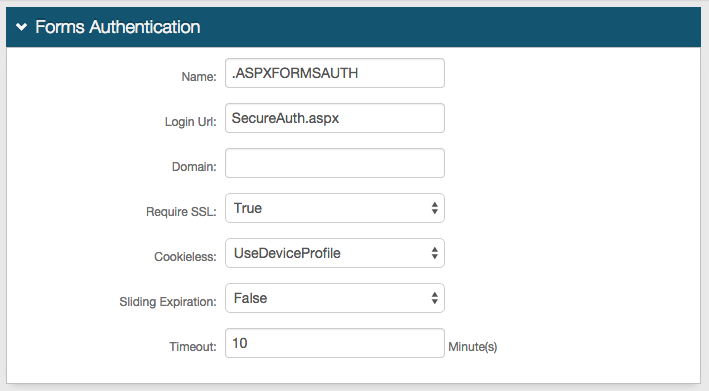
In the Forms Authentication section, set the following:
Require SSL
If the SSL is required to view the token, set to True.
Cookieless
Indicate whether SecureAuth IdP will deliver the token in a cookie to the user's browser or device:
UseCookies – Always deliver a cookie
UseUri – Do not deliver a cookie, deliver the token in a query string
AutoDetect – Deliver a cookie if the user's settings allow it.
UseDeviceProfile – Deliver a cookie if the browser settings allow it, regardless of the user's settings
Sliding Expiration
For the cookie to remain valid as long as the user is interacting with the page, set to True.
Timeout
Set the length of time in minutes the cookie is valid.
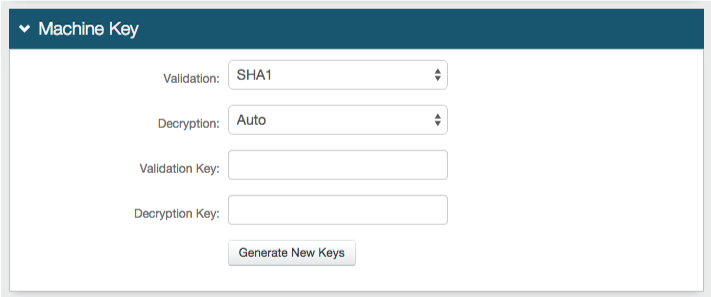
In the Machine Key section, set the following:
Validation
If the default value does not match your organization's requirements, choose another value.
Decryption
If the default value does not match your organization's requirements, choose another value.
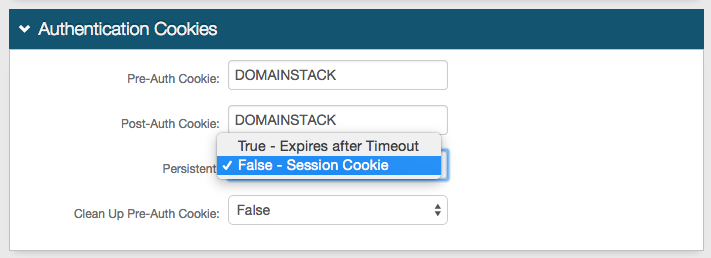
In the Authentication Cookies section, set the following:
Persistent
Set one of the following values:
True - Expires after Timeout – Allow the cookie to be persistent
False - Session Cookie – Allow the cookie to be valid as long as the session is open, and expires when the browser is closed or the session expires
Save your changes.
Note
To configure this realm for SSO, refer to SecureAuth IdP Single Sign-on Configuration
Note
To configure this realm for Windows Desktop SSO, refer to Windows desktop SSO configuration