MS-CHAPv2 and RADIUS (SP-initiated) for Cisco and Netscaler configuration guide
Updated April 28, 2020
SecureAuth RADIUS server supports the Microsoft Challenge Handshake Authentication Protocol (CHAP) version 2 (MS-CHAPv2) with Cisco Adaptive Security Appliance (ASA) and Citrix NetScaler Gateway. Use Cisco or Netscaler with MS-CHAPv2 to enable end users to authenticate into your corporate VPN by using SecureAuth IdP's multi-factor authentication (MFA) methods through the SecureAuth IdP RADIUS server.
This guide provides instructions for administrators to:
configure SecureAuth RADIUS server and Cisco to work with MS-CHAPv2, or
configure SecureAuth RADIUS server and Netscaler to work with MS-CHAPv2.
Limitations
SecureAuth RADIUS requires a third-party product, Microsoft Network Policy Server (NPS), to use MS-CHAPv2 because RADIUS works as a proxy to NPS.
SecureAuth RADIUS functions as a proxy only. This means that RADIUS cannot read the data stream that moves through the authentication process, so only six MFA methods are available. They are listed inEnd user experience.
When an end user password expires, the SecureAuth client will request a password change. After end users change their password and then log in using the new password, the client sends a false login failure message. End users can successfully log in with the new password the second time they log in and thereafter. The failure message is sent from NPS and cannot be configured differently.
Prerequisites
SecureAuth IdP v9.3 or later with a realm ready for Cisco ASA or Netscaler
SecureAuth RADIUS server v20.03 or later
Windows Server 2012 R2 or Windows Server 2016, configured with Active Directory in the same location where users will perform authentication
If configuring Cisco:
Configure Cisco with RADIUS
Obtain a valid Cisco license for testing. (The configuration requires more than the two, default, free secure sockets layer (SSL) virtual private network (VPN) Peers.)
Cisco ASA version 9.7.1 or later for AnyConnect client
Cisco Adaptive Security Device Manager (ASDM) account and environment (version 7.8 or later)
If configuring Netscaler, configure RADIUS in the server by following the instructions in How to Configure NetScaler Gateway to use RADIUS and LDAP Authentication with Mobile/Tablet Devices or RADIUS Authentication – NetScaler Gateway 10.5.
SecureAuth IdP configuration steps
Follow the steps in the SecureAuth RADIUS server v20.03 documentation, in the "Step B: IdP Realms configuration" section.
Configure the Cisco Adaptive Security Appliance
The Cisco ASA configuration includes setting up how Cisco will authenticate users. Use the Cisco Adaptive Security Device Manager (ASDM) user interface to make the following changes:
If not yet completed, configure Cisco with the RADIUS server.
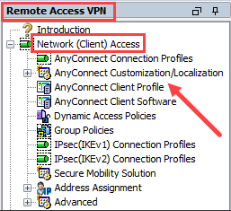
You should now have Cisco in the Remote Access VPN configuration, under Network (Client) Access.
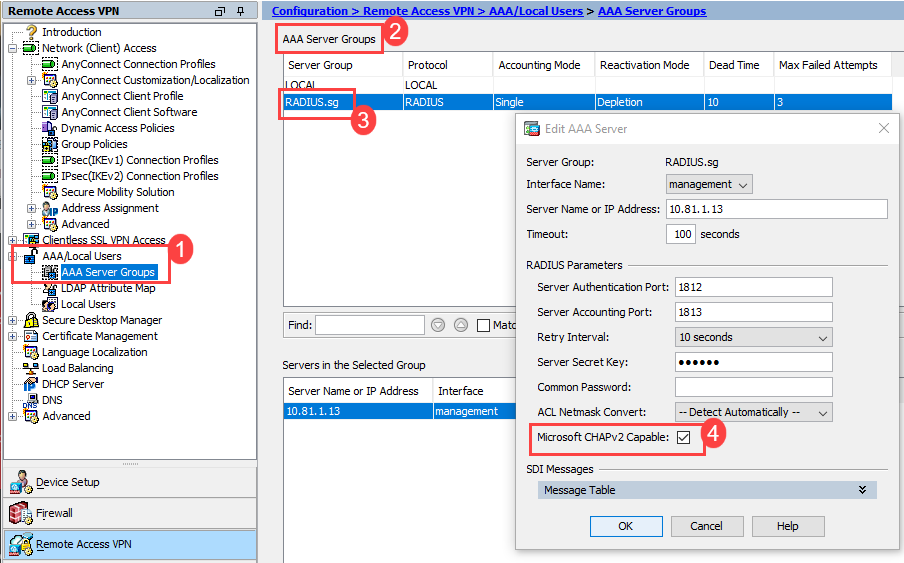
In the Cisco ASDM UI, open the AAA/Local Users folder, and select AAA Server Groups. Open the configured RADIUS server and select the Microsoft CHAPv2 Capable box.
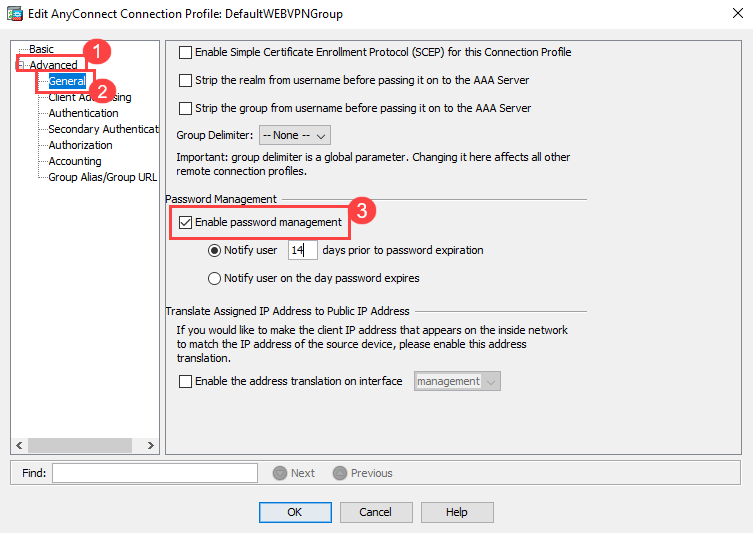
Change the current AnyConnect connection profiles. Open AnyConnect Connection Profile folder >Advanced> General>Enable Password Management.
Proceed to Configure SecureAuth RADIUS.
Configure Netscaler
Configure Netscaler to delineate how it will authenticate users.
If not yet completed, configure RADIUS in the server by following the instructions in How to Configure NetScaler Gateway to use RADIUS and LDAP Authentication with Mobile/Tablet Devices or RADIUS Authentication – NetScaler Gateway 10.5.
In the NetScaler Gateway folder, open Policies > Authentication > RADIUS.

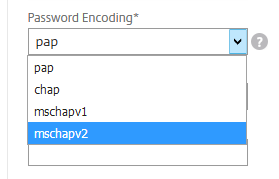
Click More, click thePassword Encoding dropdown, and selectmschapv2.
Proceed to Configure SecureAuth RADIUS.
Configure SecureAuth RADIUS
You can have a network policy server (NPS) for each RADIUS client. If your company uses multiple VPN servers and authentication protocols, you can use the same RADIUS server. You only need to configure the client that uses MS-CHAPv2 as a proxy, and leave the rest of the protocols without configurations.
Configure SecureAuth RADIUS as a proxy on the RADIUS Clients page, in the NPS Proxy Configuration section. (See SecureAuth RADIUS server v20.03 documentation.)
Set the IP Address and Port fields as follows:
Set the IP Address to the IP of the SecureAuth windows server, for example, 10.81.1.45.
Set the Port field to the port where the Windows server will be listening, for example, 1823.
Proceed to Configure Windows Server.
Configure Windows Server
Configure Windows Server 2012 R2 or Windows Server 2016 with Active Directory in the same location where users will perform authentication.
This section describes how to configure Microsoft Network Policy Server (NPS).
Open the Microsoft Server Manager.
In Manage, selectAdd Roles and Features, and set as follows:
Set Installation Type toRole-based or feature-based installation. Select the appropriate server.
Set Server Roles to Active Directory Domain Services,Remote Access, andNetwork Policy and Access Services.
In Tools, selectNetwork Policy Server.
Right-click NPS and openRegister server in Active Directory. The option is inactive if AD disallows registering a server or if the server is already registered in AD.
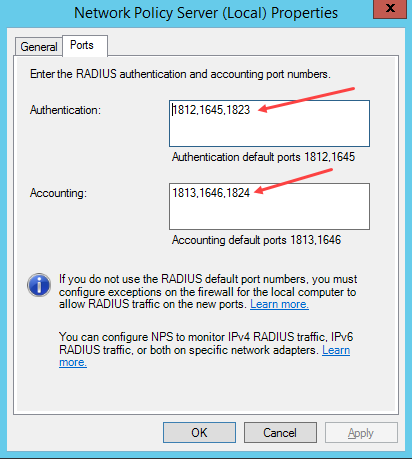
Right-click NPS and openProperties. In thePorts tab, add the ports that you set up in Configure SecureAuth RADIUS.
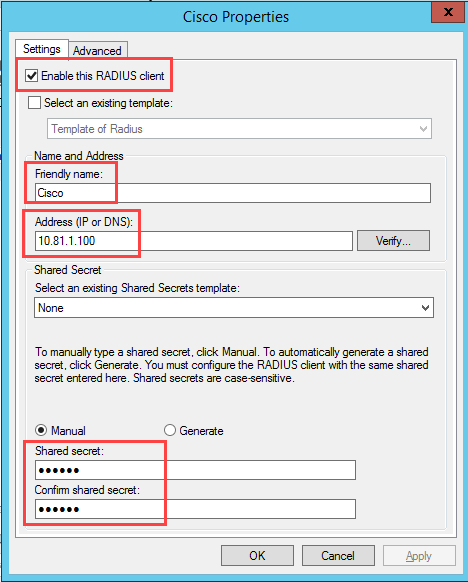
In RADIUS Clients and Servers, openRADIUS Clients.
Add your RADIUS server.
Add your Cisco or Netscaler server.
Right-click New and set up a friendly name (for example, Cisco or Netscaler), the corresponding IP address, and the RADIUS shared secret.
Create two policies, either for Cisco or Netscaler.
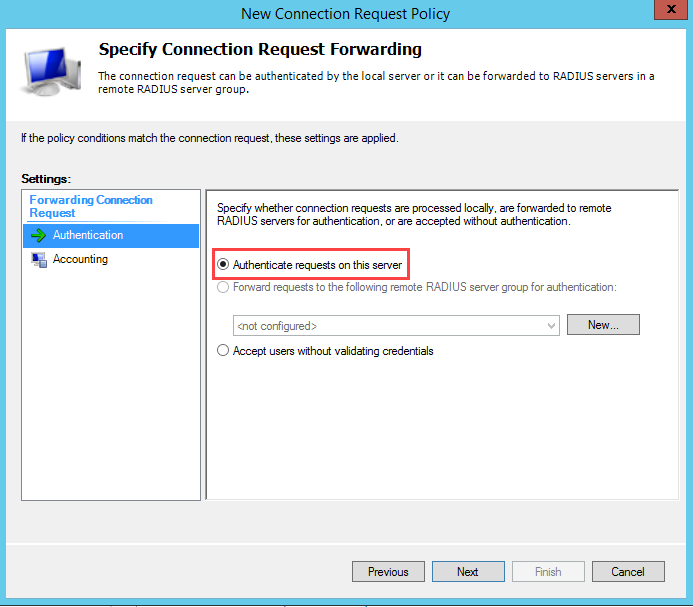
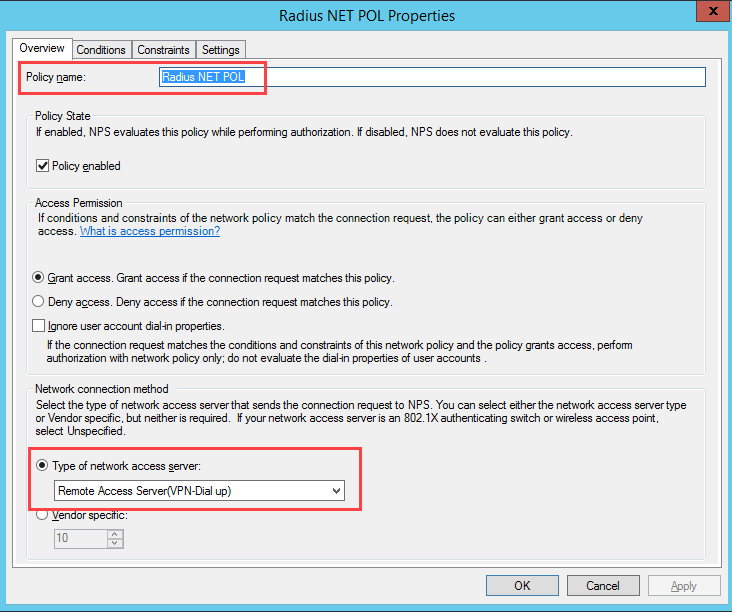
In New Connection Request Policy, create a policy name.
New Connection Request Policy
Set Type of network access server toRemote Access Server. The following shows the two policies:
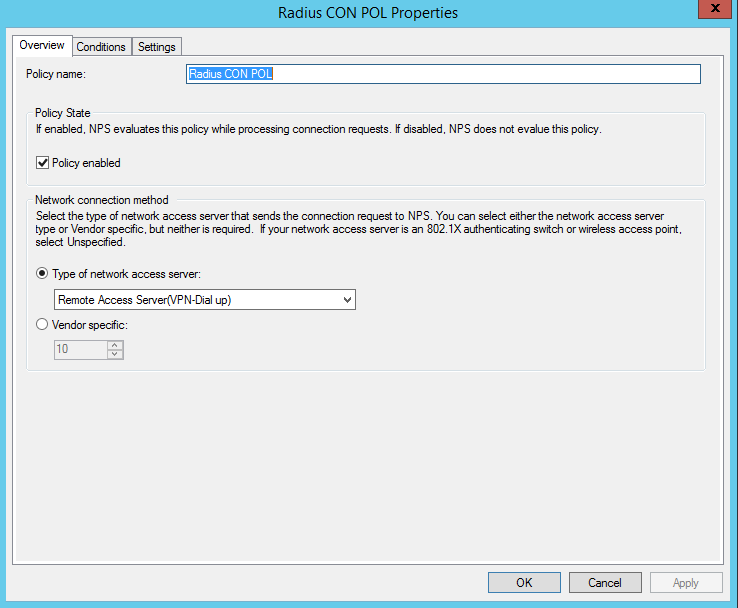
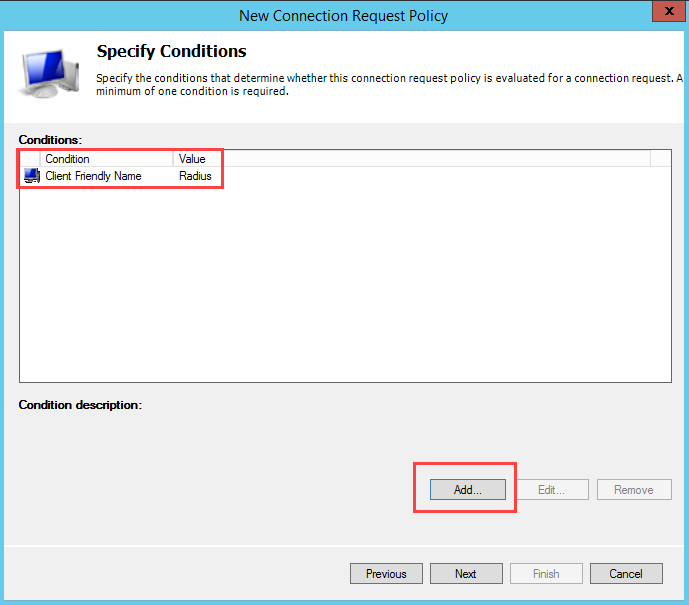
Add two conditions and set them to the client friendly names that you set up in the previous step.
Set Authenticate requests on this server. Leave the settings in the default state, and save the changes.
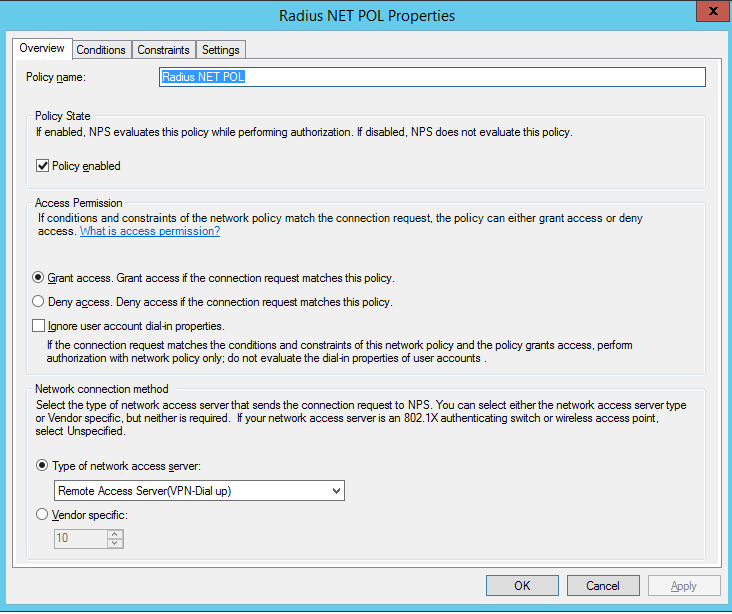
Create the network policy.
Select a policy name and set it to Remote Access Server.
Using the client friendly names you set in the previous step, add the names to conditions In the Conditions tab.
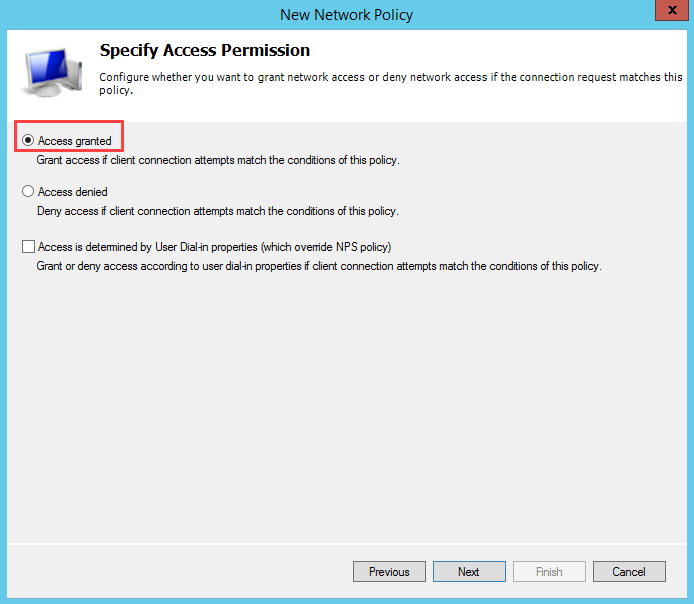
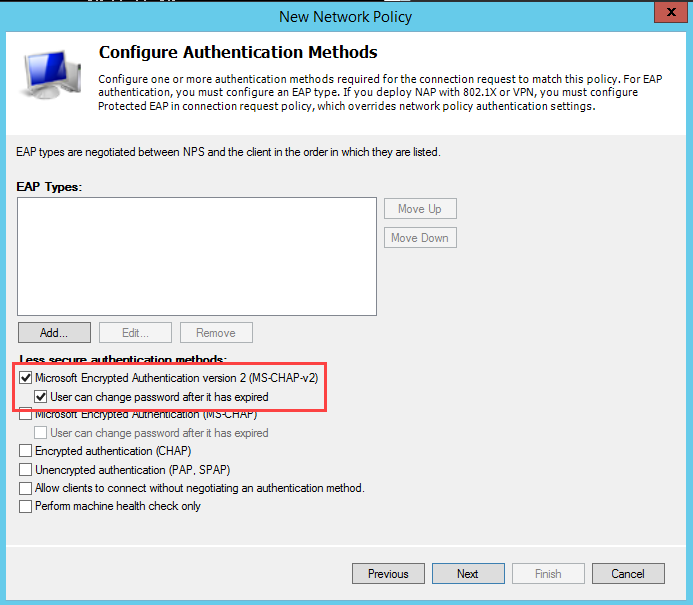
Select Access Granted.
In Authentication Methods, selectMS-CHAPv2 and set User can change password.
Optionally, set up variables for site.
In Conditions, move the two new policies to the top of the list.
Log in using SecureAuth RADIUS.
End user experience
All end users added to SecureAuth RADIUS through Active Directory can authenticate into the corporate VPN by using the following SecureAuth IdP second-factor MFA methods:
Password | Second Factor
SMS / Text Message Phone
Email
Send Passcode to Phone (Push Notification)
Send Login Request to Phone (Push-to-Accept)
PIN
Yubico OTP Token
Help Desk OTP
Symbol-to-Accept
Fingerprint
Face Recognition
Password & Mobile Login Request (Approve/Deny)
Password only
Password | One-Time Passcode (TOTP/HOTP)
Password & One-Time Passcode (TOTP/HOTP)
Password | Yubico OTP
The available MFA methods are described in the SecureAuth RADIUS server v20.03 documentation, in the topics listed under the section called End user enrollment.
If end users select any of the options that require accepting push notifications, the VPN waits for RADIUS to respond. When the Login Request screen appears on the mobile app, tap Approve or Deny on the screen.
iOS end users who start the SecureAuth Authenticate app for the first time will see the Allow notifications screen, guiding them to allow the Authenticate app to send them notifications. They must accept notifications or they will not be able to authenticate by using the app. See the Login Requests from Push Notifications topic for details.
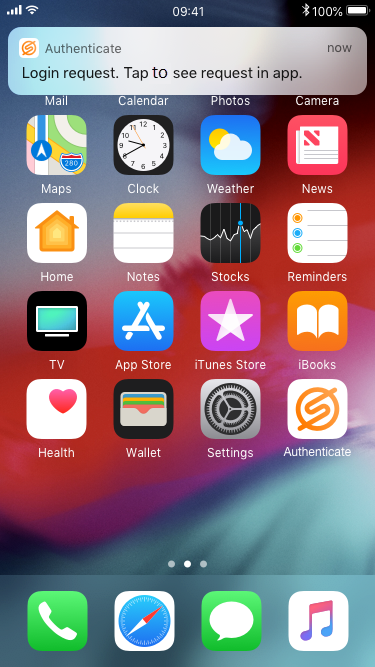
The following images show push notification examples that end users will see in the Authenticate app:
App is closed
Open the app by swiping down on the login request notification.
 |
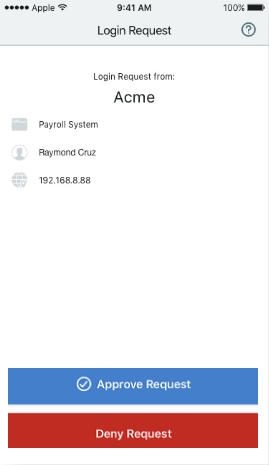
2. Tap Accept to securely authenticate into the corporate VPN.
 |
App is open
Tap Approve this request to securely log into the corporate VPN.
 |