Remediant SecureONE (IdP-initiated) integration guide
Introduction
Use this guide to enable Multi-Factor Authentication and Single Sign-on (SSO) access via SAML to Remediant SecureONE.
Prerequisites
Remediant SecureONE account
SecureAuth IdP version 9.1 or later, with a realm for the Remediant SecureONE integration
Configure the following tabs in SecureAuth IdP Web Admin before configuring the Post Authentication tab:
Overview – define the description of the realm and SMTP connections
Data – an enterprise directory must be integrated with SecureAuth IdP
Workflow – define the how users access this application
Multi-Factor Methods – define the multi-factor authentication methods to be used to access this page (if any)
SecureAuth IdP Configuration Steps
1. Log in to your SecureAuth IdP Admin console.
Data tab
2. Select the Data tab.
3. In the Profile Fields section, map the Distinguished Name attribute (distinguishedName) to an available SecureAuth IdP Profile Property (for example, Aux ID 1).
 |
4. Click Save.
Post Authentication tab
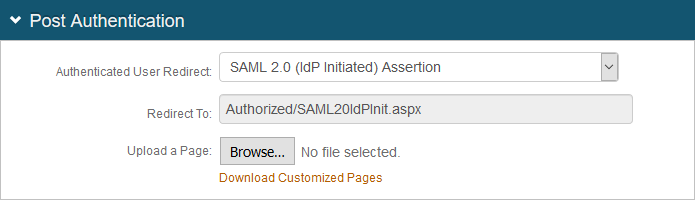
5. Select the Post Authentication tab.
6. In the Post Authentication section, make the following entry:
a. Set Authenticated User Redirect to SAML 2.0 (IdP Initiated) Assertion.
The Redirect To field automatically fills with an URL that appends to the domain name and realm number in the address bar (for example, Authorized/SAML20IdPInit.aspx).
 |
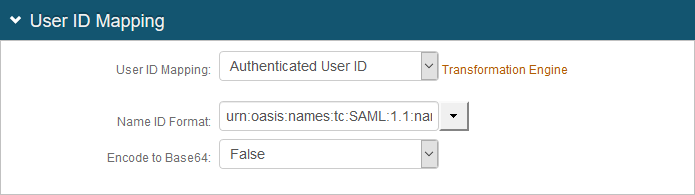
7. In the User ID Mapping section, make the following entries:
a. Set User ID Mapping to Authenticated User ID.
b. Set Name ID Format to urn:oasis:names:tc:SAML:1.1:nameid-format:unspecified. Otherwise, if Citrix requires a different option, choose the one provided by the Service Provider (SP).
c. Set Encode to Base 64 to False.
 |
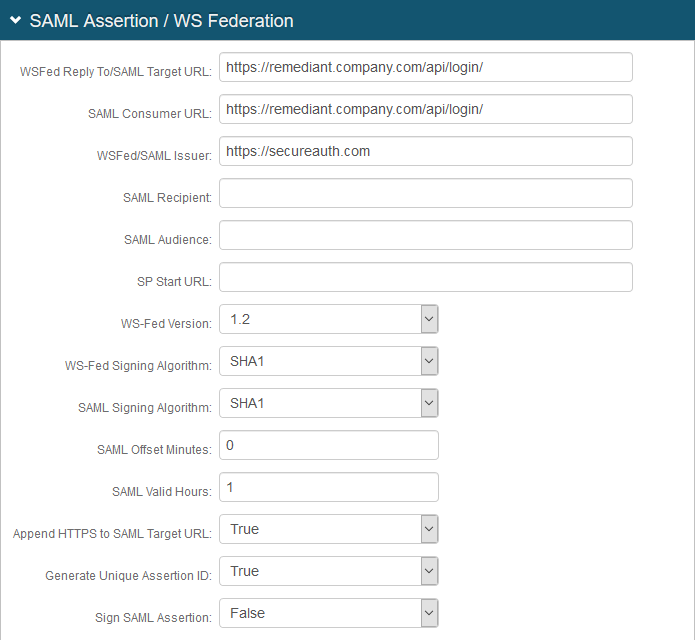
8. In the SAML Assertion / WS Federation section, make the following entries:
a. Set WSFed Reply To/SAML Target URL to the Remediant SecureONE URL for the specific environment (for example, https://remediant.company.com/api/login/).
b. Set SAML Consumer URL to the Remediant SecureONE URL for the specific environment (for example, https://remediant.company.com/api/login/).
c. Set WSFed/SAML Issuer to the same URL that matches what is set in the Remediant SecureONE configuration (for example, https://secureauth.com). The actual value does not matter as long as it matches in both the Remediant SecureONE and SecureAuth IdP configurations.
d. Set SAML Offset Minutes to make up for time differences between devices.
e. Set SAML Valid Hours to limit how long the SAML assertion is valid.
f. Set Sign SAML Assertion to False.
 |
g. Next to Assertion Signing Certificate, click the certificate.wse3.cer link to download the certificate, export it as Base64, and store it on a local PC to be imported in the Remediant SecureONE configuration settings.
 |
9. In the SAML Attributes / WS Federation section, make the following entries for Attribute 1:
a. Set Name to dn.
b. Set Format to Basic.
c. Set Value to Aux ID 1 (or the aux value used to store the Distinguished Name attribute set on the Data tab in the SAML Attributes / WS Federation section).
 |
10. Click Save.
Remediant SecureONE configuration steps
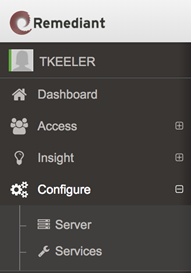
1. Open the Remediant SecureONE Admin console.
2. Select Configure > Server.
 |
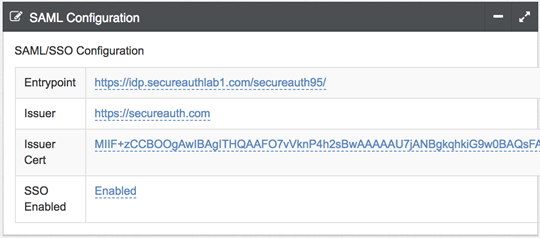
3. In the SAML Configuration section make the following entries:
a. Set the Entrypoint to the SecureAuth IdP realm URL configured for this integration.
b. Set the Issuer to the same URL value set in the SecureAuth IdP SAML configuration.
c. For the Issuer Cert, import the SecureAuth IdP signing certificate.
d. Set SSO Enabled to Enabled.
 |
4. In the env.js configuration file, add the value for the SecureAuth IdP realm being used for the integration. For example:
window.__env.ssoUrl = 'https://secureauth.company.com/secureauth1/';