Customize the Registration Code (OTP) Email Message
Introduction
Use this guide to customize the verbiage or logo on the One-time Registration Code (OTP) email sent out to end-users for Multi-Factor Authentication.
Applies to
SecureAuth IdP Version | OS Version |
|---|---|
8.0+ |
|
SecureAuth IdP Configuration Steps
Notice
Select the SecureAuth IdP version number, and then select instructions for customizing email verbiage or the logo to appear on the OTP email
Customize verbiage
Overview
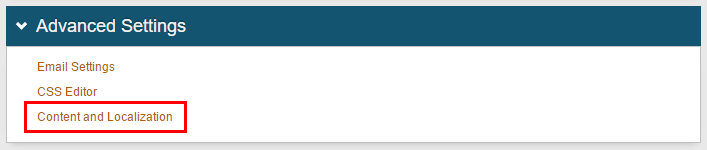
1. In the Advanced Settings section on the Overview tab, click Content and Localization
 |
Email Settings
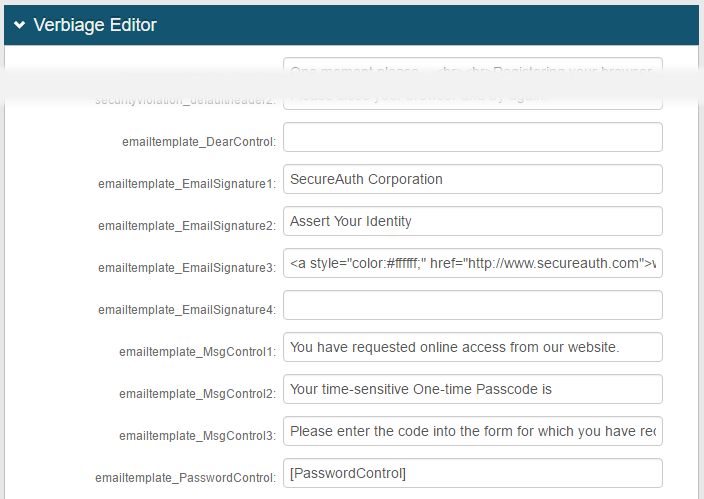
2. In the Verbiage Editor section, in emailtemplate_DearControl, enter the salutation to appear in the email (e.g. Dear) or leave the field empty to start the email with the recipient's name
3. In emailtemplate_MsgControl1, modify the freeform text that appears in the body of the message
4. In emailtemplate_MsgControl2, optionally modify the text that precedes the auto-generated passcode in the email
5. In emailtemplate_MsgControl3, modify the text that explains where to enter the passcode
6. In emailtemplate_Signature1, enter freeform text to appear in the email footer – e.g. the company name
7. In emailtemplate_Signature2, optionally enter freeform text to appear in the email footer – e.g. company phone number
8. In emailtemplate_Signature3, optionally enterfreeform text to appear in the email footer – e.g. company website URL
9. In emailtemplate_Signature4, optionally enterfreeform text to appear in the email footer – e.g. company slogan
 |
Warning
Click Save once the configuration is complete and before leaving the Email Settings page to avoid losing changes
Sample SecureAuth IdP OTP Email
 |
Notice
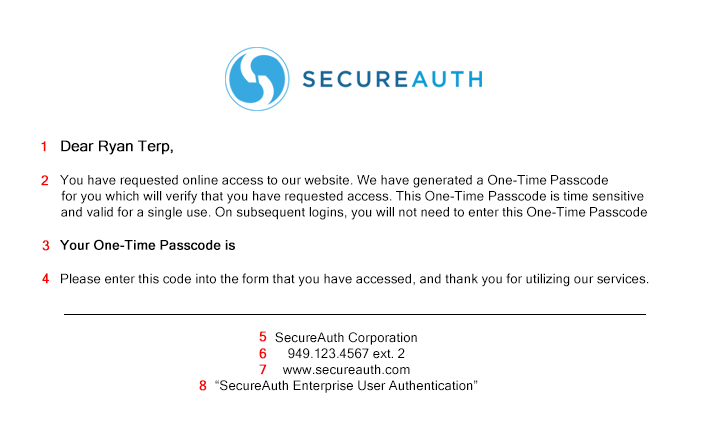
Numbers in red (1 - 8) in the sample email correlate to Verbiage Editor fields identified in the table below
Number in Sample Email | Verbiage Editor Field |
|---|---|
1 | emailtemplate_DearControl |
2 | emailtemplate_MsgControl1 |
3 | emailtemplate_MsgControl2 |
4 | emailtemplate_MsgControl3 |
5 | emailtemplate_Signature1 |
6 | emailtemplate_Signature2 |
7 | emailtemplate_Signature3 |
8 | emailtemplate_Signature4 |
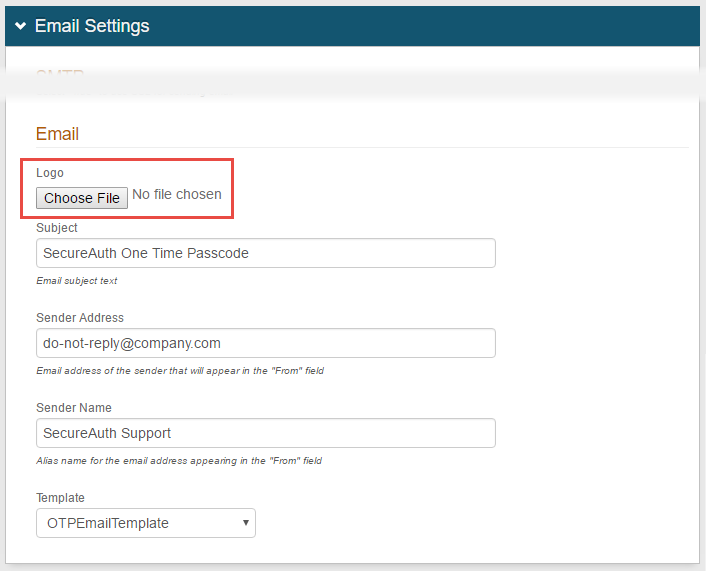
Customize Logo
Overview
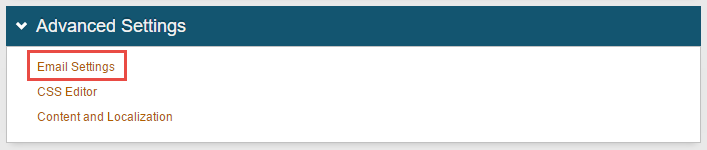
1. In the Advanced Settings section on the Overview tab, click Email Settings
 |
Email Settings
2. In the Email Settings section, under Email, click Choose File
3. Browse to find the logo, select it for uploading, and click Open
 |
Notice
In SecureAuth IdP version 9.0.2+, the Show passcode in subject line checkbox appears to the right of the Subject field
See OTP Email Configuration Guide for information about using this option and configuring the OTP email
Warning
Click Save once the configuration is complete and before leaving the Email Settings page to avoid losing changes