Juniper IVE as the SAML IdP to SecureAuth IdP Integration Guide
Introduction
Use this guide to enable Juniper IVE as an Identity Provider that authenticates users and issues a SAML assertion to SecureAuth IdP, which acts as a Service Provider (SP). This will enable any Post Authentication event from SecureAuth IdP once the SAML authentication has been completed.
Prerequisites
1. Have Juniper IVE version 7.4R2 or above
2. Create a New Realm or access an existing realm for the Juniper IVE SAML assertion integration in the SecureAuth IdP Web Admin
3. Configure the following tabs in the Web Admin before configuring the realm for the Juniper integration:
Overview – the description of the realm and SMTP connections must be defined
Workflow – the authentication mode and other workflow variables must be defined
Multi-Factor Methods – the Multi-Factor Authentication methods that will be used to access this page (if any) must be defined
Post Authentication
Juniper IVE Configuration Steps
SAML Settings
 |
1. Log into the Juniper IVE admin console, and select Configuration under System, and click SAML
2. Click Settings
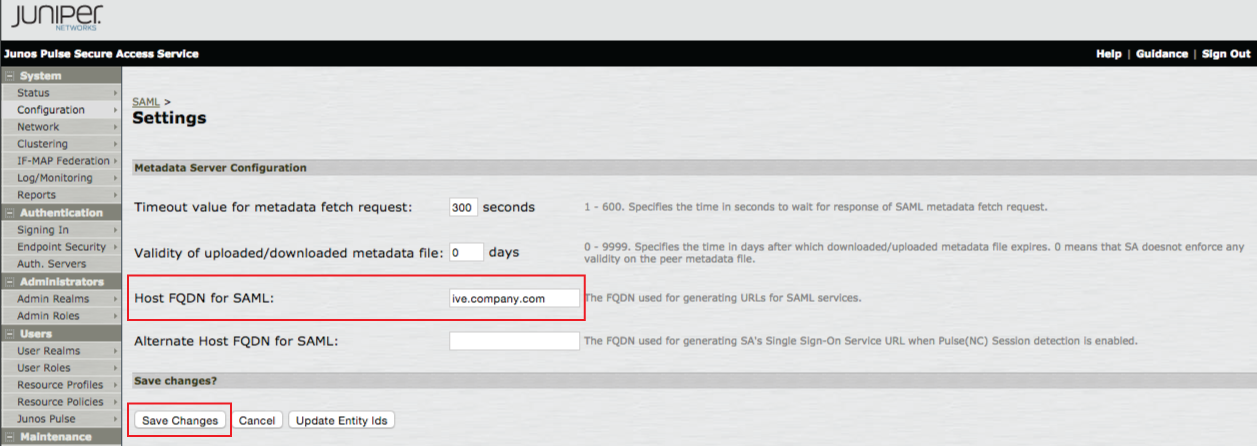 |
3. Set the Host FQDN for SAML to the Fully Qualified Domain Name (FQDN) of the Juniper IVE server, e.g. ive.company.com
4. Click Save Changes
Sign-in SAML
Metadata Provider
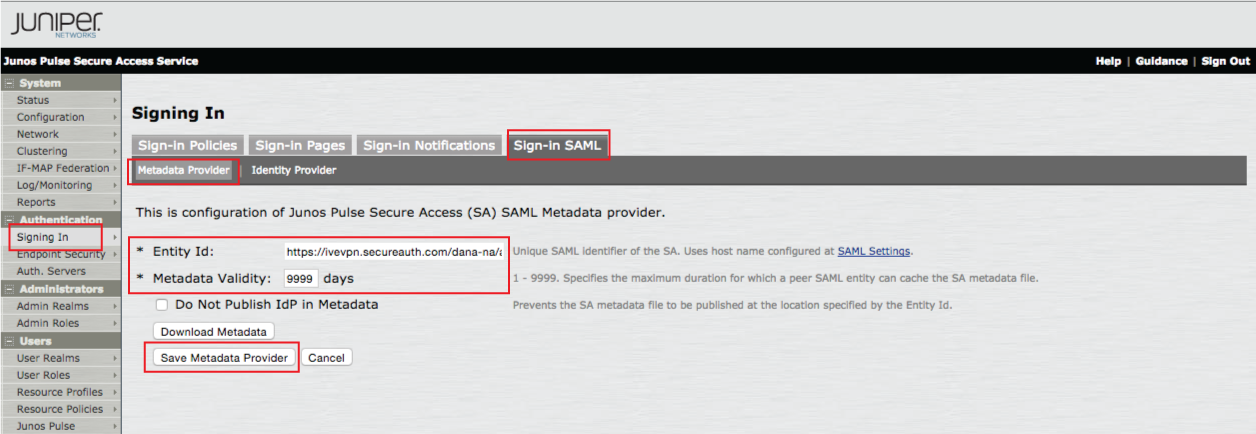 |
5. In the admin console, select Signing-in under Authentication, and click Sign-in SAML
6. Select the Metadata Provider menu option
7. Set the Entity ID to the FQDN of the Juniper IVE server, followed by /dana-na/auth/saml-endpoint.cgi, e.g. https://ive.company.com/dana-na/auth/saml-endpoint.cgi
8. Set the Metadata Validity to a number between 1 and 9999 days
9. Click Save Metadata Provider
Identity Provider
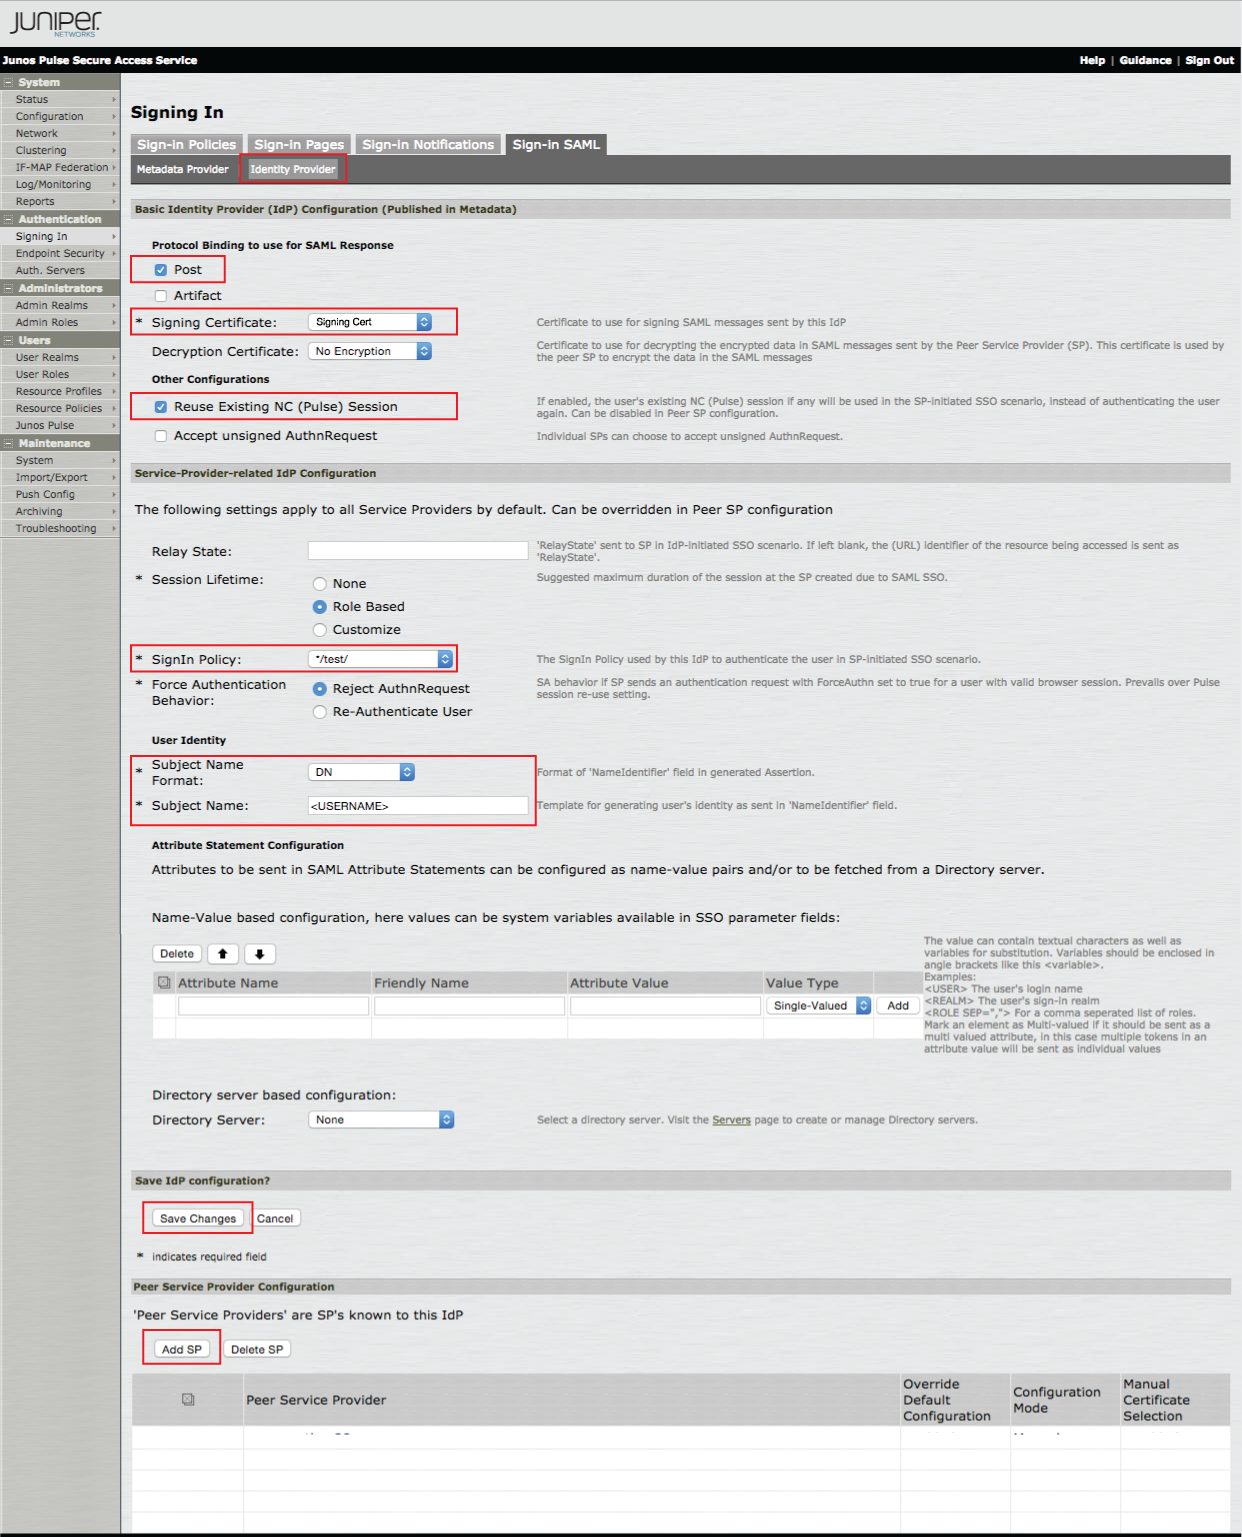 |
10. Select the Identity Provider menu option from the Sign-in SAML section
11. Select Post from the Protocol Binding to use for SAML Response options
12. Select the SSL Signing Certificate that will be used in the assertion from the Signing Certificate dropdown
13. Select Reuse Existing NC (Pulse) Session from the Other Configurations options
14. Select the Sign-in Policy to be used for the Identity Provider
15. Select DN from the Subject Name Format dropdown
16. Set the Subject Name to <USERNAME>
17. Click Save Changes
18. Click Add SP
New Peer Service Provider
 |
19. Select Manual from the Configuration Mode options
20. Provide a Name for the Entity ID, e.g. SecureAuthIdP
21. Set the Assertion Consumer Service URL to the FQDN of the SecureAuth IdP appliance, followed by the SecureAuth IdP realm to which the SAML assertion will be sent and AssertionConsumerService.aspx, e.g. https://secureauth.company.com/secureauth2/AssertionConsumerService.aspx
22. Select Post from the Protocol Binding supported by the Assertion Consumer Service at the SP and the Default Binding options
23. The SSL Signing Certificate selected in step 12 will appear in the Signature Verification Certificate section
24. Click Save Changes
Web Bookmarks
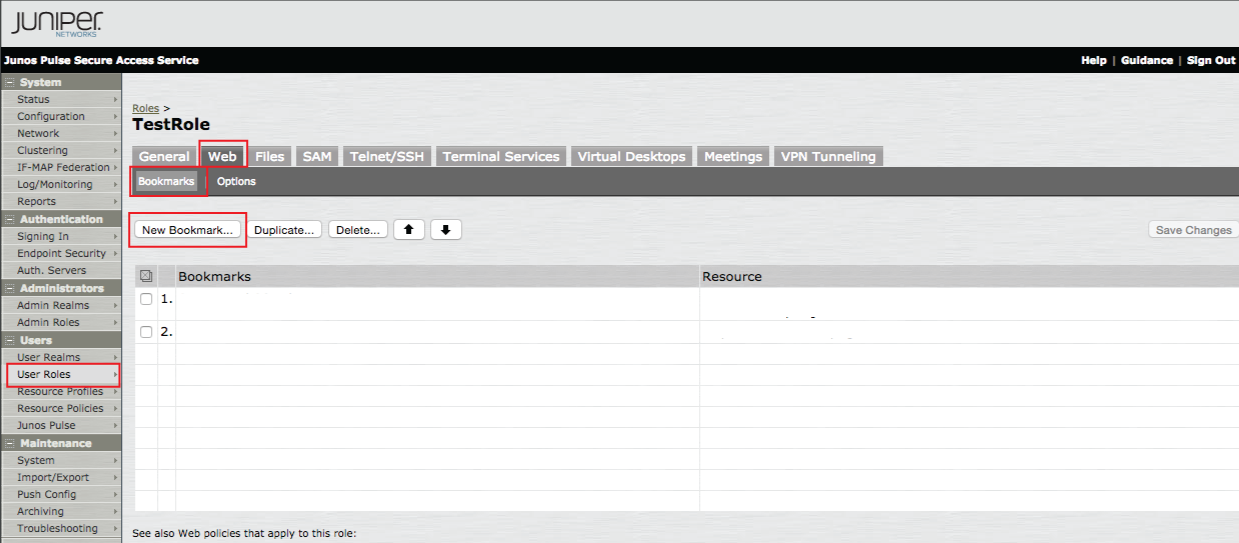 |
25. In the admin console, select User Roles under Users, and click Web
26. Select the Bookmarks menu option
27. Click New Bookmark ...
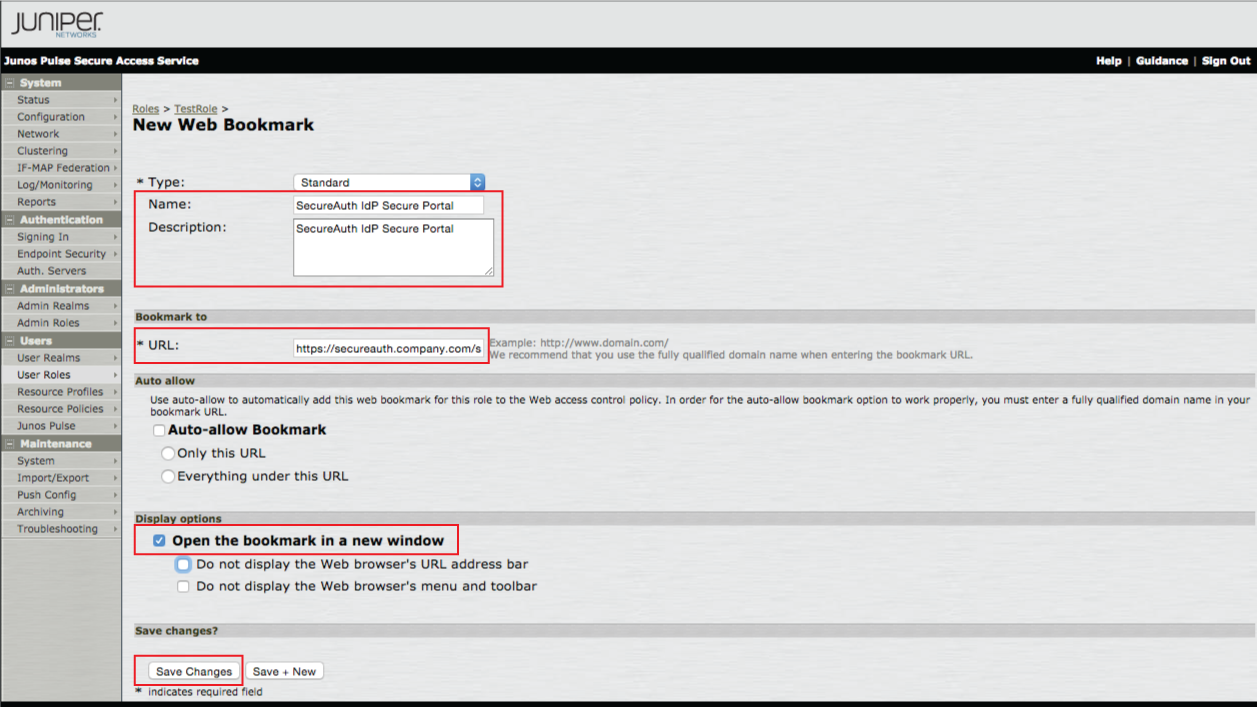 |
28. Provide a Name and Description for the new bookmark
29. Set the URL to the FQDN of the SecureAuth IdP appliance, followed by the SecureAuth IdP realm to which the SAML assertion will be sent and AssertionConsumerService.aspx, e.g.https://secureauth.company.com/secureauth2/AssertionConsumerService.aspx
30. Select Open the bookmark in a new window
31. Click Save Changes
SSO
SAML
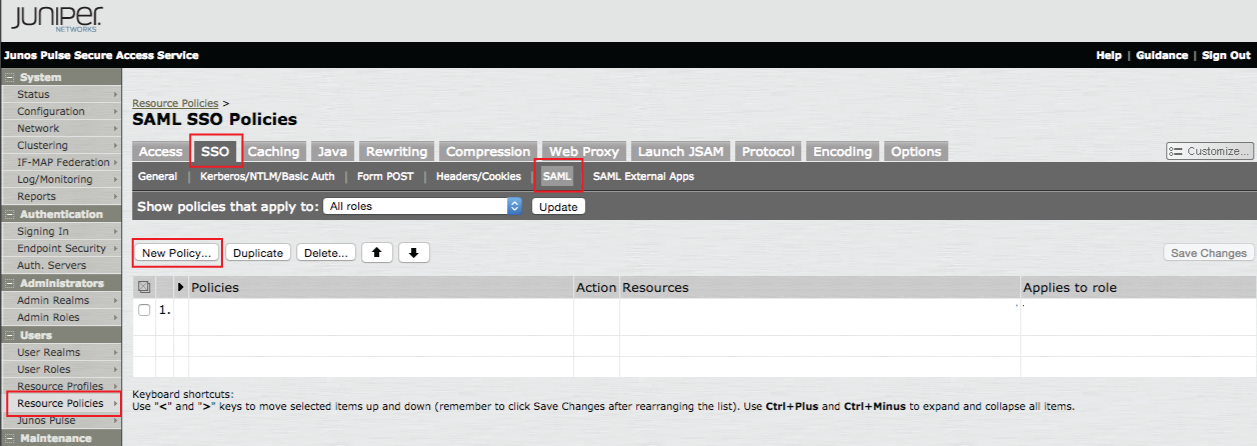 |
32. In the admin console, select Resource Policies under Users, and click SSO
33. Select the SAML menu option
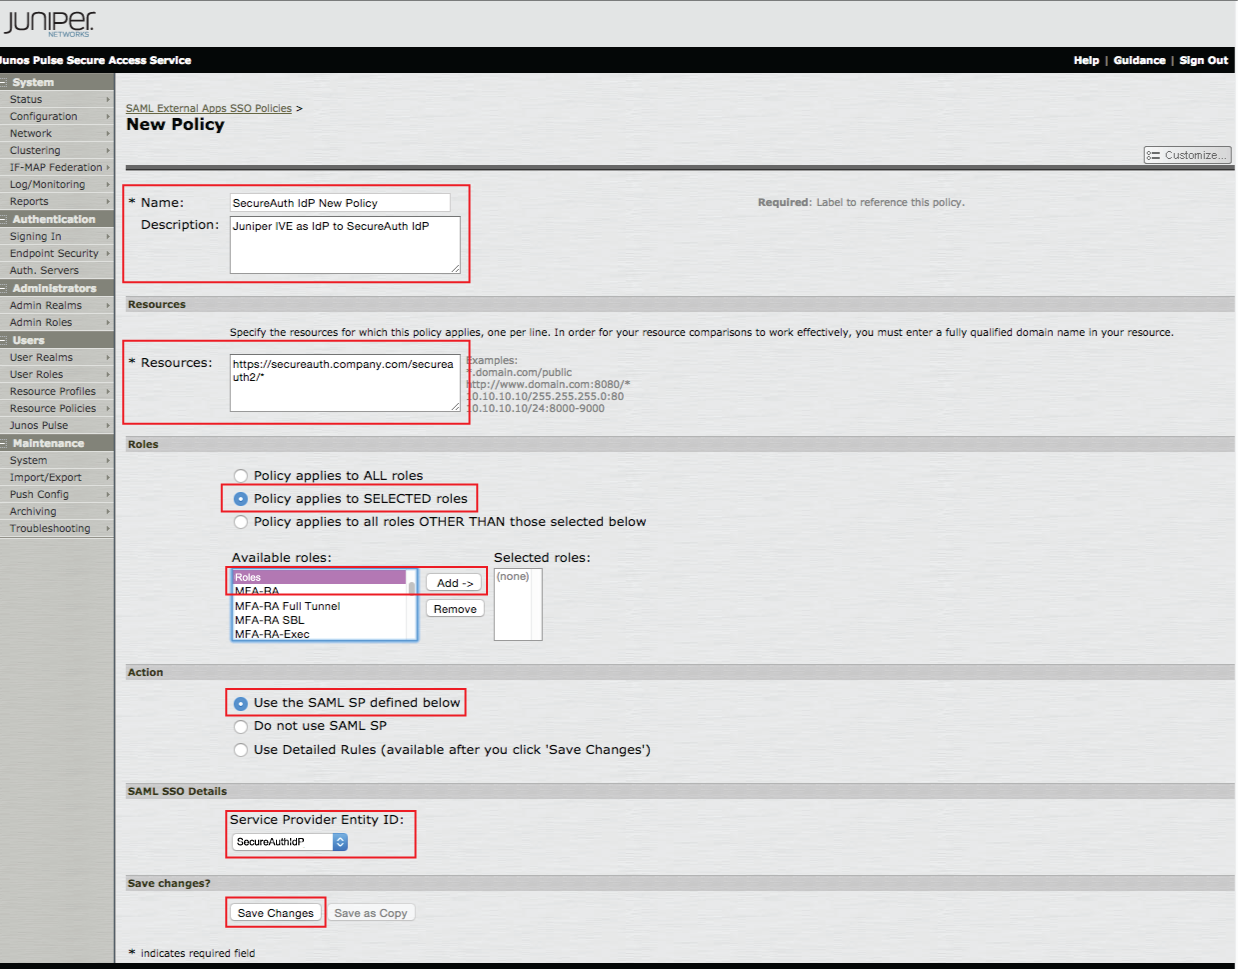
34. Click New Policy...
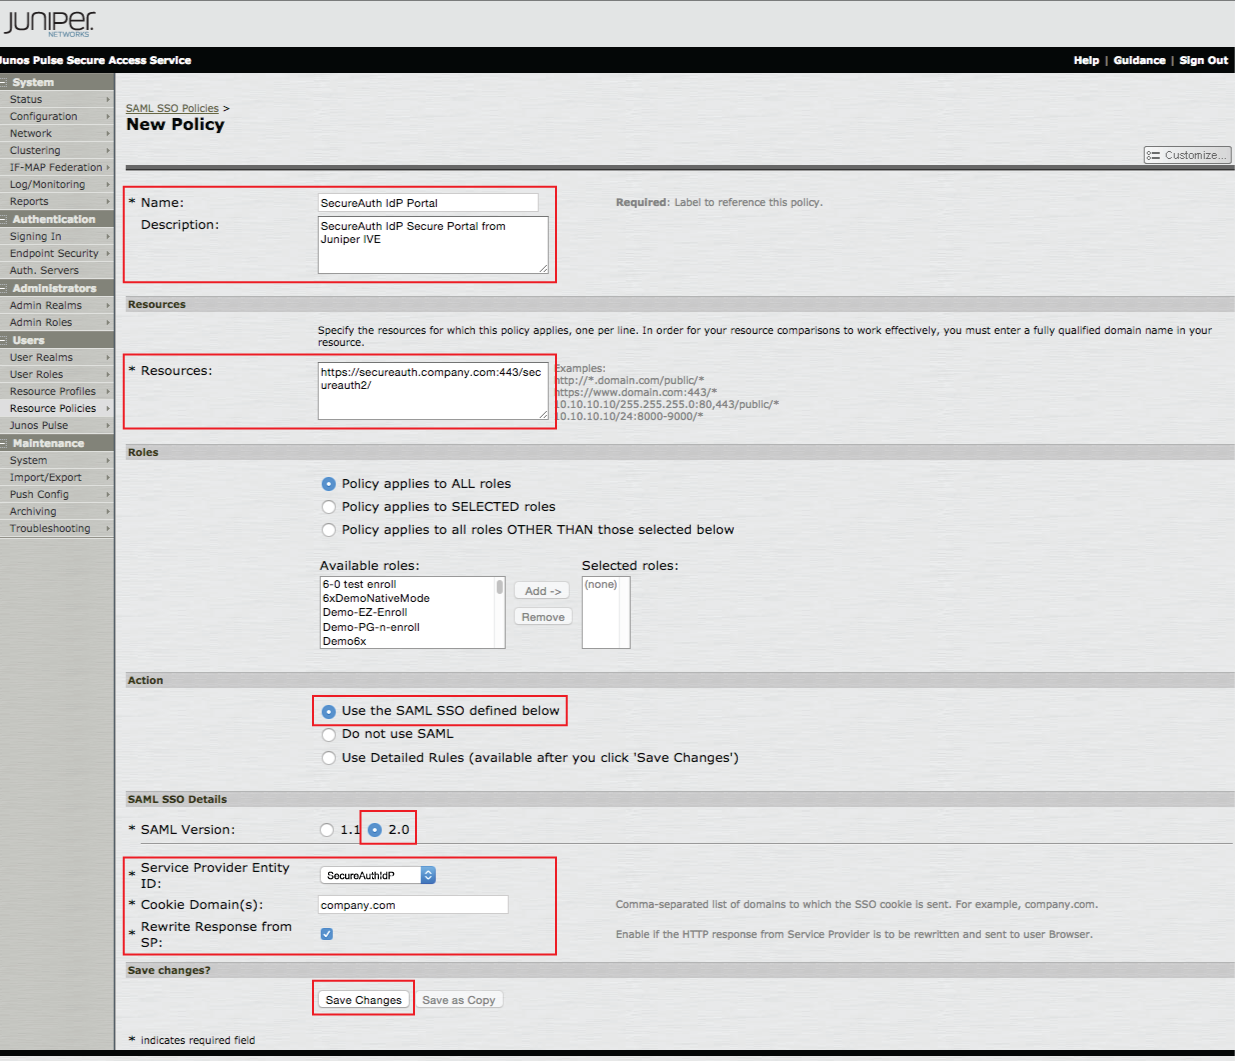 |
35. Provide a Name and Description for the new policy
36. Provide the FQDN of the SecureAuth IdP appliance, followed by the SecureAuth IdP realm to which the SAML assertion will be sent, e.g.https://secureauth.company.com/secureauth2/ in the Resources field
37. Apply the policy to the appropriate Roles
38. Select Use the SAML SSO defined below from the Action options
39. Select 2.0 from the SAML Version options
40. Select the Entity ID set in step 20 (e.g. SecureAuthIdP) from the Service Provider Entity ID dropdown
41. Set the Cookie Domain(s) to the domain names for the SSO cookies
42. Check Rewrite Response from SP
43. Click Save Changes
SAML External Apps
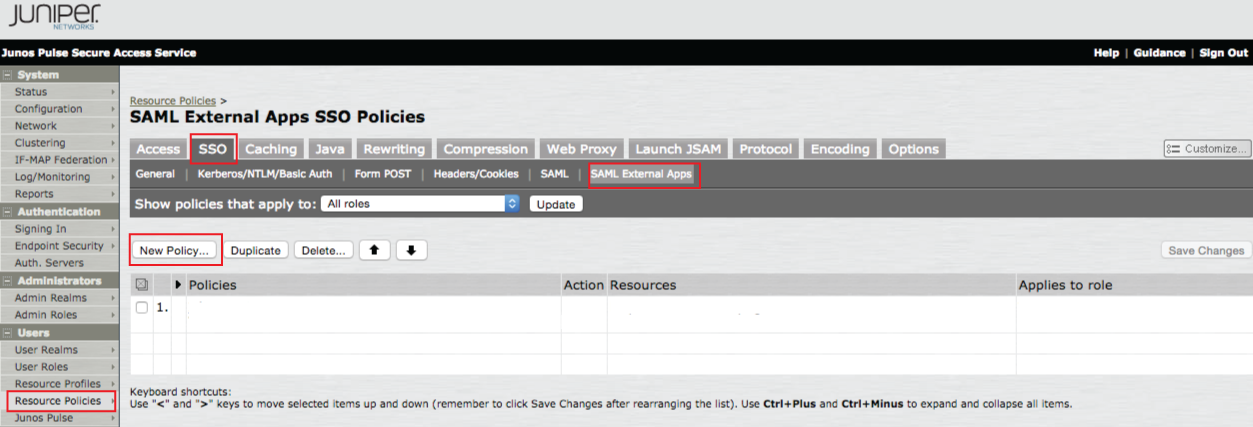 |
44. Select the SAML External Apps menu option from the SSO section
45. Click New Policy...
 |
46. Provide a Name and Description for the new policy
47. Provide the FQDN of the SecureAuth IdP appliance, followed by theSecureAuth IdP realm to which the SAML assertion will be sent, e.g.https://secureauth.company.com/secureauth2/ in theResources field
48. Select Policy applies to SELECTED roles from the Roles options
49. Select the Roles to which this policy applies, and click Add
50. Select Use the SAML SP defined below from the Actions options
51. Select the Entity ID set in step 20 (e.g. SecureAuthIdP) from the Service Provider Entity ID dropdown
52. Click Save Changes
SecureAuth IdP Configuration Steps
Data
 |
1. In the Membership Connection Settings section, select No Data Store from the Data Store dropdown
Warning
Click Save once the configurations have been completed and before leaving the Data page to avoid losing changes
Workflow
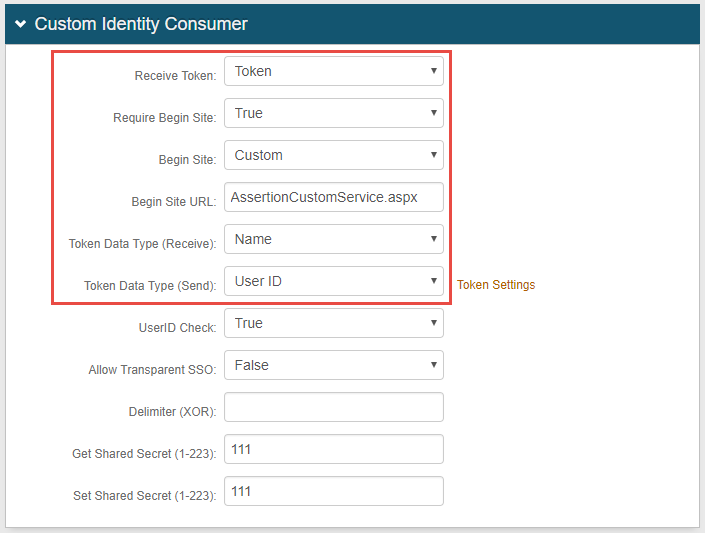 |
2. In the Custom Identity Consumer section, select Token from the Receive Token dropdown
3. Select True from the Require Begin Site dropdown
4. Select Custom from the Begin Site dropdown
5. Set the Begin Site URL to AssertionConsumerService.aspx
6. Select Name from the Token Data Type (Receive) dropdown
7. Select User ID from the Token Data Type (Send) dropdown
SAML Consumer
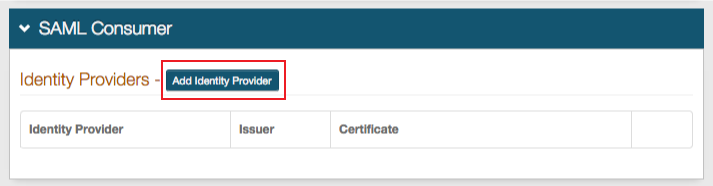 |
8. Click Add Identity Provider to add Juniper IVE as the SAML IdP
Add Identity Provider
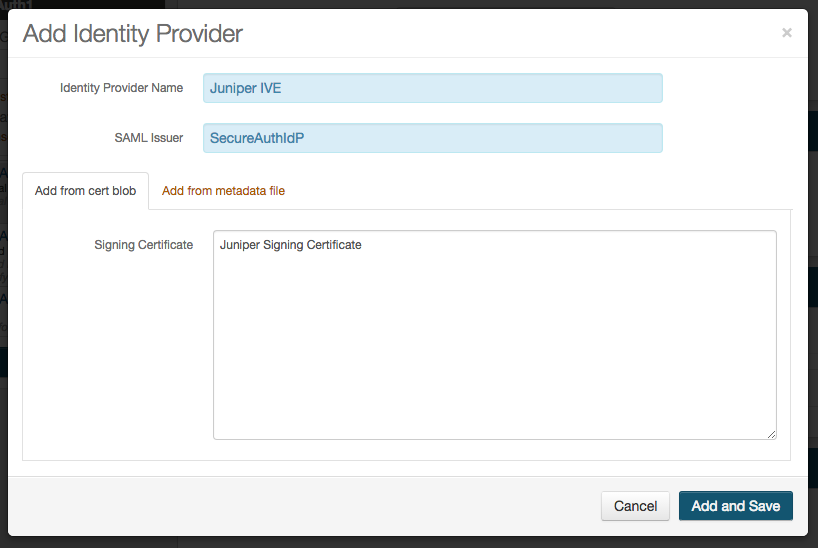 |
9. Set the Identity Provider Name to a friendly name that appears on the Workflow page
10. Set the SAML Issuer to the same Entity ID from the Juniper Configuration Steps (step 20), e.g. SecureAuthIdP
11. Copy the contents of the SSL Certificate and paste the BLOB into the Signing Certificate field
12. Click Add and Save
Warning
Click Save once the configurations have been completed and before leaving the Workflow page to avoid losing changes
Post Authentication
 |
13. In the Forms Auth / SSO Token section, click View and Configure FormsAuth keys / SSO token
Forms Authentication
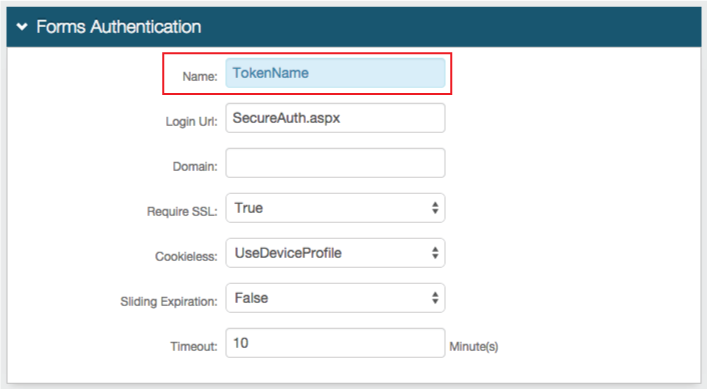 |
14. Set the Name of the FBA token to any name
Authentication Cookies
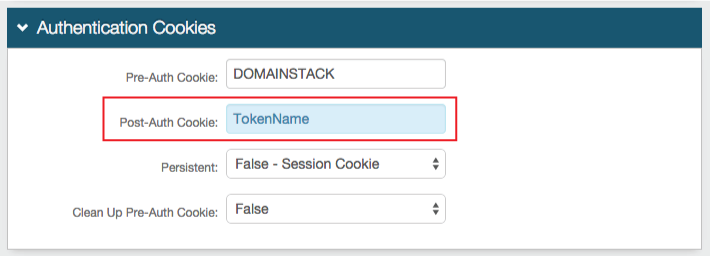 |
15. Set the Post-Auth Cookie name to the same token name set in step 14
The FBA Token Name and the Post-Auth Cookie Name must match in realms utilizing the SAML Multi-tenant Consumer
Warning
Click Save once the configurations have been completed and before leaving the Forms Authentication page to avoid losing changes