Native Mobile App Integration Guide
Introduction
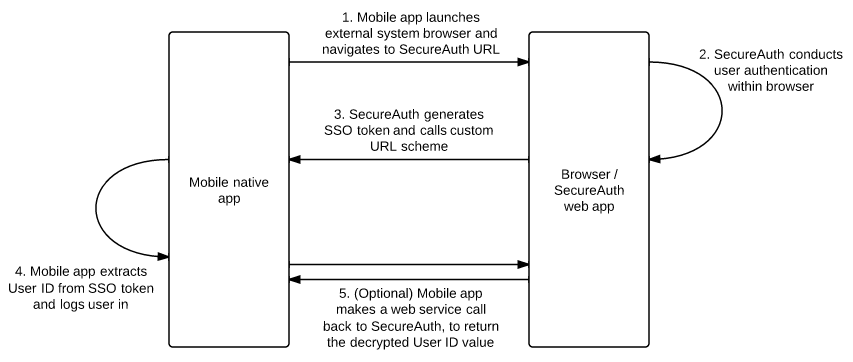
Use this guide to enable the integration of and the appropriate redirection to iOS, Android, and Windows RT native mobile applications, post-authentication. Through this integration, 2-Factor Authentication and Single Sign-on (SSO) access can be achieved.
Workflow Diagram:
 |
Prerequisites
1. Have native mobile application(s) and access to the source code
2. Create a New Realm for the native mobile app(s) integration in the SecureAuth IdP Web Admin
3. Configure the following tabs in the Web Admin before configuring the Post Authentication tab:
Overview – the description of the realm and SMTP connections must be defined
Data – an enterprise directory must be integrated with SecureAuth IdP
Workflow – the way in which users will access this application must be defined
Multi-Factor Methods – the Multi-Factor Authentication methods that will be used to access this page (if any) must be defined
Native Mobile App Configuration Steps
Define URL Scheme for Native Mobile Application
Android and iOS native mobile applications enable the registration of the app to a certain custom URL scheme
This step may have already been completed when the app was first developed; but if not, it is important that a unique URL scheme is created to ensure that it will not conflict with any other applications
For this configuration, the custom URL scheme foo will be used
Android
Add an intent filer to the activity in the AndroidManifest.xml file
<activity android:name=".LoginActivity" android:launchMode="singleTask">
  …
  <intent-filter>
    <action android:name="android.intent.action.VIEW" />
      <category android:name="android.intent.category.DEFAULT" />
      <category android:name="android.intent.category.BROWSABLE" />
      <data android:scheme="foo" />
    </intent-filter>
   …
</activity>
iOS
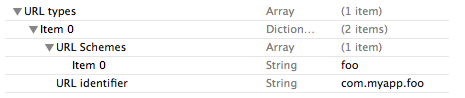 |
1. Open the Info.plist file, right-click to Add Row, and select URL types as the key
2. Right-click on the new URL types row to Add Row, and an Item will be created underneath it
3. Expand the new added item and set the URL Identifier to a unique value that uses a reverse domain style, e.g. com.myapp.foo
4. Add Row under the item, select URL Schemes as the key, and set it to foo
Windows RT
The application receives activation events only for the URI scheme names listed in the package manifest
Indicate whether the application handles the secureauthclient URL scheme name
This is a brief description of each of the fields that will be filled out:
Field | Description |
Name | Choose a name for a group of file types that share the same display name, logo, info tip, and edit flags. Choose a group name that can stay the same across app updates. Note: The Name must be in all lower case letters. |
Display Name | Specify the display name to identify the URI scheme name in the Set Default Programs on the Control Panel. |
Logo | Specify the logo that is used to identify the URI scheme name in the Set Default Programs on the Control Panel. If no Logo is specified, the small logo for the app is used. |
1. Select the Declarations tab
2. Select Protocol from the dropdown list, and click Add
3. Set the Name to secureauthclient
4. Save the change to package.appxmanifest
Launch External System Browser and Navigate to SecureAuth IdP for Authentication
Here, the application's existing authentication step (e.g. username and password in a view) is being replaced with launching an external system browser
The Start URL should be defined in the code or in the application's configuration file
Android
Add a control to the layout xml file first, then add the onClickListener to it
Note
Replace the https://secureauth.company.com/SecureAuth1/ value with the actual Fully Qualified Domain Name (FQDN) of the SecureAuth IdP appliance, followed by the native mobile app-integrated realm (configured below)
@Override
protected void onCreate(Bundle savedInstanceState) {
  super.onCreate(savedInstanceState);
  …
  Button button = (Button) findViewById(R.id.login_button);
  button.setOnClickListener(new OnClickListener() {
    @Override
    public void onClick(View v) {
      Intent i = new Intent(Intent.ACTION_VIEW, "https://secureauth.company.com/SecureAuth1/");
      startActivity(i);
    }
  });
  …
}
iOS
Add a control to the xib or storyboard file, then associate it with an action
Note
Replace the https://secureauth.company.com/SecureAuth1/ value with the actual Fully Qualified Domain Name (FQDN) of the SecureAuth IdP appliance, followed by the native mobile app-integrated realm (configured below)
- (IBAction) startLogin: (id)sender
{
 NSURL *url = [NSURL URLWithString:@"https://secureauth.company.com/SecureAuth1/"];
  [[UIApplication sharedApplication] openURL:url];
}
Windows RT
Add a button control and then attach a click event to it
Replace the https://secureauth.company.com/SecureAuth1/ value with the actual Fully Qualified Domain Name (FQDN) of the SecureAuth IdP appliance, followed by the native mobile app-integrated realm (configured below)
private void Button_Click(object sender, RoutedEventArgs e)
{
   String realmUrl = @"https://secureauth.company.com/SecureAuth1/";
   Uri newUri = new Uri(realmUrl); Windows.System.Launcher.LaunchUriAsync(newUri);
}
Accept SecureAuth IdP Token in Mobile Native App
Whether the token coming from SecureAuth IdP is encrypted or not, it still needs to be accepted through the same step
If it is a clear text UserID, it can be used immediately; if it is encrypted, the optional next step must be administered
Android
Read the value out of the Query String
@Override
protected void onNewIntent(Intent intent) {
  Uri data = intent.getData();
  if (data != null) {
    String accessToken = data.getQueryParameter("UserID");
    // Use the accessToken.
  }
}
iOS
Read the value out of the Query String
- (BOOL)application:(UIApplication *)application handleOpenURL:(NSURL *)url
{
  for (NSString *param in [[url query] componentsSeparatedByString:@"&"])
  {
    NSArray *parts = [param componentsSeparatedByString:@"="];
    if ([parts count] == 2 &&
        [[parts objectAtIndex:0] isEqualToString:@"UserID"])
    {
      NSString *accessToken = [parts objectAtIndex:1];
      // Use the UserID Query String.
    }
  }
  return YES;
}
Windows RT
The onActivated event handler receives all activation events
The Kind property indicates the type of activation events, and this example is set up to handle Protocol activation events
protected override void OnActivated(IActivatedEventArgs args)
{
   if (args.Kind == ActivationKind.Protocol)
   {
      ProtocolActivatedEventArgs protocolArgs = args as ProtocolActivatedEventArgs;
      if (protocolArgs != null)
      {
         string[] query = protocolArgs.Uri.Query.Substring(1).Split(new[] { "=" }, StringSplitOptions.RemoveEmptyEntries);
         string userid;
         if (query.Length == 2)
         {
            if (query[0] == "userid")
               userid = query[1];
         }
      }
   }
}
(OPTIONAL) Decrypt SecureAuth IdP Token
In the case that the SecureAuth IdP token is encrypted, instruct the mobile application to make a web service call to obtain the decrypted value
Android
Non-time Sensitive GetUserId (POC)
Call the GetUserId function that is non-time sensitive, e.g. for POC
Note
Replace the secureauth.company.com value with the actual Fully Qualified Domain Name (FQDN) of the SecureAuth IdP appliance (two instances)
import org.ksoap2.SoapEnvelope;
import org.ksoap2.serialization.SoapObject;
import org.ksoap2.serialization.SoapSerializationEnvelope;
import org.ksoap2.transport.HttpTransportSE;
import android.app.*;
import android.os.*;
import android.widget.TextView;
public class ksoap2sample extends Activity {
  /** Called when the activity is first created. */
  private static final String SOAP_ACTION = "https://secureauth.company.com/SecureAuthWS/UserService.asmx";
  private static final String METHOD_NAME = "GetUserId";
  private static final String NAMESPACE = "http://secureauth.com";
  private static final String URL = " https://secureauth.company.com/SecureAuthWS/UserService.asmx"; TextView tv;
@Override
  public void onCreate(Bundle savedInstanceState) {
    super.onCreate(savedInstanceState);
    setContentView(R.layout.main);
    tv=(TextView)findViewById(R.id.text1);
    call();
  }
public void call()
  {
    try {
      SoapObject request = new SoapObject(NAMESPACE, METHOD_NAME);
      request.addProperty("EncryptedUserString", accessToken);
      SoapSerializationEnvelope envelope = new SoapSerializationEnvelope(SoapEnvelope.VER11);
      envelope.dotNet=true;
      envelope.setOutputSoapObject(request);
      HttpTransportSE androidHttpTransport = new HttpTransportSE(URL);
      androidHttpTransport.call(SOAP_ACTION, envelope);
      Object result = (Object)envelope.getResponse();
      tv.setText(result.toString());
    } catch (Exception e) {
      tv.setText(e.getMessage());
    }
  }
}
Time Sensitive GetUserIdWithTimeCheck (Production)
Call the GetUserIdWithTimeCheck function that is time sensitive, e.g. for Production
Note
Replace the secureauth.company.com value with the actual Fully Qualified Domain Name (FQDN) of the SecureAuth IdP appliance (two instances)
import org.ksoap2.SoapEnvelope;
import org.ksoap2.serialization.SoapObject;
import org.ksoap2.serialization.SoapSerializationEnvelope;
import org.ksoap2.transport.HttpTransportSE;
import android.app.*;
import android.os.*;
import android.widget.TextView;
public class ksoap2sample extends Activity {

  /** Called when the activity is first created. */
  private static final String SOAP_ACTION = "https://secureauth.company.com/SecureAuthWS/UserService.asmx";
  private static final String METHOD_NAME = "GetUserIdWithTimeCheck";
  private static final String NAMESPACE = "http://secureauth.com";
  private static final String URL = " https://secureauth.company.com/SecureAuthWS/UserService.asmx"; TextView tv;
@Override
  public void onCreate(Bundle savedInstanceState) {
    super.onCreate(savedInstanceState);
    setContentView(R.layout.main);
    tv=(TextView)findViewById(R.id.text1);
    call();
  }
public void call()
  {
    try {
      SoapObject request = new SoapObject(NAMESPACE, METHOD_NAME);
      request.addProperty("EncryptedUserString", accessToken);
      request.addProperty("ValiditySeconds", 5);
      SoapSerializationEnvelope envelope = new SoapSerializationEnvelope(SoapEnvelope.VER11);
      envelope.dotNet=true;
      envelope.setOutputSoapObject(request);
      HttpTransportSE androidHttpTransport = new HttpTransportSE(URL);
      androidHttpTransport.call(SOAP_ACTION, envelope);
      Object result = (Object)envelope.getResponse();
      tv.setText(result.toString());
    } catch (Exception e) {
      tv.setText(e.getMessage());
    }
  }
}
iOS
Non-time Sensitive GetUserId (POC)
Call the GetUserId function that is non-time sensitive, e.g. for POC
Note
Contact SecureAuth Support to download the files XMLGetUserID.h and XMLGetUserID.m
1. #import the header file XMLGetUserID.h
2. Implement the delegate, which is the callback function for the XMLGetUserID class
@interface ViewController : UIViewController <UITextFieldDelegate, XMLGetUserIDDelegate>
3. Add a method to initialize the class and make the web service call
- (void)getDecryptedUserID:(NSString*)encUserID
{
    XMLGetUserID *xmlGetUserID = [[XMLGetUserID alloc] init];
    NSArray *arry = [NSArray arrayWithObjects:encUserID, nil];
    xmlGetUserID.delegate2 = self;
    [xmlGetUserID callGetUserID:arry];
    xmlGetUserID = nil;
}
4. Implement the delegate from XMLGetUserID class
- (void)delegateGetUserID:(XMLGetUserID *)xml withDic:(NSDictionary *)dic
{
     if (dic.count > 0)
    {
        // User login
        self.IsLoggedIn = YES;
        self.userName.text = [dic valueForKey:@"GetUserIDResult"];
         [self updateLabelState:self.IsLoggedIn];
    }
}
Time Sensitive GetUserIdWithTimeCheck (Production)
Call the GetUserIdWithTimeCheck function that is time sensitive, e.g. for Production
Note
Contact SecureAuth Support to download the files XMLGetUserID.h and XMLGetUserID.m
1. #import the header file XMLGetUserID.h
2. Implement the delegate, which is the callback function for the XMLGetUserID class
@interface ViewController : UIViewController <UITextFieldDelegate, XMLGetUserIDDelegate>
3. Add a method to initialize the class and make the web service call
- (void)getDecryptedUserID:(NSString*)encUserID
{
    XMLGetUserID *xmlGetUserID = [[XMLGetUserID alloc] init];
    NSArray *arry = [NSArray arrayWithObjects:encUserID, nil];
    xmlGetUserID.delegate2 = self;
    [xmlGetUserID callGetUserID:arry];
    xmlGetUserID = nil;
}
4. Implement the delegate from the XMLGetUserID class
- (void)delegateGetUserID:(XMLGetUserID *)xml withDic:(NSDictionary *)dic
{
     if (dic.count > 0)
    {
        // User login
        self.IsLoggedIn = YES;
        self.userName.text = [dic valueForKey:@"GetUserIDResult"];
         [self updateLabelState:self.IsLoggedIn];
    }
}
(OPTIONAL / OUT OF SCOPE) Maintain Native Mobile App's Token for Internal SSO
Once the native mobile application has obtained the authenticated UserID and has successfully logged in the user, it is up the customer's design whether to cache the token locally on the app to enable SSO access for subsequent mobile app launches
As an alternative design, the application can launch the external system browser to SecureAuth IdP, and allow SecureAuth IdP to inspect the token
Note
There are pros and cons to each design
One offers transparent SSO for subsequent logins, while the other offer great user revocation control
Contact SecureAuth Support for more information and to determine which design would best suit the needs
SecureAuth IdP Configuration Steps
Post Authentication
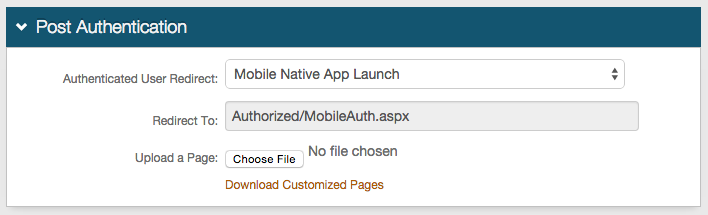 |
1. In the Post Authentication section, select Mobile Native App Launch Page from the Authenticated User Redirect dropdown
2. An unalterable URL will be auto-populated in the Redirect To field, which will append to the domain name and realm number in the address bar (Authorized/MobileAuth.aspx)
User ID Mapping
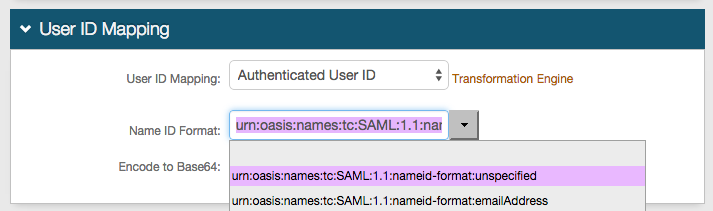 |
3. Select Authenticated User ID from the User ID Mapping dropdown
If the user ID is mapped to a different SecureAuth IdP Profile Property (Data tab), select that value instead
Mobile Browser Token
 |
4. Set a Name for the Mobile Browser Token
Native Mobile Apps
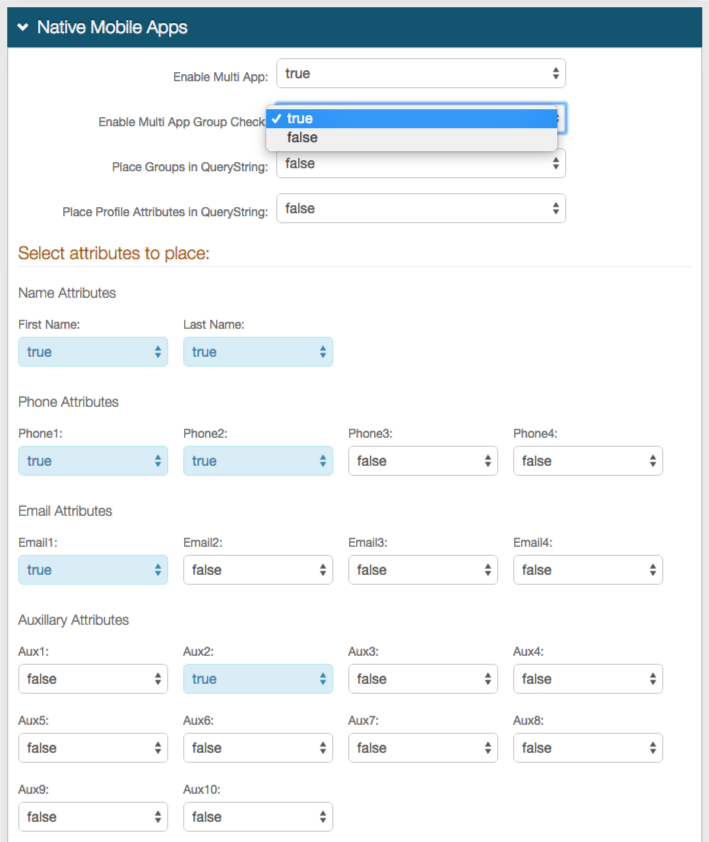 |
5. Select True from the Enable Multi App dropdown if this integration will include more than one native mobile application
Select False if this integration is for only one native mobile application
6. Select True from the Enable Multi App Group Check dropdown if integrating multiple native mobile applications and if SecureAuth IdP will check user group information to allow or deny access
Select False if no group restrictions are required
7. Select True from the Place Groups in QueryString dropdown if the user group information will be returned to the application in a query string
8. Select True from the Place Profile Attributes in QueryString dropdown if the user profile attributes will be returned to the application in a query string
9. Select True from the dropdowns of the Attributes that will be sent in the assertion
Attributes that set to False will not be sent in the assertion
Custom URL Schemes
Note
This section's configuration varies depending on the selection made in step 6
If Enable Multi App Group Check is set to False, follow these configuration steps
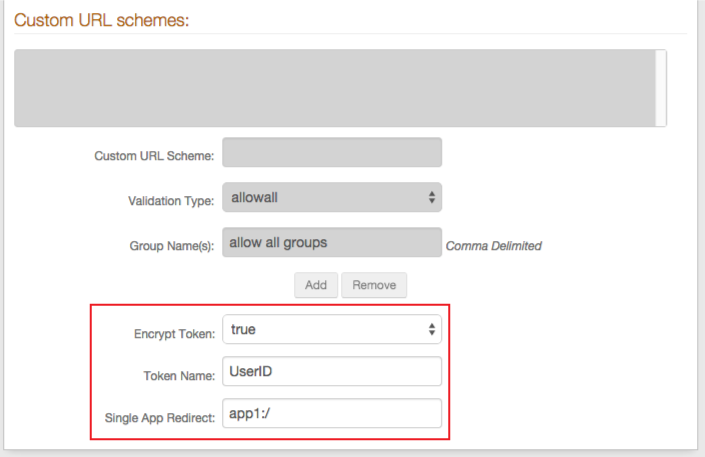 |
10. Select True from the Encrypt Token dropdown if the token containing the authenticated UserID and other attributes is to be encrypted
If True, the optional Decryption Configuration Steps of the Native Mobile App will be required
11. Set a Token Name for the assertion token, e.g. UserID
12. Set the Single App Redirect to the URL Scheme of the native mobile application, e.g. foo:/ or app1:/ to ensure appropriate redirection from SecureAuth IdP
If Enable Multi App Group Check is set to True, follow these configuration steps
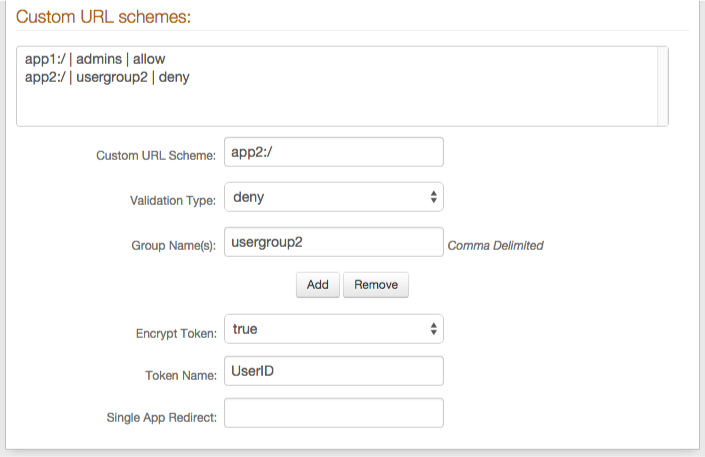 |
10. Provide the URL scheme of the native mobile app in the Custom URL Scheme field, e.g. foo:/ or app1:/
11. Select the appropriate restriction from the Validation Type dropdown (allowall, allow, deny)
12. If allow is selected in step 11, provide the Group Name(s) that will alone be granted access to the application; if deny is selected in step 11, provide the Group Name(s) that will alone be denied access to the application
13. Click Add, see the results in the field above, and repeat steps 10-12 for additional native mobile applications
14. Select True from the Encrypt Token dropdown if the token containing the authenticated UserID and other attributes is to be encrypted
If True, the optional Decryption Configuration Steps of the Native Mobile App will be required
15. Set a Token Name for the assertion token, e.g. UserID
Warning
Click Save once the configurations have been completed and before leaving the Post Authentication page to avoid losing changes
Forms Auth / SSO Token
 |
These are optional configurations
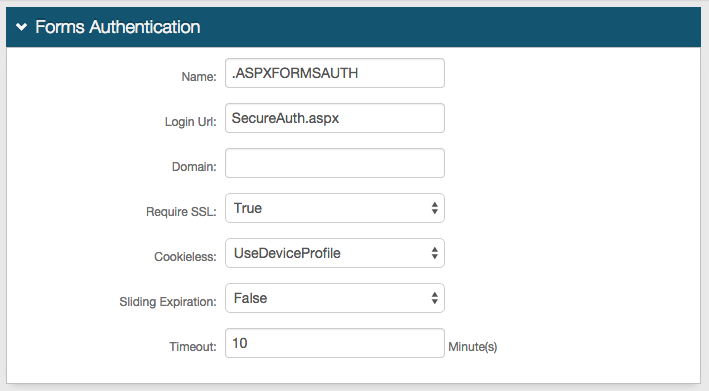 |
1. If SSL is required to view the token, select True from the Require SSL dropdown
2. Choose whether SecureAuth IdP will deliver the token in a cookie to the user's browser or device:
UseCookies enables SecureAuth IdP to always deliver a cookie
UseUri disables SecureAuth IdP to deliver a cookie, and instead deliver the token in a query string
AutoDetect enables SecureAuth IdP to deliver a cookie if the user's settings allow it
UseDeviceProfile enables SecureAuth IdP to deliver a cookie if the browser's settings allow it, no matter the user's settings
3. Set the Sliding Expiration to True if the cookie remains valid as long as the user is interacting with the page
4. Set the Timeout length to determine for how many minutes a cookie is valid
Note
No configuration is required for the Name, Login URL, or Domain fields
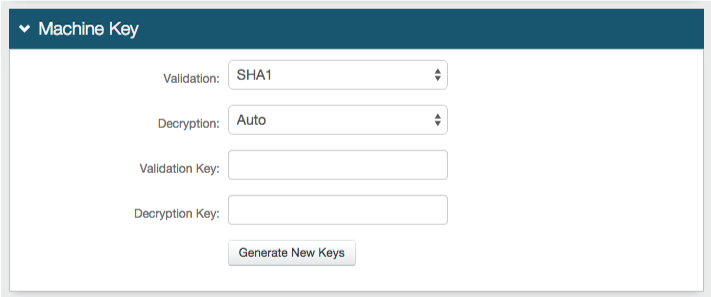 |
5. No changes are required in the Validation field, unless the default value does not match the company's requirement
If a different value is required, select it from the dropdown
6. No changes are required in the Decryption field, unless the default value does not match the company's requirement
If a different value is required, select it from the dropdown
Note
No configuration is required for the Validation Key or Decryption Key fields
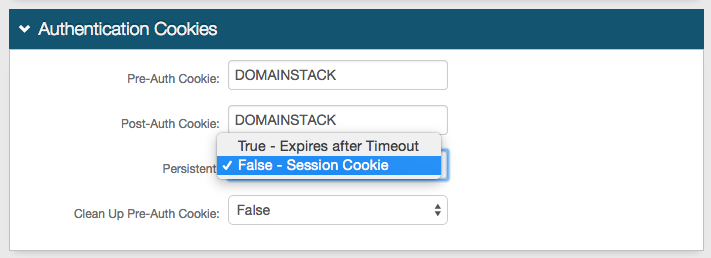 |
7. Enable the cookie to be Persistent by selecting True - Expires after Timeout from the dropdown
Selecting False - Session Cookie enables the cookie to be valid as long as the session is open, and will expire once the browser is closed or the session expires
Note
No configuration is required for the Pre-Auth Cookie, Post-Auth Cookie, or the Clean Up Pre-Auth Cookie fields
Warning
Click Save once the configurations have been completed and before leaving the Forms Auth / SSO Token page to avoid losing changes