Citrix NetScaler AGEE 11.0 Published Apps (SP-initiated) Integration Guide (SAML)
Introduction
Use this guide to enable Multi-Factor Authentication and Single Sign-on (SSO) access via SAML to Citrix NetScaler AGEE 11.0 Published Apps.
Warning
Citrix Desktop Receiver does not support SAML authentication and Citrix Mobile Receiver will support SAML authentication in Web Interface Setup only
Prerequisites
1. Have Citrix NetScaler 11.0 with a valid license
2. Have NS platform license and separate AG license for Access Gateway (AG) functionality
Refer to detailed Citrix license information
3. Ensure that the Citrix NetScaler server has a valid identity certificate installed
An SSL Certificate can be purchased from SSL certificate providers (Entrust, VeriSign, GoDaddy, etc.)
4. Have Citrix NetScaler Published App(s) and access to the configuration
5. Create a New Realm for the Citrix NetScaler AGEE Published App integration in the SecureAuth IdP Web Admin
6. Configure the following tabs in the Web Admin before configuring the Post Authentication tab:
Overview – the description of the realm and SMTP connections must be defined
Data – an enterprise directory must be integrated with SecureAuth IdP
Workflow – the way in which users will access this application must be defined
Multi-Factor Methods – the Multi-Factor Authentication methods that will be used to access this page (if any) must be defined
SecureAuth IdP Configuration Steps
Post Authentication
 |
1. Select SAML 2.0 (SP Initiated by Post) Assertion Page from the Authenticated User Redirect dropdown in the Post Authentication tab in the Web Admin
2. An unalterable URL will be auto-populated in the Redirect To field, which will append to the domain name and realm number in the address bar (Authorized/SAML20SPInitPost.aspx)
3. A customized post authentication page can be uploaded, but it is not required
User ID Mapping
 |
4. Select Authenticated User ID from the User ID Mapping
In typical scenarios, the Authenticated User ID is sent; however, if the Citrix Published App ID is contained in a different SecureAuth IdP Property, select that value from the dropdown
5. Select urn:oasis:names:tc:SAML:1.1:nameid-format:unspecified from the Name ID Format dropdown (default)
Select a different option if the app requires it, which the Service Provider (SP) will provide
6. Select False from the Encode to Base64 dropdown
SAML Assertion / WS Federation
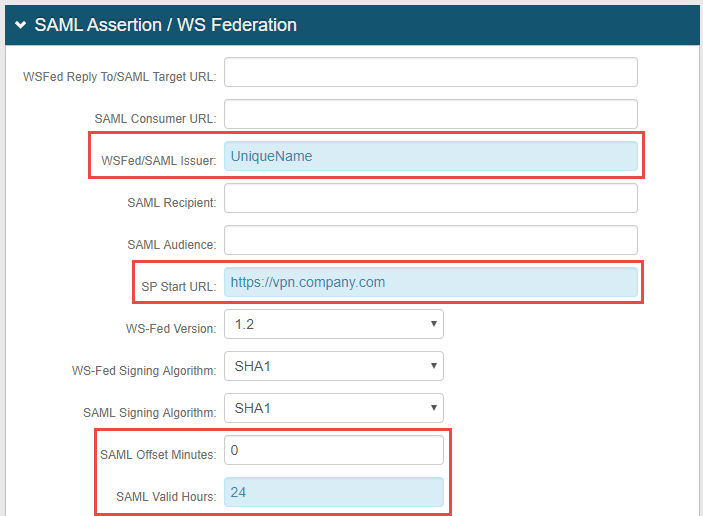 |
7. Set the WSFed/SAML Issuer to a Unique Name that will be shared with Citrix NetScaler
The WSFed/SAML Issuer must match exactly on the SecureAuth IdP side and the Citrix side
8. Provide the SP Start URL to enable SSO and to redirect users appropriately to access Citrix NetScaler Published Apps
This would be the Citrix NetScaler VPN domain URL
9. Set the SAML Offset Minutes to make up for time differences between devices
10. Set the SAML Valid Hours to limit for how long the SAML assertion is valid
Note
No configuration is required for the WSFed Reply To/SAML Target URL, SAML Consumer URL, SAML Recipient, or SAML Audience fields
 |
11. Leave the Signing Cert Serial Number as the default value, unless there is a third-party certificate being used for the SAML assertion
If using a third-party certificate, click Select Certificate and choose the appropriate certificate
12. Download the Assertion Signing Certificate, export it as Base64, and store it on a local PC or Citrix NetScaler appliance to be used below
13. Provide the Domain in order to Download the Metadata File to send to Citrix (if required)
Warning
Click Save once the configurations have been completed and before leaving the Post Authentication page to avoid losing changes
Forms Auth / SSO Token
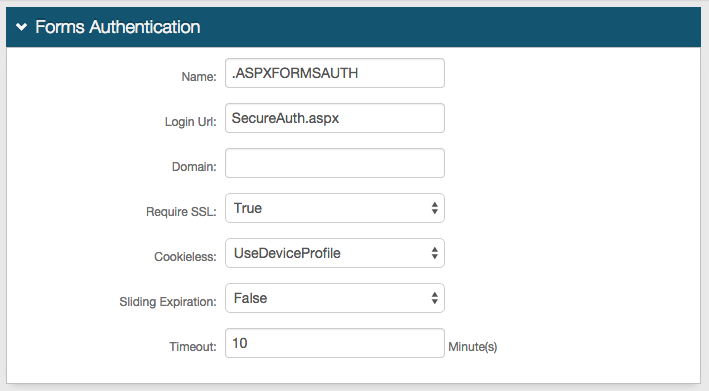
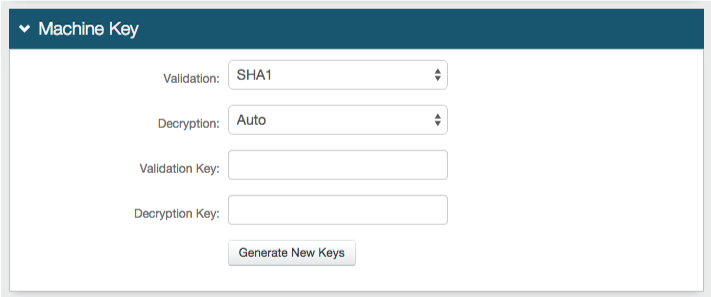
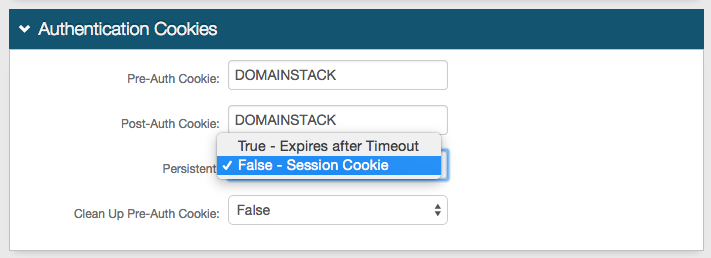
Optionally, in the Forms Auth / SSO Token section, click the View and Configure FormsAuth keys/SSO token link to configure the token/cookie settings and configure this realm for SSO.
 |
Citrix NetScaler Configuration Steps
 |
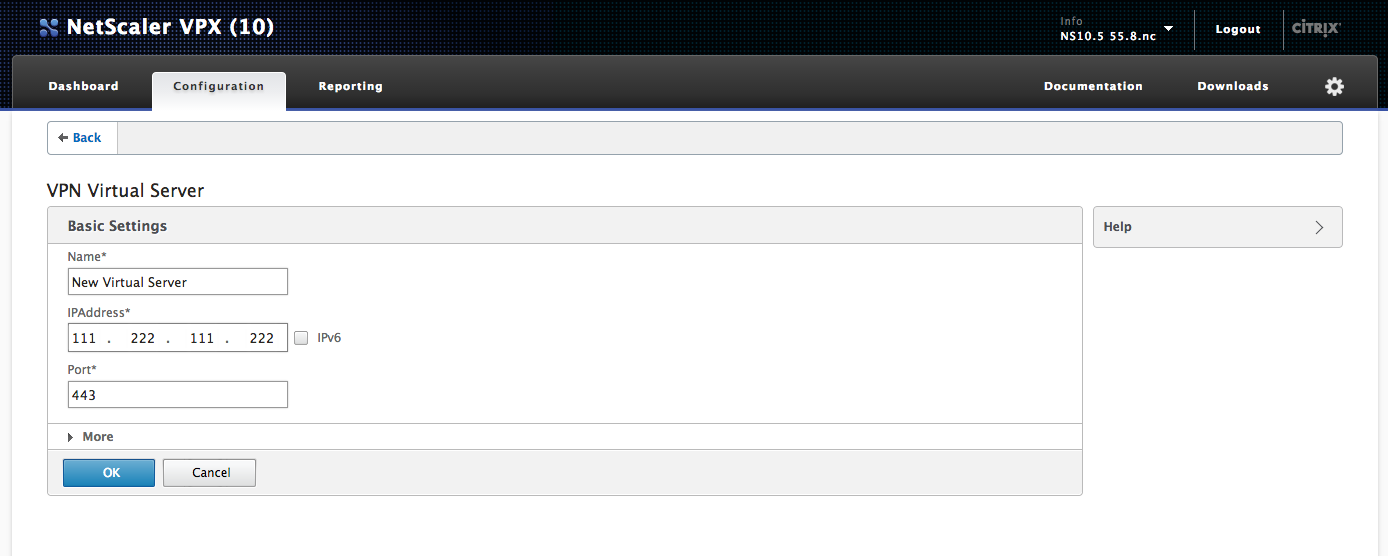
A VPN Virtual Server is required for this integration
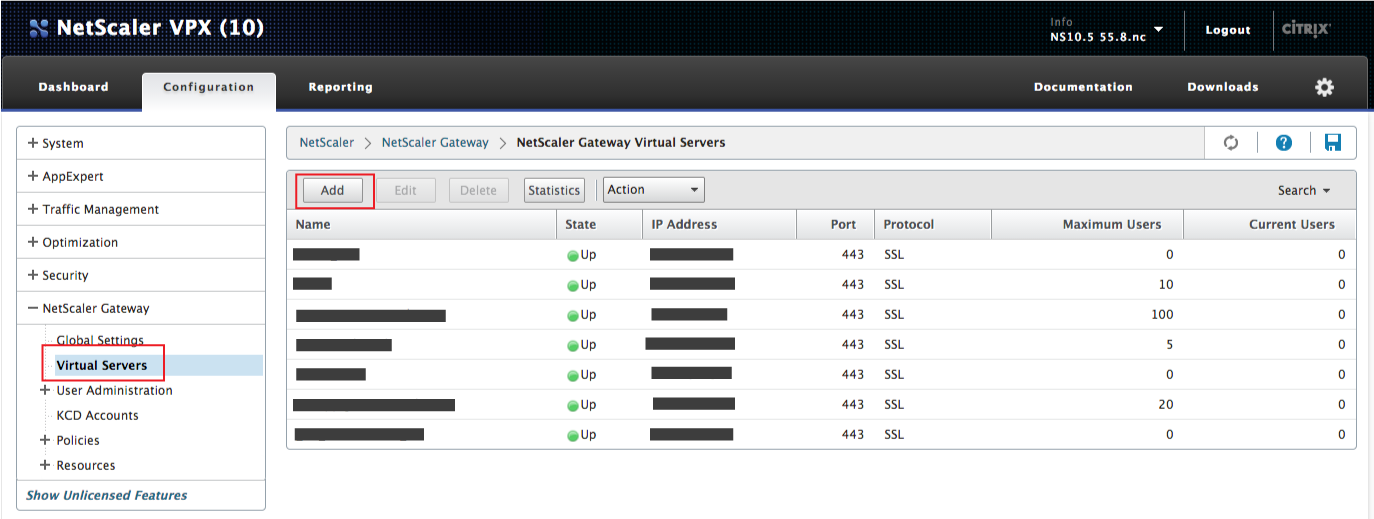
1. Log into the Citrix NetScaler AGEE admin console, and select Virtual Servers under NetScaler Gateway
2. Select the appropriate Virtual Server to use for this integration, or click Add to create a new one
See below for Virtual Server creation steps
Server Certificate
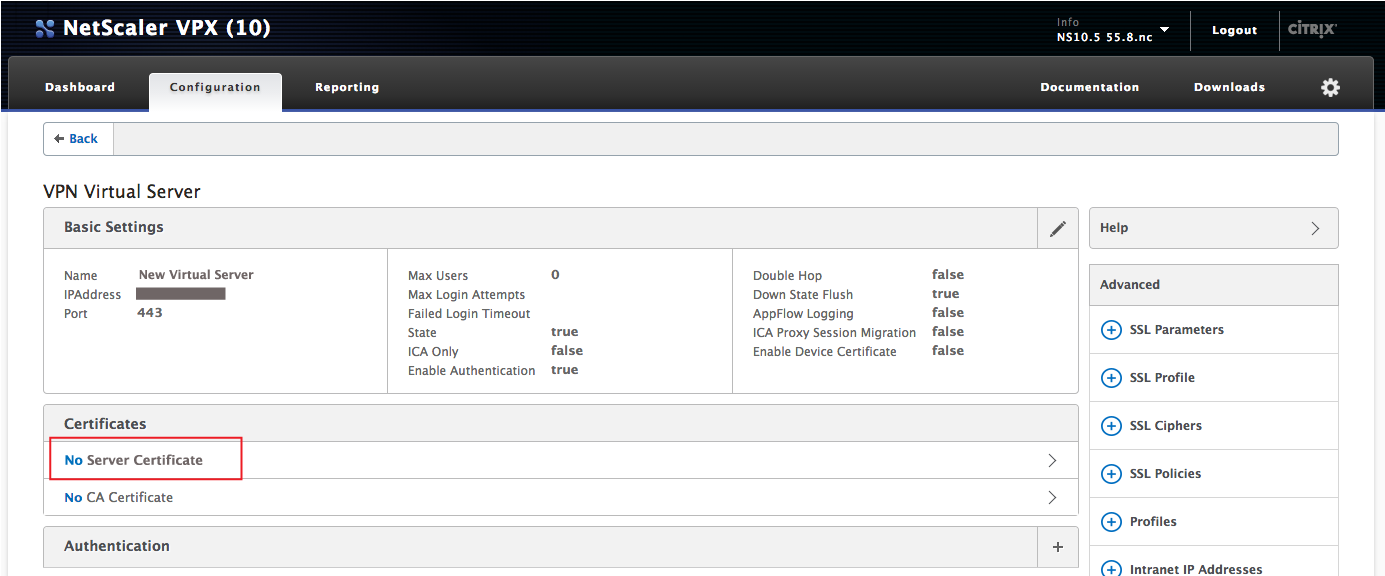 |
3. Open the Virtual Server, and click on the Server Certificate option
 |
4. Select the SSL Identity Certificate (Prerequisites, #3) from the Select Server Certificate dropdown; or click the + to add the SSL Identity Certificate (see below)
5. Once the SSL Identity Certificate is selected, click Bind
SAML Authentication Policy
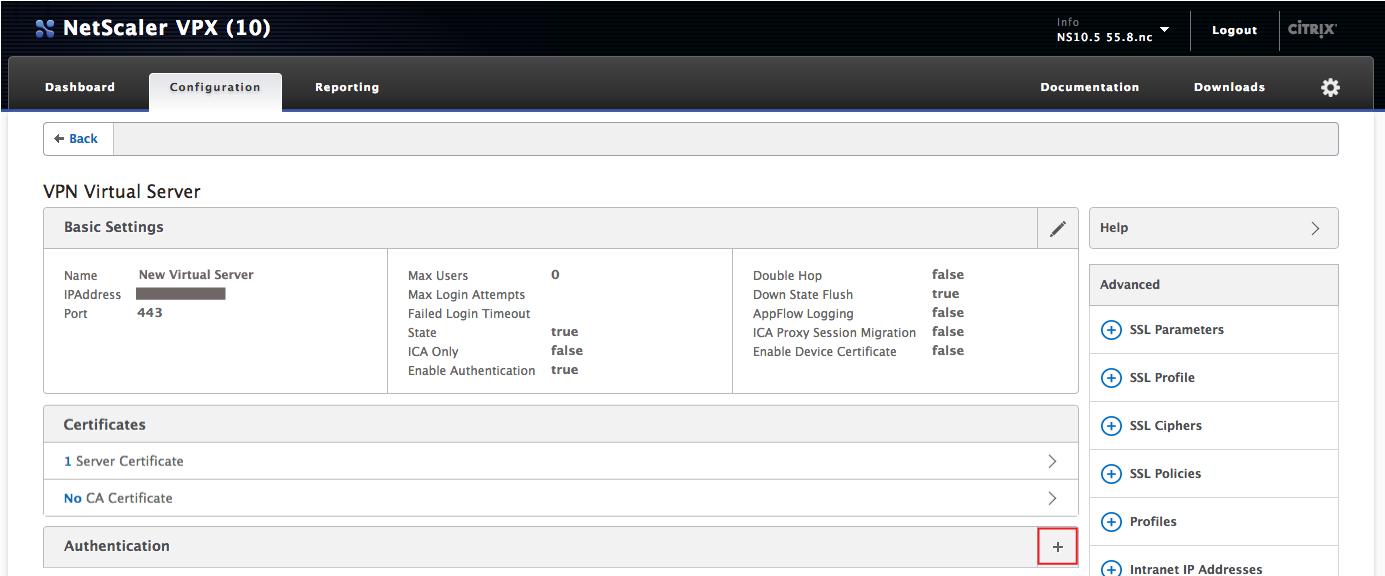 |
6. In the Virtual Server, click the + in the Authentication section to add an Authentication SAML Policy
 |
7. Select SAML from the Choose Policy dropdown
8. Select Primary from the Choose Type dropdown
9. Click Continue
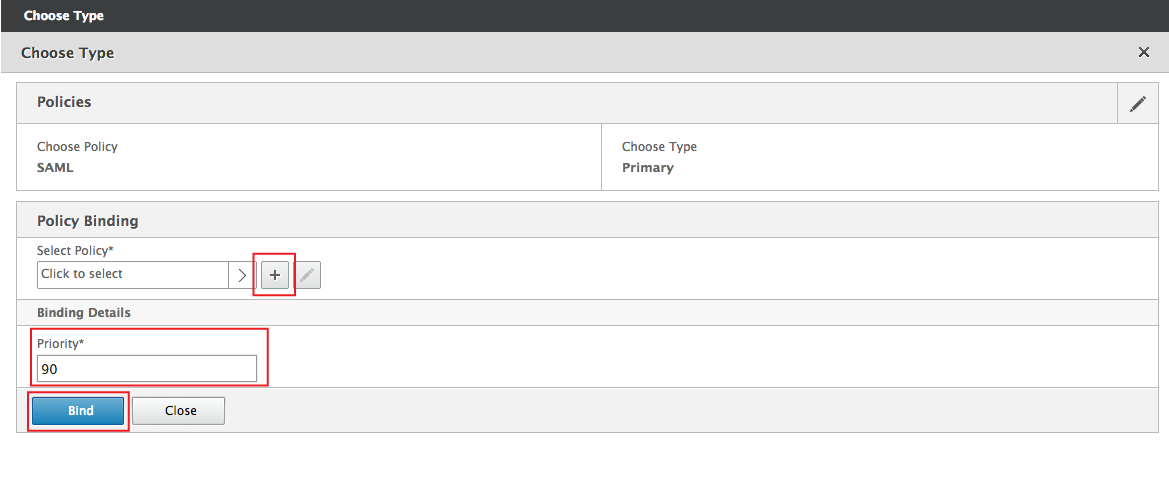 |
10. Click to + in the Select Policy section to create a new SAML policy
11. Once the policy and profile with certificate are created (steps 13-29 below), set the Priority to a value lower than the Priority of the Authentication LDAP Policy (configured below)
12. Click Bind
Create Authentication SAML Policy
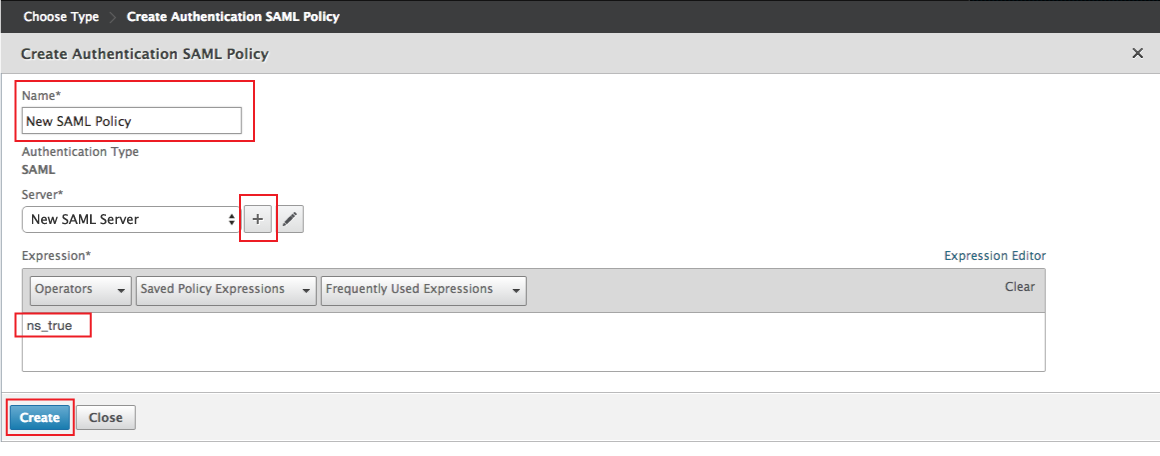 |
13. Provide a Name for the new SAML policy
14. Click the + in the Server section to create a new SAML server
15. Select the newly created SAML server (steps 18-29 below) from the Server dropdown
16. Create an ns_true Expression
17. Click Create
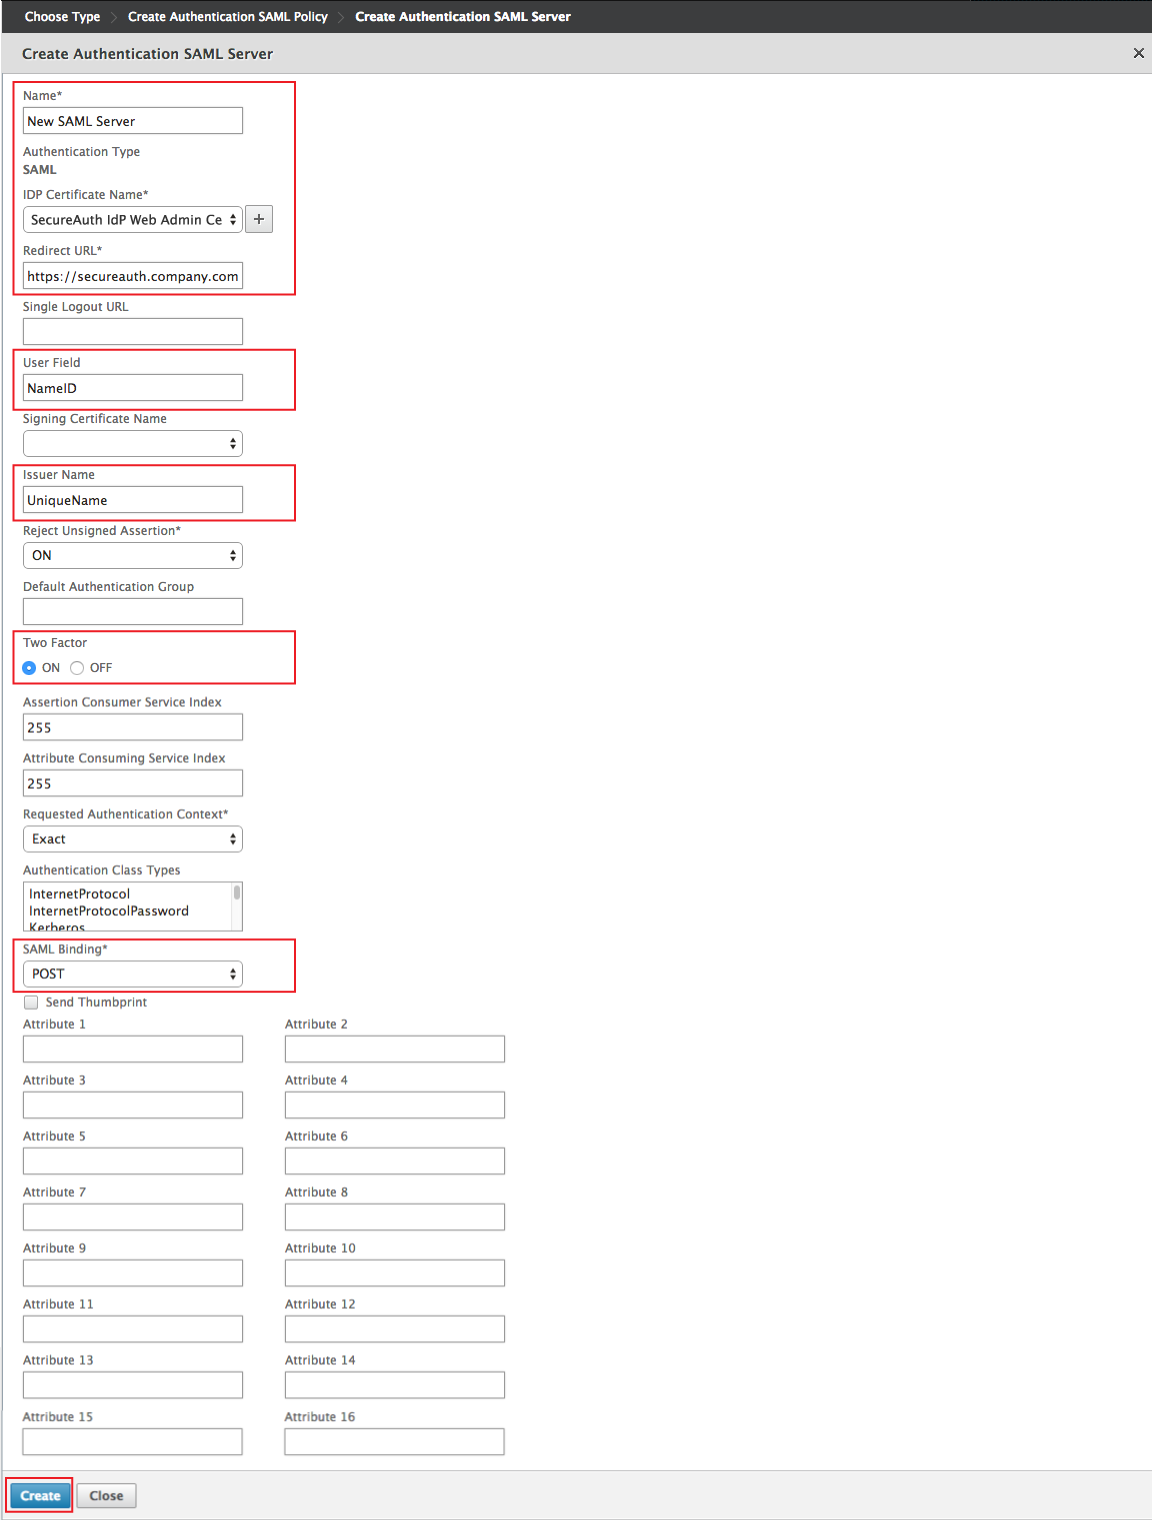 |
18. Provide a Name for the new SAML profile
19. Click the + in the IDP Certificate Name section to add the SAML certificate
20. Select the newly uploaded SAML certificate (steps 26-29 below) from the IDP Certificate Name dropdown
21. Set the Redirect URL to the Fully Qualified Domain Name (FQDN) of the SecureAuth IdP appliance, followed by the Citrix-integrated realm and /secureauth.aspx, e.g. https://secureauth.company.com/secureauth2/secureauth.aspx
22. Set the Issuer Name to the same Unique Name established in the WSFed/SAML Issuer field in the SecureAuth IdP Web Admin (step 7)
23. Select ON from the Two Factor options
24. Select POST from the SAML Binding dropdown
25. Click Create
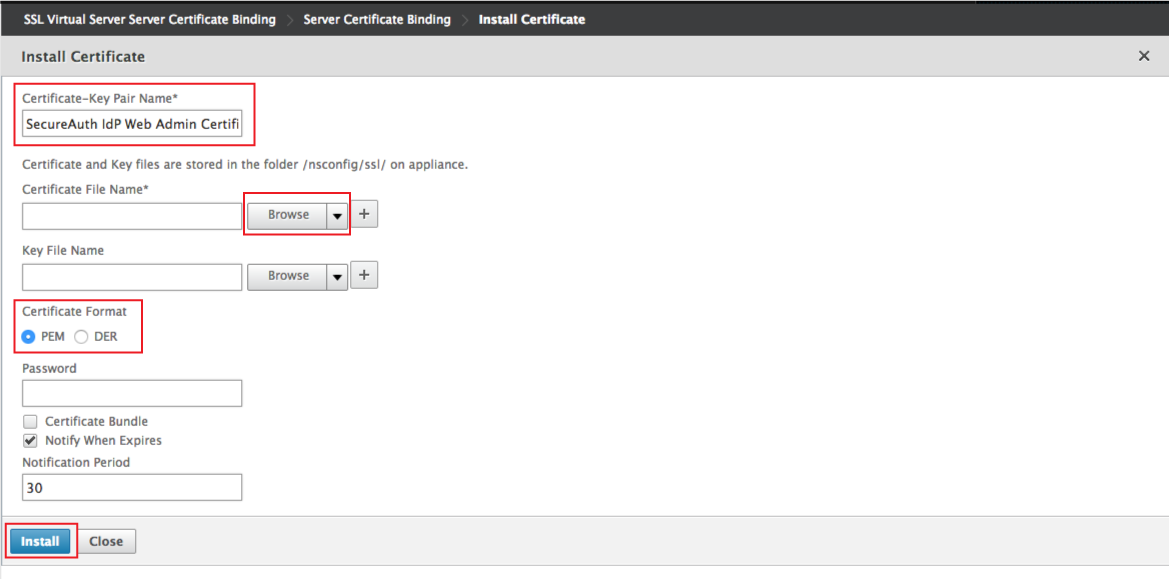 |
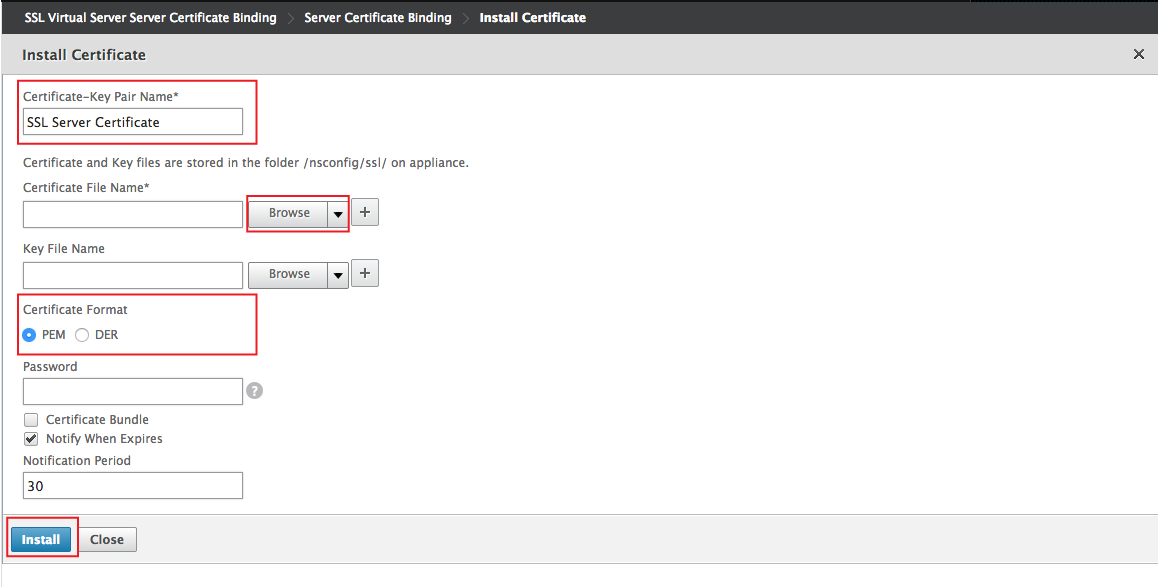
26. Provide the Certificate-Key Page Name of the certificate
27. Click Browse in the Certificate File Name section, and select the Assertion Signing Certificate from the SecureAuth IdP Web Admin (step 12)
28. Select PEM from the Certificate Format options
29. Click Install
LDAP Authentication Policy
 |
30. In the Virtual Server, click the + in the Authentication section to add an Authentication LDAP Policy
 |
31. Select LDAP from the Choose Policy dropdown
32. Select Primary from the Choose Type dropdown
33. Click Continue
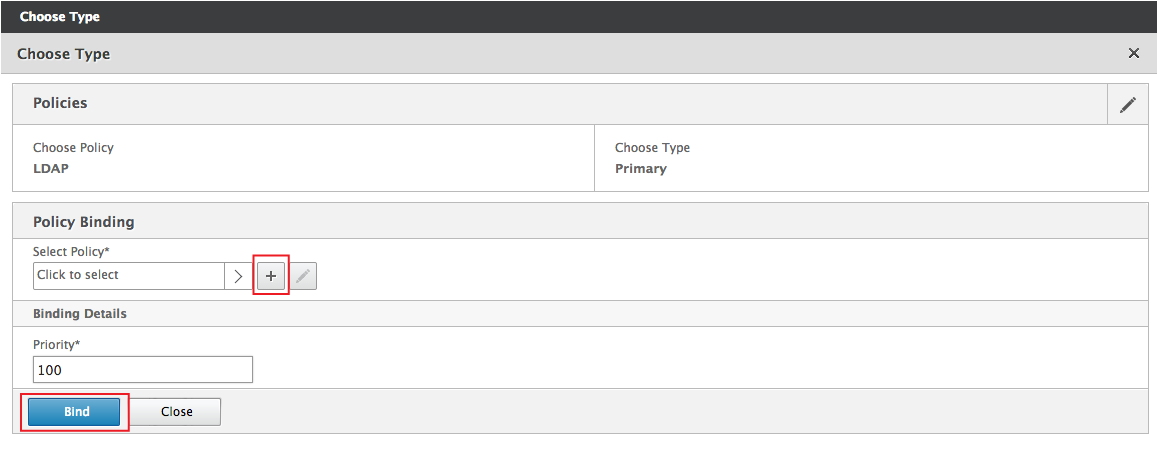 |
34. Click the + in the Select Policy section to create a new LDAP policy
35. Once the policy and profile are created (steps 36-52 below), click Bind
Note
Be sure that the Priority amount is higher than the Priority of the Authentication SAML Policy
Create Authentication LDAP Policy
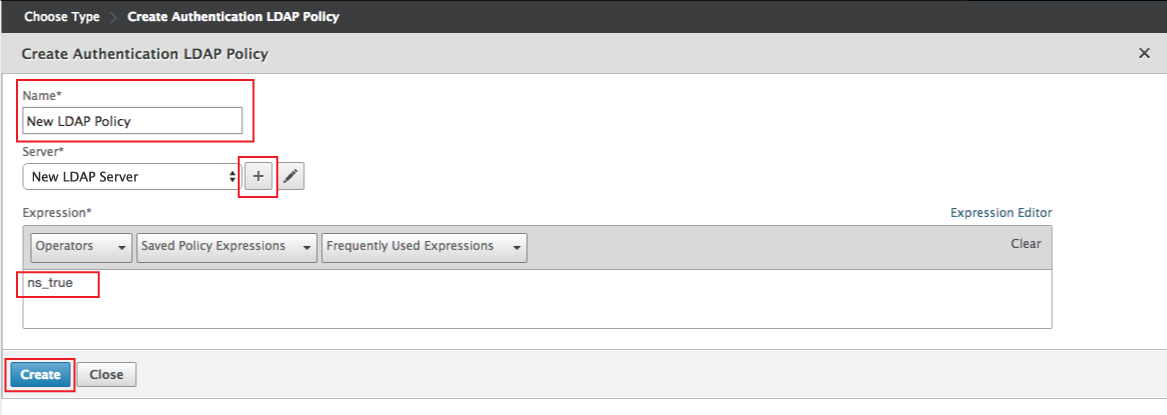 |
36. Provide a Name for the new LDAP policy
37. Click the + in the Server section to create a new LDAP server
38. Select the newly created LDAP server (steps 41-52 below) from the Server dropdown
39. Create an ns_true Expression
40. Click Create
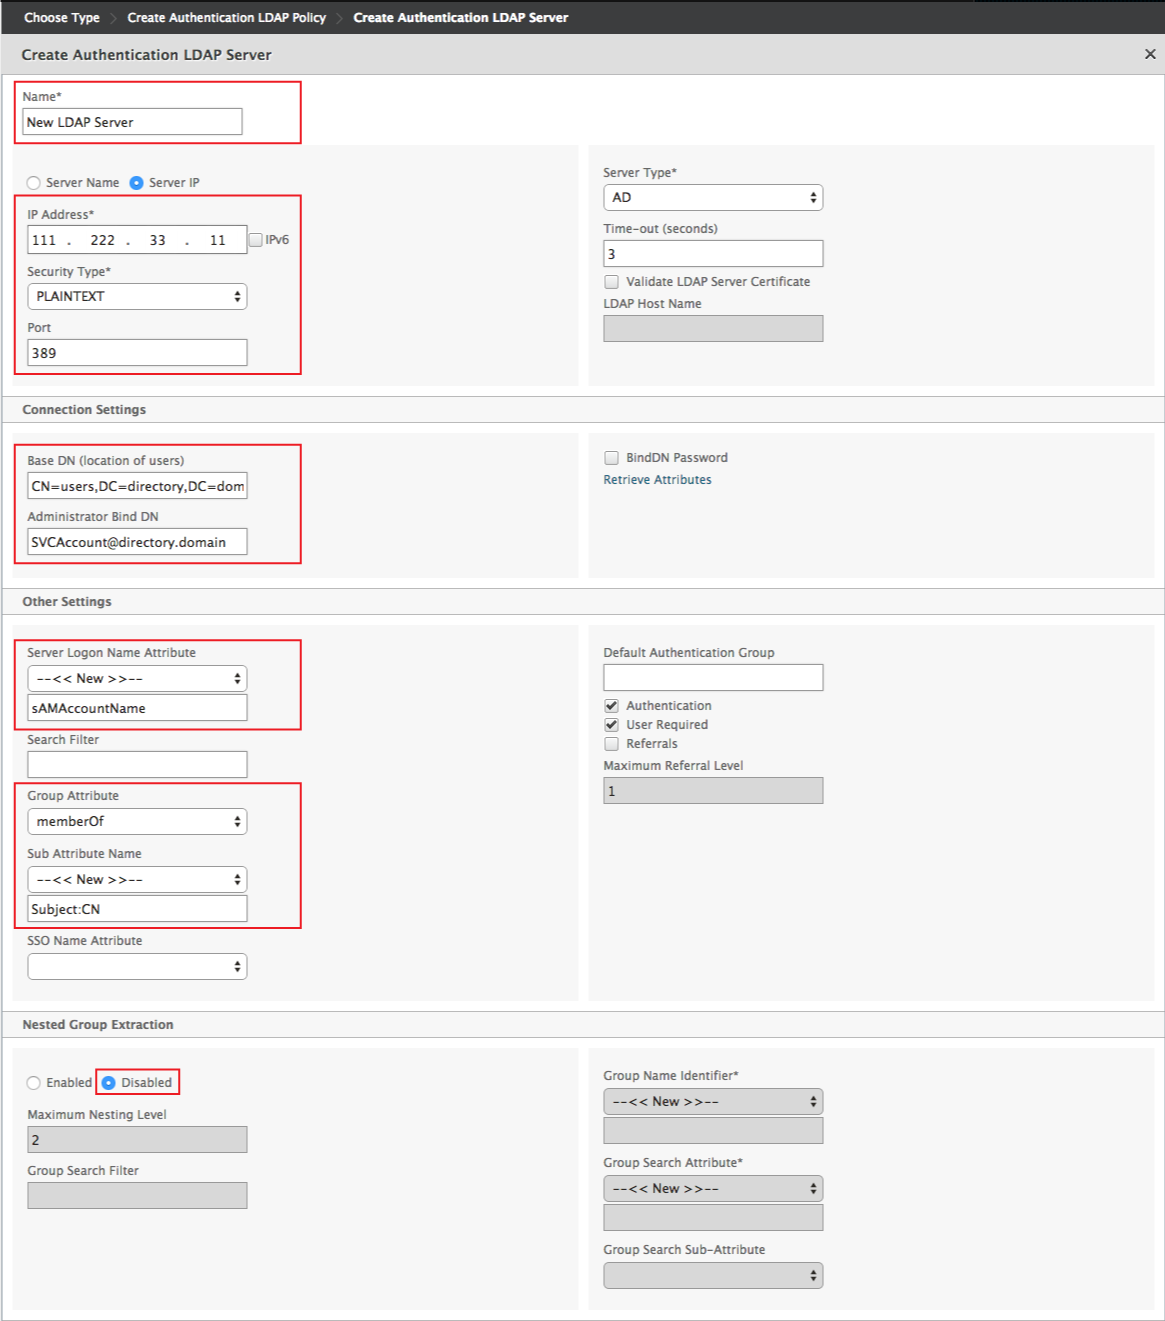 |
41. Provide a Name for the new LDAP server
42. Provide the Server Name or the Server IP Address
43. Select the Security Type from the dropdown
44. Provide the Port of the LDAP directory
45. Provide the Base DN of the location of users in the LDAP directory
46. Provide the Citrix service account information in the Administrator Bind DN field
47. Select --<< New >>-- from the Server Logon Name Attribute dropdown, and set it to sAMAccountName
48. Select memberOf from the Group Attribute dropdown
49. Select --<< New >>-- from the Sub Attribute Name dropdown, and set it to Subject:CN
50. Select Disabled in the Nested Group Extraction section
51. Configure the rest as required for the LDAP directory
52. Click Create
Session Policy
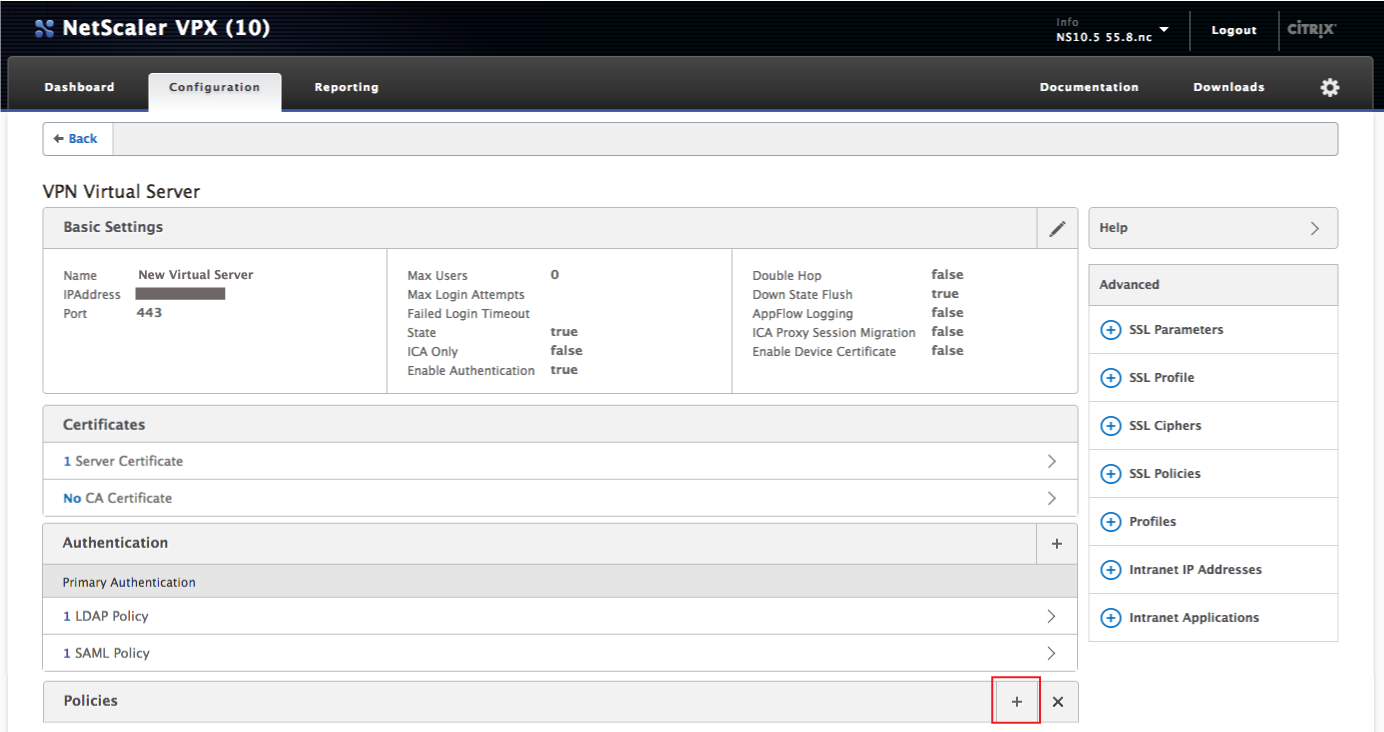 |
53. In the Virtual Server, click the + in the Policies section to add a Session Policy
 |
54. Select Session from the Choose Policy dropdown
55. Select Request from the Choose Type dropdown
56. Click Continue
57. (next page) Click the + in the Select Policy section to create a new session policy
58. Once the policy and profile are created (steps 59-71 below), click Bind
Create Session Policy
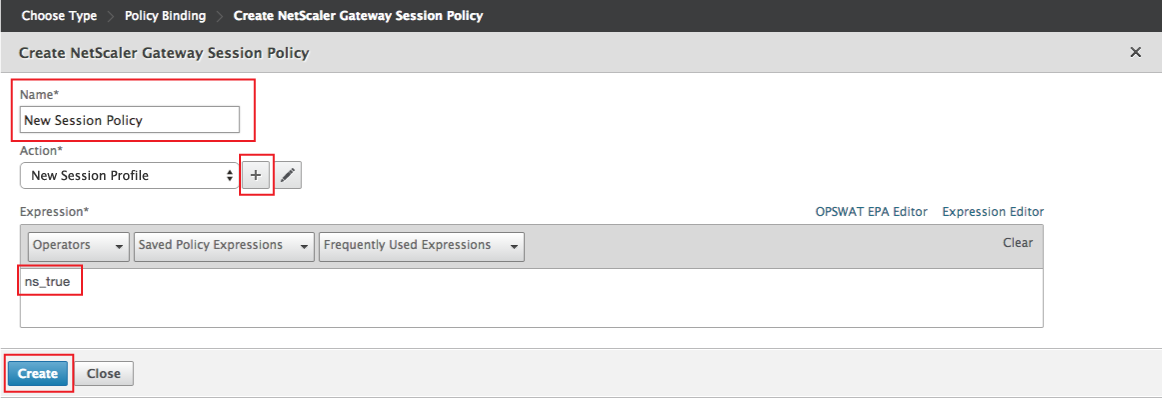 |
59. Provide a Name for the new session policy
60. Click the + in the Action section to create a new session profile
61. Select the newly created session profile (steps 64-71 below) from the Action dropdown
62. Create an ns_true Expression
63. Click Create
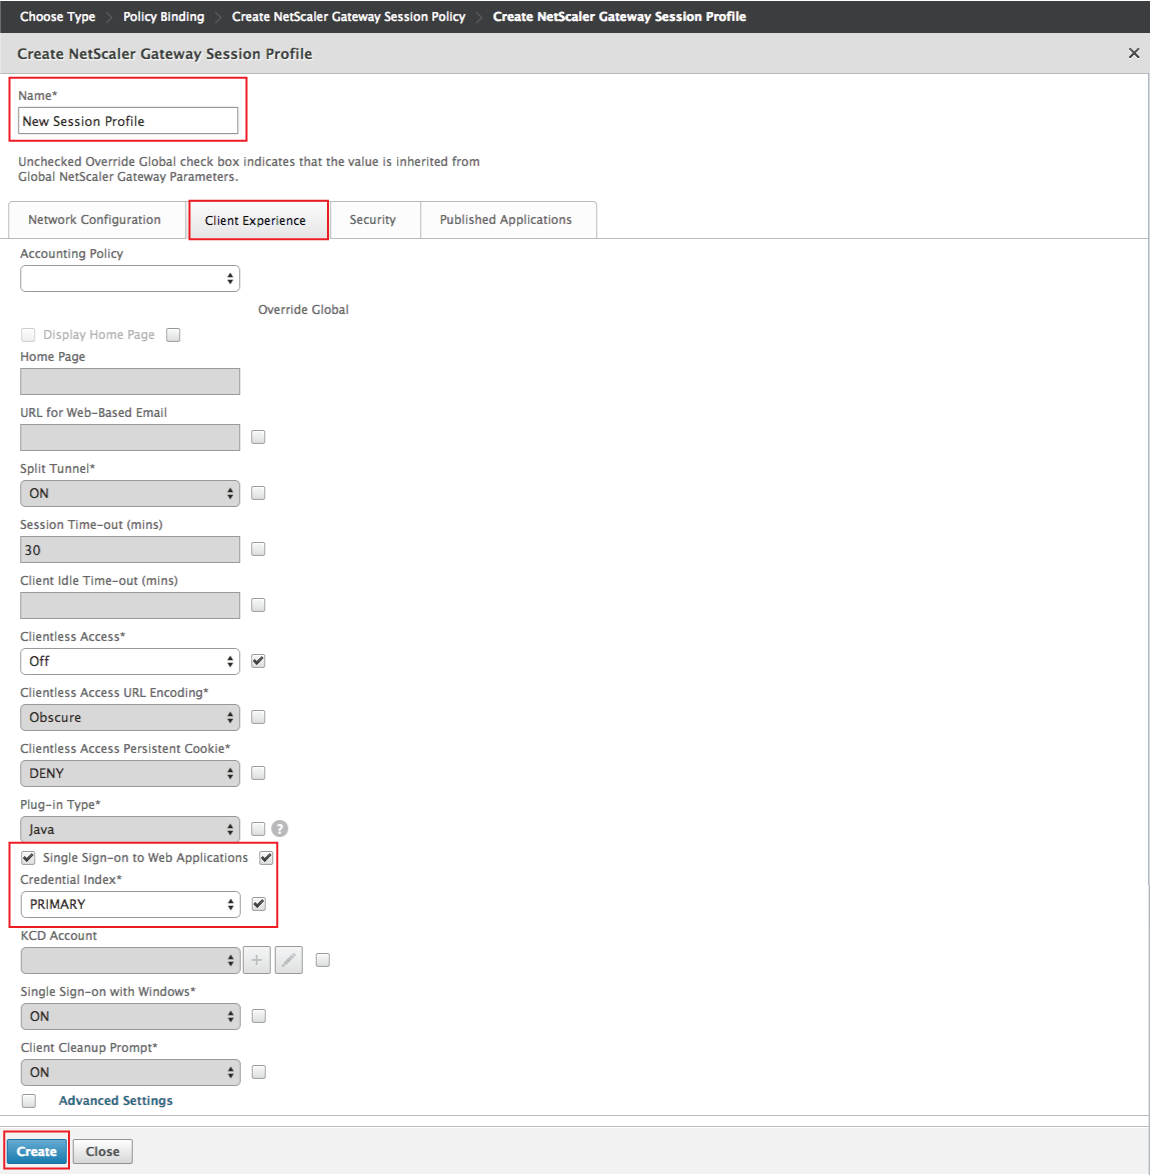 |
64. Provide a Name for the new session profile
65. In the Client Experience section, check Single Sign-on to Web Applications
66. Select PRIMARY from the Credential Index
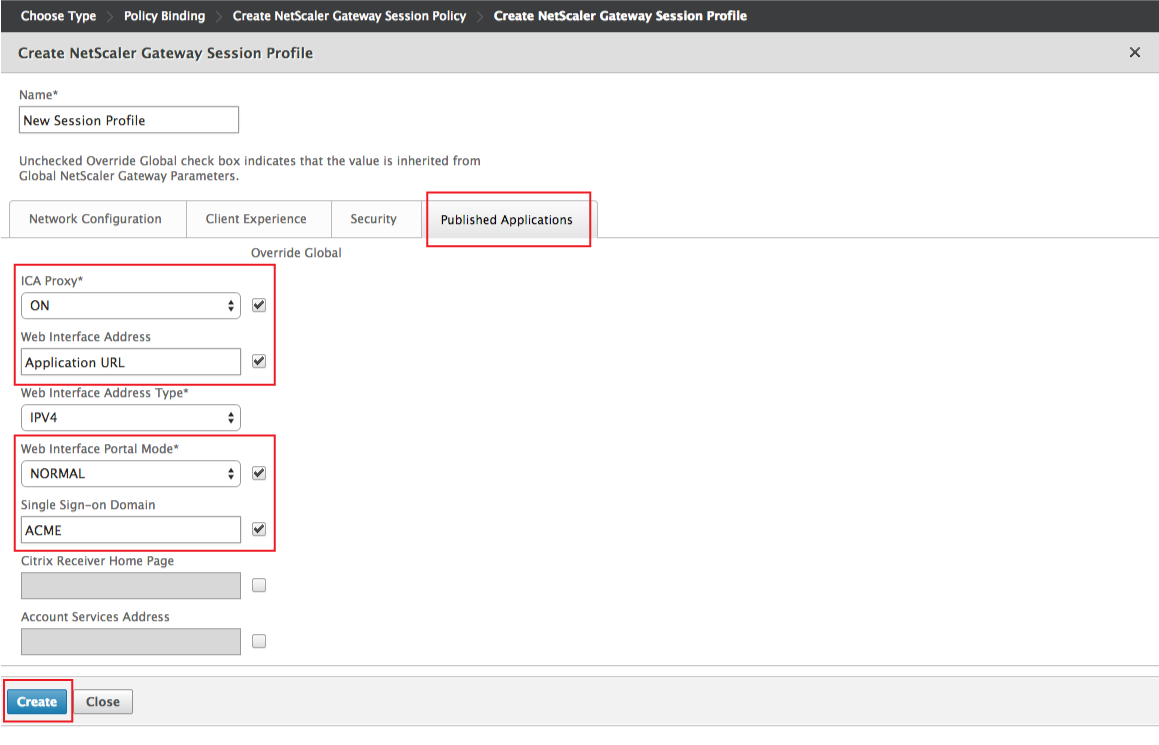 |
67. In the Published Applications section, select ON from the ICA Proxy dropdown
68. Set the Web Interface Address to the Published Application's URL
69. Select NORMAL from the Web Interface Portal Mode dropdown
70. Set the Single Sign-on Domain to the Published Application's domain, e.g. the company name
71. Click Create
