- SecureAuth IdP 9.2
- Administration
- Logs Tab Configuration
- Logging database configuration
Logging database configuration
To generate logs on the appliance for SecureAuth IdP, create the logging database. You will need to create SQL Server database files and then connect the SQL Server to SecureAuth IdP.
Information about maintaining log files is at the end of this document.
Prerequisites
SQL Server installed on a server
Create the SQL Server database
Contact SecureAuth Support to download the loggingScripts.zip file containing the CreateLoggingDatabase.sql and CreateLoggingDatabaseUser.sql files.
Create the SQL Server database, reporting tables, and stored procedures. See the following code example for Create logging database.
Change the file path to the location of the database files.
--Purpose: To create all the tables and stored procedures of "Logging" database --Steps: -- 1. Connect to a SQL server instance with a login with permission of creating databases. -- 2. Run this script SET ANSI_NULLS ON GO SET QUOTED_IDENTIFIER ON GO USE [master] GO IF NOT EXISTS (SELECT name FROM sys.databases WHERE name = N'Logging') BEGIN CREATE DATABASE [Logging] END GO USE [Logging] GO /****** Object: Table [dbo].[Category] ******/ IF NOT EXISTS (SELECT * FROM sys.objects WHERE object_id = OBJECT_ID(N'[dbo].[Category]') AND type in (N'U')) BEGIN CREATE TABLE [dbo].[Category]( [CategoryID] [bigint] IDENTITY(1,1) NOT NULL, [CategoryName] [nvarchar](128) NOT NULL, CONSTRAINT [PK_Categories] PRIMARY KEY CLUSTERED ( [CategoryID] ASC )WITH (PAD_INDEX = OFF, STATISTICS_NORECOMPUTE = OFF, IGNORE_DUP_KEY = OFF, ALLOW_ROW_LOCKS = ON, ALLOW_PAGE_LOCKS = ON) ON [PRIMARY] ) ON [PRIMARY] END GO /****** Object: Table [dbo].[Log] ******/ IF NOT EXISTS (SELECT * FROM sys.objects WHERE object_id = OBJECT_ID(N'[dbo].[Log]') AND type in (N'U')) BEGIN CREATE TABLE [dbo].[Log]( [LogID] [bigint] IDENTITY(1,1) NOT NULL, [EventID] [int] NULL, [Priority] [int] NOT NULL, [Severity] [nvarchar](32) NOT NULL, [Title] [nvarchar](256) NOT NULL, [Timestamp] [datetime] NOT NULL, [Company] [nvarchar](1024) NOT NULL, [MachineName] [nvarchar](64) NOT NULL, [Appliance] [nvarchar](1024) NOT NULL, [Realm] [nvarchar](1024) NOT NULL, [ProcessID] [nvarchar](256) NOT NULL, [ProcessName] [nvarchar](512) NOT NULL, [Win32ThreadId] [nvarchar](128) NULL, [UserID] [nvarchar](2048) NOT NULL, [UserAgent] [nvarchar](MAX) NOT NULL, [UserHostAddress] [nvarchar](64) NOT NULL, [BrowserSession] [nvarchar](128) NOT NULL, [Message] [nvarchar](MAX) NULL, [FormattedMessage] [nvarchar](MAX) NULL, CONSTRAINT [PK_Log] PRIMARY KEY CLUSTERED ( [LogID] ASC )WITH (PAD_INDEX = OFF, STATISTICS_NORECOMPUTE = OFF, IGNORE_DUP_KEY = OFF, ALLOW_ROW_LOCKS = ON, ALLOW_PAGE_LOCKS = ON) ON [PRIMARY] ) ON [PRIMARY] TEXTIMAGE_ON [PRIMARY] END GO /****** Object: Table [dbo].[CategoryLog] ******/ IF NOT EXISTS (SELECT * FROM sys.objects WHERE object_id = OBJECT_ID(N'[dbo].[CategoryLog]') AND type in (N'U')) BEGIN CREATE TABLE [dbo].[CategoryLog]( [CategoryLogID] [bigint] IDENTITY(1,1) NOT NULL, [CategoryID] [bigint] NOT NULL, [LogID] [bigint] NOT NULL, CONSTRAINT [PK_CategoryLog] PRIMARY KEY CLUSTERED ( [CategoryLogID] ASC )WITH (PAD_INDEX = OFF, STATISTICS_NORECOMPUTE = OFF, IGNORE_DUP_KEY = OFF, ALLOW_ROW_LOCKS = ON, ALLOW_PAGE_LOCKS = ON) ON [PRIMARY] ) ON [PRIMARY] END GO IF NOT EXISTS (SELECT * FROM sys.indexes WHERE object_id = OBJECT_ID(N'[dbo].[CategoryLog]') AND name = N'IDX_NC_CategoryLog_CategoryID') CREATE NONCLUSTERED INDEX [IDX_NC_CategoryLog_CategoryID] ON [dbo].[CategoryLog] ( [CategoryID] ASC ) INCLUDE ( [CategoryLogID]) WITH (PAD_INDEX = OFF, STATISTICS_NORECOMPUTE = OFF, SORT_IN_TEMPDB = OFF, DROP_EXISTING = OFF, ONLINE = OFF, ALLOW_ROW_LOCKS = ON, ALLOW_PAGE_LOCKS = ON) ON [PRIMARY] GO IF NOT EXISTS (SELECT * FROM sys.indexes WHERE object_id = OBJECT_ID(N'[dbo].[CategoryLog]') AND name = N'IDX_NC_CategoryLog_LogID') CREATE NONCLUSTERED INDEX [IDX_NC_CategoryLog_LogID] ON [dbo].[CategoryLog] ( [LogID] ASC ) INCLUDE ( [CategoryLogID]) WITH (PAD_INDEX = OFF, STATISTICS_NORECOMPUTE = OFF, SORT_IN_TEMPDB = OFF, DROP_EXISTING = OFF, ONLINE = OFF, ALLOW_ROW_LOCKS = ON, ALLOW_PAGE_LOCKS = ON) ON [PRIMARY] GO IF NOT EXISTS (SELECT * FROM sys.foreign_keys WHERE object_id = OBJECT_ID(N'[dbo].[FK_CategoryLog_Category]') AND parent_object_id = OBJECT_ID(N'[dbo].[CategoryLog]')) ALTER TABLE [dbo].[CategoryLog] WITH CHECK ADD CONSTRAINT [FK_CategoryLog_Category] FOREIGN KEY([CategoryID]) REFERENCES [dbo].[Category] ([CategoryID]) GO IF EXISTS (SELECT * FROM sys.foreign_keys WHERE object_id = OBJECT_ID(N'[dbo].[FK_CategoryLog_Category]') AND parent_object_id = OBJECT_ID(N'[dbo].[CategoryLog]')) ALTER TABLE [dbo].[CategoryLog] CHECK CONSTRAINT [FK_CategoryLog_Category] GO IF NOT EXISTS (SELECT * FROM sys.foreign_keys WHERE object_id = OBJECT_ID(N'[dbo].[FK_CategoryLog_Log]') AND parent_object_id = OBJECT_ID(N'[dbo].[CategoryLog]')) ALTER TABLE [dbo].[CategoryLog] WITH CHECK ADD CONSTRAINT [FK_CategoryLog_Log] FOREIGN KEY([LogID]) REFERENCES [dbo].[Log] ([LogID]) GO IF EXISTS (SELECT * FROM sys.foreign_keys WHERE object_id = OBJECT_ID(N'[dbo].[FK_CategoryLog_Log]') AND parent_object_id = OBJECT_ID(N'[dbo].[CategoryLog]')) ALTER TABLE [dbo].[CategoryLog] CHECK CONSTRAINT [FK_CategoryLog_Log] GO /****** Object: Table [dbo].[Settings] ******/ IF NOT EXISTS (SELECT * FROM sys.objects WHERE object_id = OBJECT_ID(N'[dbo].[Settings]') AND type in (N'U')) BEGIN CREATE TABLE [dbo].[Settings]( [SettingID] [uniqueidentifier] ROWGUIDCOL NOT NULL, [PropertyName] [nvarchar](128) NOT NULL, [PropertyValue] [ntext] NOT NULL, [TimeStamp] [timestamp] NULL, CONSTRAINT [Settings_PK] PRIMARY KEY CLUSTERED ( [SettingID] ASC ) ON [PRIMARY] ) ON [PRIMARY] TEXTIMAGE_ON [PRIMARY] END GO IF NOT EXISTS (SELECT * FROM sys.indexes WHERE object_id = OBJECT_ID(N'[dbo].[Settings]') AND name = N'IX_Settings_Property') CREATE UNIQUE NONCLUSTERED INDEX [IX_Settings_Property] ON [dbo].[Settings] ( [PropertyName] ASC ) ON [PRIMARY] GO IF NOT EXISTS (SELECT * FROM sys.objects WHERE object_id = OBJECT_ID(N'[dbo].[DF_Settings_SettingID]') AND type = 'D') BEGIN ALTER TABLE [dbo].[Settings] ADD CONSTRAINT [DF_Settings_SettingID] DEFAULT (newid()) FOR [SettingID] END GO ---------------------------------------------------------------------- -- -- Create Stored Procedures -- ---------------------------------------------------------------------- IF NOT EXISTS (SELECT * FROM sys.objects WHERE object_id = OBJECT_ID(N'[dbo].[WriteLog]') AND type in (N'P', N'PC')) BEGIN EXEC dbo.sp_executesql @statement = N'CREATE PROCEDURE [dbo].[WriteLog] AS' END GO /****** Object: StoredProcedure [dbo].[WriteLog] ******/ ALTER PROCEDURE [dbo].[WriteLog] ( @EventID int, @Priority int, @Severity nvarchar(32), @Title nvarchar(256), @Timestamp datetime, @Company nvarchar(1024) = '', @MachineName nvarchar(64), @Appliance nvarchar(1024) = '', @Realm nvarchar(1024) = '', @ProcessID nvarchar(256), @ProcessName nvarchar(512), @Win32ThreadId nvarchar(128), @UserID nvarchar(2048) = '', @UserAgent nvarchar(MAX) = '', @UserHostAddress nvarchar(64) = '', @BrowserSession nvarchar(128) = '', @Message nvarchar(MAX), @FormattedMessage nvarchar(MAX), @LogId bigint OUTPUT ) AS BEGIN INSERT INTO [Log] ( EventID, Priority, Severity, Title, [Timestamp], Company, MachineName, Appliance, Realm, ProcessID, ProcessName, Win32ThreadId, UserID, UserAgent, UserHostAddress, BrowserSession, Message, FormattedMessage ) VALUES ( @EventID, @Priority, @Severity, @Title, @Timestamp, @Company, @MachineName, @Appliance, @Realm, @ProcessID, @ProcessName, @Win32ThreadId, @UserID, @UserAgent, @UserHostAddress, @BrowserSession, @Message, @FormattedMessage) SET @LogID = @@IDENTITY END GO IF NOT EXISTS (SELECT * FROM sys.objects WHERE object_id = OBJECT_ID(N'[dbo].[InsertCategoryLog]') AND type in (N'P', N'PC')) BEGIN EXEC dbo.sp_executesql @statement = N'CREATE PROCEDURE [dbo].[InsertCategoryLog] AS' END GO ALTER PROCEDURE [dbo].[InsertCategoryLog] @CategoryID bigint, @LogID bigint AS BEGIN SET NOCOUNT ON; IF NOT EXISTS (SELECT * FROM CategoryLog WHERE CategoryID = @CategoryID and LogID = @LogID) BEGIN INSERT INTO CategoryLog (CategoryID, LogID) VALUES(@CategoryID, @LogID) END END GO IF NOT EXISTS (SELECT * FROM sys.objects WHERE object_id = OBJECT_ID(N'[dbo].[ClearLogs]') AND type in (N'P', N'PC')) BEGIN EXEC dbo.sp_executesql @statement = N'CREATE PROCEDURE [dbo].[ClearLogs] AS' END GO ALTER PROCEDURE [dbo].[ClearLogs] AS BEGIN SET NOCOUNT ON; DELETE FROM CategoryLog DELETE FROM [Log] DELETE FROM Category END GO IF NOT EXISTS (SELECT * FROM sys.objects WHERE object_id = OBJECT_ID(N'[dbo].[AddCategory]') AND type in (N'P', N'PC')) BEGIN EXEC dbo.sp_executesql @statement = N'CREATE PROCEDURE [dbo].[AddCategory] AS' END GO ALTER PROCEDURE [dbo].[AddCategory] @CategoryName nvarchar(128), @LogID bigint AS BEGIN SET NOCOUNT ON; DECLARE @CatID bigint SELECT @CatID = CategoryID FROM Category WHERE CategoryName = @CategoryName IF @CatID IS NULL BEGIN INSERT INTO Category (CategoryName) VALUES(@CategoryName) SELECT @CatID = @@IDENTITY END EXEC InsertCategoryLog @CatID, @LogID END GO IF NOT EXISTS (SELECT * FROM sys.objects WHERE object_id = OBJECT_ID(N'[dbo].[GetLog]') AND type in (N'P', N'PC')) BEGIN EXEC dbo.sp_executesql @statement = N'CREATE PROCEDURE [dbo].[GetLog] AS' END GO ALTER PROCEDURE [dbo].[GetLog] -- Add the parameters for the stored procedure here ( @UserId nvarchar(2048), @StartDate datetime, @EndDate datetime, @EventID int, @GroupByUser bit, @GroupByCompany bit, @GroupByRealm bit, @GroupByEvent bit, @GroupByAppliance bit, @GroupByMachine bit, @BadUserID bit, @BadUserPwd bit, @BadOTP bit, @SearchMode int ) AS BEGIN -- SET NOCOUNT ON added to prevent extra result sets from -- interfering with SELECT statements. SET NOCOUNT ON; DECLARE @NotEmpty bit = 0 DECLARE @StartVarChar varchar(25) = convert(varchar, DATEADD(DAY, 0, @StartDate), 120) DECLARE @EndVarChar varchar(25) = convert(varchar, DATEADD(DAY, 1, @EndDate), 120) DECLARE @sql nvarchar(MAX) = 'SELECT ' DECLARE @parameters nvarchar(MAX) = '@UserId nvarchar(2048), @StartVarChar varchar(25), @EndVarChar varchar(25), @EventID int, @GroupByUser bit, @GroupByCompany bit, @GroupByRealm bit, @GroupByEvent bit, @GroupByAppliance bit, @GroupByMachine bit, @BadUserID bit, @BadUserPwd bit, @BadOTP bit' IF @GroupByUser = 1 BEGIN SET @sql += '[UserID]' SET @NotEmpty = 1 END IF @GroupByCompany = 1 BEGIN IF @NotEmpty = 1 SET @sql += ', ' SET @sql += '[Company]' SET @NotEmpty = 1 END IF @GroupByRealm = 1 BEGIN IF @NotEmpty = 1 SET @sql += ', ' SET @sql += '[Realm]' SET @NotEmpty = 1 END IF @GroupByEvent = 1 BEGIN IF @NotEmpty = 1 SET @sql += ', ' SET @sql += '[EventID]' SET @NotEmpty = 1 END IF @GroupByAppliance = 1 BEGIN IF @NotEmpty = 1 SET @sql += ', ' SET @sql += '[Appliance]' SET @NotEmpty = 1 END IF @GroupByMachine = 1 BEGIN IF @NotEmpty = 1 SET @sql += ', ' SET @sql += '[MachineName]' SET @NotEmpty = 1 END IF (@NotEmpty = 1) BEGIN SET @sql += ', COUNT(*) AS Number FROM [Log] WHERE [UserID] Like ''%'' + @UserId + ''%'' AND [TimeStamp] BETWEEN @StartVarChar AND @EndVarChar AND [EventID] ' IF @EventID = 0 SET @sql += 'NOT' SET @sql += ' IN (@EventID' IF @BadUserID = 1 SET @sql += ',21070,21100' IF @BadUserPwd = 1 SET @sql += ',21090,21100,22010,22110,22210,22310,22910,22020' IF @BadOTP = 1 SET @sql += ',24200,24210,24220' SET @sql += ') GROUP BY ' SET @NotEmpty = 0 IF @GroupByUser = 1 BEGIN SET @sql += '[UserID]' SET @NotEmpty = 1 END IF @GroupByCompany = 1 BEGIN IF @NotEmpty = 1 SET @sql += ', ' SET @sql += '[Company]' SET @NotEmpty = 1 END IF @GroupByRealm = 1 BEGIN IF @NotEmpty = 1 SET @sql += ', ' SET @sql += '[Realm]' SET @NotEmpty = 1 END IF @GroupByEvent = 1 BEGIN IF @NotEmpty = 1 SET @sql += ', ' SET @sql += '[EventID]' SET @NotEmpty = 1 END IF @GroupByAppliance = 1 BEGIN IF @NotEmpty = 1 SET @sql += ', ' SET @sql += '[Appliance]' SET @NotEmpty = 1 END IF @GroupByMachine = 1 BEGIN IF @NotEmpty = 1 SET @sql += ', ' SET @sql += '[MachineName]' SET @NotEmpty = 1 END END ELSE BEGIN IF @SearchMode = 1 SET @sql += '[EventID], convert(varchar,DATEADD(minute,DATEDIFF(minute,getutcdate(),getdate()),[Timestamp]),121) AS [Time], [Company], [MachineName], [Appliance], [Realm], [UserID], [Message] FROM [Log] WHERE [UserID] Like ''%'' + @UserId + ''%'' AND [TimeStamp] >= @StartVarChar AND [TimeStamp] <= @EndVarChar AND [EventID] ' ELSE SET @sql += '[LogID], [EventID], [Priority], [Severity], [Title], convert(varchar,DATEADD(minute,DATEDIFF(minute,getutcdate(),getdate()),[Timestamp]),109) AS [Time], [Company], [MachineName], [Appliance], [Realm], [ProcessID], [ProcessName], [Win32ThreadId], [UserID], [UserAgent], [UserHostAddress], [BrowserSession], [Message], [FormattedMessage] FROM [Log] WHERE [UserID] Like ''%'' + @UserId + ''%'' AND [TimeStamp] >= @StartVarChar AND [TimeStamp] <= @EndVarChar AND [EventID] ' IF @EventID = 0 SET @sql += 'NOT' SET @sql += ' IN (@EventID' IF @BadUserID = 1 SET @sql += ',21070,21100' IF @BadUserPwd = 1 SET @sql += ',21090,21100,22010,22110,22210,22310,22910,22020' IF @BadOTP = 1 SET @sql += ',24200,24210,24220' SET @sql += ') ORDER BY [TimeStamp] DESC' END EXEC sp_executesql @sql, @parameters, @UserId = @UserId, @StartVarChar = @StartVarChar, @EndVarChar = @EndVarChar, @EventID = @EventID, @GroupByUser = @GroupByUser, @GroupByCompany = @GroupByCompany, @GroupByRealm = @GroupByRealm, @GroupByEvent = @GroupByEvent, @GroupByAppliance = @GroupByAppliance, @GroupByMachine = @GroupByMachine, @BadUserID = @BadUserID, @BadUserPwd = @BadUserPwd, @BadOTP = @BadOTP END GO IF NOT EXISTS (SELECT * FROM sys.objects WHERE object_id = OBJECT_ID(N'[dbo].[GetChart1]') AND type in (N'P', N'PC')) BEGIN EXEC dbo.sp_executesql @statement = N'CREATE PROCEDURE [dbo].[GetChart1] AS' END GO ALTER PROCEDURE [dbo].[GetChart1] ( @StartDate datetime, @EndDate datetime, @Realms varchar(250) ) AS BEGIN SET NOCOUNT ON; DECLARE @sql nvarchar(MAX) = '(SELECT @Result = COUNT(*) FROM Log WHERE [Realm] IN (' + @Realms + ') AND [EventID] = 20000 AND [TimeStamp] BETWEEN @StartDate AND @EndDate)' DECLARE @parameters nvarchar(MAX) = '@StartDate datetime, @EndDate datetime, @Result int out' DECLARE @SuccessCount int = 0 EXEC sp_executesql @sql, @parameters, @StartDate, @EndDate, @SuccessCount out DECLARE @SuccessCountVarChar VARCHAR(25) = CONVERT(VARCHAR(25), @SuccessCount) SET @sql = '(SELECT @Result = COUNT(*) FROM Log WHERE [Realm] IN (' + @Realms + ') AND [EventID] IN (21070,21100,21090,21100,22010,22110,22210,22310,22910,22020,24200,24210,24220) AND [TimeStamp] BETWEEN @StartDate AND @EndDate)' DECLARE @FailedCount int = 0 EXEC sp_executesql @sql, @parameters, @StartDate, @EndDate, @FailedCount out DECLARE @FailedCountVarChar VARCHAR(25) = CONVERT(VARCHAR(25), @FailedCount) CREATE TABLE #TempTable( [Status] varchar(25), [Total] int) INSERT INTO #TempTable VALUES ('Success (' + @SuccessCountVarChar + ')', @SuccessCount) INSERT INTO #TempTable VALUES ('Failed (' + @FailedCountVarChar + ')', @FailedCount) SELECT * FROM #TempTable END GO IF NOT EXISTS (SELECT * FROM sys.objects WHERE object_id = OBJECT_ID(N'[dbo].[GetChart2]') AND type in (N'P', N'PC')) BEGIN EXEC dbo.sp_executesql @statement = N'CREATE PROCEDURE [dbo].[GetChart2] AS' END GO ALTER PROCEDURE [dbo].[GetChart2] ( @StartDate datetime, @EndDate datetime, @PhoneMethod varchar(50), @EmailMethod varchar(50), @SMSMethod varchar(50), @Realms varchar(250) ) AS BEGIN SET NOCOUNT ON; CREATE TABLE #TempTable2( [EmailStatus] varchar(25), [EmailTotal] int, [EmailTimeStamp] varchar(10), [PhoneStatus] varchar(25), [PhoneTotal] int, [PhoneTimeStamp] varchar(10), [SMSStatus] varchar(25), [SMSTotal] int, [SMSTimeStamp] varchar(10)) DECLARE @sql nvarchar(MAX) = 'SELECT ''Email'', COUNT(*), CONVERT(VARCHAR(10), [TimeStamp], 101), NULL, NULL, NULL, NULL, NULL, NULL AS [TimeStamp] FROM [LOG] WHERE [Realm] IN (' + @Realms + ') AND [Message] like ''%'' + @EmailMethod + ''%'' AND [TimeStamp] BETWEEN @StartDate AND @EndDate GROUP BY CONVERT(VARCHAR(10), [TimeStamp], 101)' DECLARE @parameters nvarchar(MAX) = '@StartDate datetime, @EndDate datetime, @EmailMethod varchar(50)' INSERT INTO #TempTable2 EXEC sp_executesql @sql, @parameters, @StartDate, @EndDate, @EmailMethod SET @sql = 'SELECT NULL, NULL, NULL, ''Phone'', COUNT(*), CONVERT(VARCHAR(10), [TimeStamp], 101) AS [TimeStamp], NULL, NULL, NULL FROM [LOG] WHERE [Realm] IN (' + @Realms + ') AND [Message] like ''%'' + @PhoneMethod + ''%'' AND [TimeStamp] BETWEEN @StartDate AND @EndDate GROUP BY CONVERT(VARCHAR(10), [TimeStamp], 101)' SET @parameters = '@StartDate datetime, @EndDate datetime, @PhoneMethod varchar(50)' INSERT INTO #TempTable2 EXEC sp_executesql @sql, @parameters, @StartDate, @EndDate, @PhoneMethod SET @sql = 'SELECT NULL, NULL, NULL, NULL, NULL, NULL, ''SMS'', COUNT(*), CONVERT(VARCHAR(10), [TimeStamp], 101) AS [TimeStamp] FROM [LOG] WHERE [Realm] IN (' + @Realms + ') AND [Message] like ''%'' + @SMSMethod + ''%'' AND [TimeStamp] BETWEEN @StartDate AND @EndDate GROUP BY CONVERT(VARCHAR(10), [TimeStamp], 101)' SET @parameters = '@StartDate datetime, @EndDate datetime, @SMSMethod varchar(50)' INSERT INTO #TempTable2 EXEC sp_executesql @sql, @parameters, @StartDate, @EndDate, @SMSMethod SELECT * FROM #TempTable2 END GO IF NOT EXISTS (SELECT * FROM sys.objects WHERE object_id = OBJECT_ID(N'[dbo].[GetChart3]') AND type in (N'P', N'PC')) BEGIN EXEC dbo.sp_executesql @statement = N'CREATE PROCEDURE [dbo].[GetChart3] AS' END GO ALTER PROCEDURE [dbo].[GetChart3] ( @StartDate datetime, @EndDate datetime, @Realms varchar(250) ) AS BEGIN SET NOCOUNT ON; CREATE TABLE #TempTable3( [Status] varchar(25), [Total] int) DECLARE @sql nvarchar(MAX) = 'SELECT DATEPART(HOUR, [TimeStamp]), COUNT(*) FROM [LOG] WHERE [Realm] IN (' + @Realms + ') AND EventID=20000 AND [TimeStamp] BETWEEN @StartDate AND @EndDate GROUP BY DATEPART(HOUR, [TimeStamp])' DECLARE @parameters nvarchar(MAX) = '@StartDate datetime, @EndDate datetime' INSERT INTO #TempTable3 EXEC sp_executesql @sql, @parameters, @StartDate, @EndDate SELECT * FROM #TempTable3 ORDER BY [Status] ASC END GO IF NOT EXISTS (SELECT * FROM sys.objects WHERE object_id = OBJECT_ID(N'[dbo].[GetChart4]') AND type in (N'P', N'PC')) BEGIN EXEC dbo.sp_executesql @statement = N'CREATE PROCEDURE [dbo].[GetChart4] AS' END GO ALTER PROCEDURE [dbo].[GetChart4] ( @StartDate datetime, @EndDate datetime, @Realms varchar(250) ) AS BEGIN SET NOCOUNT ON; CREATE TABLE #TempTable4( [Status] varchar(25), [Total] int) DECLARE @sql nvarchar(MAX) = 'SELECT [Realm], COUNT(*) FROM [LOG] WHERE [Realm] IN (' + @Realms + ') AND EventID=20000 AND [TimeStamp] BETWEEN @StartDate AND @EndDate GROUP BY [Realm]' DECLARE @parameters nvarchar(MAX) = '@StartDate datetime, @EndDate datetime' INSERT INTO #TempTable4 EXEC sp_executesql @sql, @parameters, @StartDate, @EndDate SELECT * FROM #TempTable4 ORDER BY [Status] ASC END GO ---------------------------------------------------------------------- -- -- 1000 - Initial version -- 1002 - Widened LogId and LogCategoryId columns -- ---------------------------------------------------------------------- IF NOT EXISTS (SELECT * FROM dbo.Settings WHERE PropertyName LIKE 'DatabaseVersion' and PropertyValue LIKE '1002') BEGIN INSERT INTO dbo.Settings(PropertyName, PropertyValue) VALUES(N'DatabaseVersion', N'1002') END GOCreate user and roles, and grant permissions for stored procedures. See the following code example for Create logging database user.
Replace [PasswordPlaceHolder] with the preferred password.
Use master
GO
CREATE LOGIN [SecureAuthSQLUser] WITH PASSWORD=N'[PasswordPlaceHolder]',
DEFAULT_DATABASE=[Logging], DEFAULT_LANGUAGE=[us_english], CHECK_EXPIRATION=OFF, CHECK_POLICY=OFF
GO
Use Logging
GO
CREATE USER [SecureAuthSQLUser] FOR LOGIN [SecureAuthSQLUser] WITH DEFAULT_SCHEMA=[dbo]
GO
EXEC sp_addrolemember 'db_datareader', 'SecureAuthSQLUser'
GO
EXEC sp_addrolemember 'db_datawriter', 'SecureAuthSQLUser'
GO
GRANT EXECUTE ON [Logging].dbo.AddCategory TO SecureAuthSQLUser
GO
GRANT EXECUTE ON [Logging].dbo.GetLog TO SecureAuthSQLUser
GO
GRANT EXECUTE ON [Logging].dbo.InsertCategoryLog TO SecureAuthSQLUser
GO
GRANT EXECUTE ON [Logging].dbo.WriteLog TO SecureAuthSQLUser
GO
GRANT EXECUTE ON [Logging].dbo.GetChart1 TO SecureAuthSQLUser
GO
GRANT EXECUTE ON [Logging].dbo.GetChart2 TO SecureAuthSQLUser
GO
GRANT EXECUTE ON [Logging].dbo.GetChart3 TO SecureAuthSQLUser
GO
GRANT EXECUTE ON [Logging].dbo.GetChart4 TO SecureAuthSQLUser
GO
OPTIONAL: Create chart stored procedures. See the following code example for Drop / create charts.
USE [Logging]
GO
SET ANSI_NULLS ON
GO
SET QUOTED_IDENTIFIER ON
GO
IF OBJECT_ID ( 'GetChart1', 'P' ) IS NOT NULL
    DROP PROCEDURE GetChart1;
GO
CREATE PROCEDURE [dbo].[GetChart1]
        (
        @StartDate datetime,
        @EndDate datetime,
        @Realms varchar(250)
        )
AS
BEGIN
        SET NOCOUNT ON;
        DECLARE @sql nvarchar(MAX) = '(SELECT @Result = COUNT(*) FROM Log WHERE [Realm] IN (' + @Realms + ') AND [EventID] = 20000 AND [TimeStamp] BETWEEN @StartDate AND @EndDate)'
        DECLARE @parameters nvarchar(MAX) =    '@StartDate datetime,
                                                                                        @EndDate datetime,
                                                                                        @Result int out'
        DECLARE @SuccessCount int = 0
        EXEC sp_executesql @sql, @parameters, @StartDate, @EndDate, @SuccessCount out
        DECLARE @SuccessCountVarChar VARCHAR(25) = CONVERT(VARCHAR(25), @SuccessCount)
        SET @sql = '(SELECT @Result = COUNT(*) FROM Log WHERE [Realm] IN (' + @Realms + ') AND [EventID] IN (21070,21100,21090,21100,22010,22110,22210,22310,22910,22020,24200,24210,24220) AND [TimeStamp] BETWEEN @StartDate AND @EndDate)'
        DECLARE @FailedCount int = 0
        EXEC sp_executesql @sql, @parameters, @StartDate, @EndDate, @FailedCount out
        DECLARE @FailedCountVarChar VARCHAR(25) = CONVERT(VARCHAR(25), @FailedCount)

        CREATE TABLE #TempTable(
                [Status] varchar(25),
                [Total] int)
        INSERT INTO #TempTable VALUES ('Success (' + @SuccessCountVarChar + ')', @SuccessCount)
        INSERT INTO #TempTable VALUES ('Failed (' + @FailedCountVarChar + ')', @FailedCount)
        SELECT * FROM #TempTable
END
GO
IF OBJECT_ID ( 'GetChart2', 'P' ) IS NOT NULL
    DROP PROCEDURE GetChart2;
GO
CREATE PROCEDURE [dbo].[GetChart2]
        (
        @StartDate datetime,
        @EndDate datetime,
        @PhoneMethod varchar(50),
        @EmailMethod varchar(50),
        @SMSMethod varchar(50),
        @Realms varchar(250)
        )
AS
BEGIN
        SET NOCOUNT ON;
        CREATE TABLE #TempTable2(
                [EmailStatus] varchar(25),
                [EmailTotal] int,
                [EmailTimeStamp] varchar(10),
                [PhoneStatus] varchar(25),
                [PhoneTotal] int,
                [PhoneTimeStamp] varchar(10),
                [SMSStatus] varchar(25),
                [SMSTotal] int,
                [SMSTimeStamp] varchar(10))
        DECLARE @sql nvarchar(MAX) = 'SELECT ''Email'', COUNT(*), CONVERT(VARCHAR(10), [TimeStamp], 101), NULL, NULL, NULL, NULL, NULL, NULL AS [TimeStamp] FROM [LOG] WHERE [Realm] IN (' + @Realms + ') AND [Message] like ''%'' + @EmailMethod + ''%'' AND [TimeStamp] BETWEEN @StartDate AND @EndDate GROUP BY CONVERT(VARCHAR(10), [TimeStamp], 101)'
        DECLARE @parameters nvarchar(MAX) = '@StartDate datetime, @EndDate datetime, @EmailMethod varchar(50)'
        INSERT INTO #TempTable2 EXEC sp_executesql @sql, @parameters, @StartDate, @EndDate, @EmailMethod
        SET @sql = 'SELECT NULL, NULL, NULL, ''Phone'', COUNT(*), CONVERT(VARCHAR(10), [TimeStamp], 101) AS [TimeStamp], NULL, NULL, NULL FROM [LOG] WHERE [Realm] IN (' + @Realms + ') AND [Message] like ''%'' + @PhoneMethod + ''%'' AND [TimeStamp] BETWEEN @StartDate AND @EndDate GROUP BY CONVERT(VARCHAR(10), [TimeStamp], 101)'
        SET @parameters = '@StartDate datetime, @EndDate datetime, @PhoneMethod varchar(50)'
        INSERT INTO #TempTable2 EXEC sp_executesql @sql, @parameters, @StartDate, @EndDate, @PhoneMethod
        SET @sql = 'SELECT NULL, NULL, NULL, NULL, NULL, NULL, ''SMS'', COUNT(*), CONVERT(VARCHAR(10), [TimeStamp], 101) AS [TimeStamp] FROM [LOG] WHERE [Realm] IN (' + @Realms + ') AND [Message] like ''%'' + @SMSMethod   + ''%'' AND [TimeStamp] BETWEEN @StartDate AND @EndDate GROUP BY CONVERT(VARCHAR(10), [TimeStamp], 101)'
        SET @parameters = '@StartDate datetime, @EndDate datetime, @SMSMethod varchar(50)'
        INSERT INTO #TempTable2 EXEC sp_executesql @sql, @parameters, @StartDate, @EndDate, @SMSMethod

        SELECT * FROM #TempTable2
END
GO
IF OBJECT_ID ( 'GetChart3', 'P' ) IS NOT NULL
    DROP PROCEDURE GetChart3;
GO
CREATE PROCEDURE [dbo].[GetChart3]
        (
        @StartDate datetime,
        @EndDate datetime,
        @Realms varchar(250)
        )
AS
BEGIN
        SET NOCOUNT ON;

        CREATE TABLE #TempTable3(
                [Status] varchar(25),
                [Total] int)
        DECLARE @sql nvarchar(MAX) = 'SELECT DATEPART(HOUR, [TimeStamp]), COUNT(*) FROM [LOG] WHERE [Realm] IN (' + @Realms + ') AND EventID=20000 AND [TimeStamp] BETWEEN @StartDate AND @EndDate GROUP BY DATEPART(HOUR, [TimeStamp])'
        DECLARE @parameters nvarchar(MAX) = '@StartDate datetime, @EndDate datetime'
        INSERT INTO #TempTable3 EXEC sp_executesql @sql, @parameters, @StartDate, @EndDate

        SELECT * FROM #TempTable3 ORDER BY [Status] ASC
END
GO
IF OBJECT_ID ( 'GetChart4', 'P' ) IS NOT NULL
    DROP PROCEDURE GetChart4;
GO
CREATE PROCEDURE [dbo].[GetChart4]
        (
        @StartDate datetime,
        @EndDate datetime,
        @Realms varchar(250)
        )
AS
BEGIN
        SET NOCOUNT ON;

        CREATE TABLE #TempTable4(
                [Status] varchar(25),
                [Total] int)
        DECLARE @sql nvarchar(MAX) = 'SELECT [Realm], COUNT(*) FROM [LOG] WHERE [Realm] IN (' + @Realms + ') AND EventID=20000 AND [TimeStamp] BETWEEN @StartDate AND @EndDate GROUP BY [Realm]'
        DECLARE @parameters nvarchar(MAX) = '@StartDate datetime, @EndDate datetime'
        INSERT INTO #TempTable4 EXEC sp_executesql @sql, @parameters, @StartDate, @EndDate

        SELECT * FROM #TempTable4 ORDER BY [Status] ASC
END
GO
Connect the SQL Server database to SecureAuth IdP
In this section, create a Logging database / user before or after you update the SecureAuth IdP appliance. After you process the update and updatewebconfig function, specify a connection string in the Logs tab.
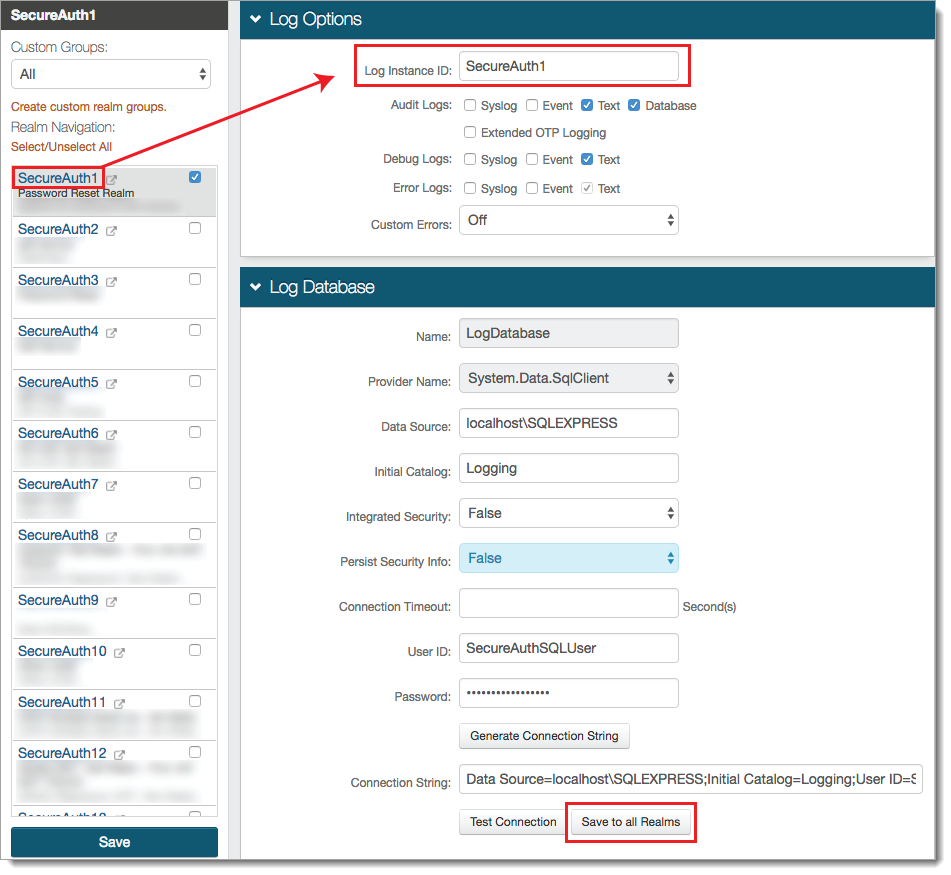
Go to the Logs tab.
In the Logs Option section, verify the Log Instance ID value is unique and represents the realm. This the value used for the Realm column in each audit log event record.
In the Log Database section, set the following.
Data Source
Set to the server machine name / SQL server instance name.
Integrated Security
To use SQL authentication, set to False.
Persist Security Info
Set to False.
Generate Connection String
Click to generate a connection string and populate the Connection String field.
Test Connection
Click to test the connection.
To apply changes to the web.config files for all realms, click Save to all realms.
Caution
Do not click the Save button with all realm check boxes selected. The Log Instance ID must be different on each realm.
Maintaining log files
The log database continues to grow unless a backup or truncate procedure is implemented. The log database continues to grow until you put in place a backup or truncate procedure.
In this section, you can use any of the following commands to truncate the log table and shrink the actual database (.mdf) and log (.ldf) files.
Note
Definitions:
Truncating a table removes ALL rows. This is not reversible and with no rollback, it takes less time to process and has no overhead.
Deleting uses the WHERE parameter. The processing time is proportional to the size of the table.
Truncate the log table
Truncating the log table removes all rows from the table.
In SQL Management Studio, connect as a db user with either sysadmin or dbowner permissions.
Drop all foreign keys (FKs) that point to the table using the following command in Drop foreign keys (FKs).
USE [Logging]
GO
ALTER TABLE [dbo].[CategoryLog] DROP CONSTRAINT [FK_CategoryLog_Category]
GO
ALTER TABLE [dbo].[CategoryLog] DROP CONSTRAINT [FK_CategoryLog_Log]
GO
To truncate the log table, use the following command in Truncate log table.
USE [Logging]
TRUNCATE TABLE [CategoryLog]
TRUNCATE TABLE [Log]
GO
Recreate the foreign keys using the following command in Recreate foreign keys (FKs).
USE [Logging]
GO

ALTER TABLE [dbo].[CategoryLog]  WITH CHECK ADD  CONSTRAINT [FK_CategoryLog_Log] FOREIGN KEY([LogID])
REFERENCES [dbo].[Log] ([LogID])
GO

ALTER TABLE [dbo].[CategoryLog] CHECK CONSTRAINT [FK_CategoryLog_Log]
GO

ALTER TABLE [dbo].[CategoryLog]  WITH CHECK ADD  CONSTRAINT [FK_CategoryLog_Category] FOREIGN KEY([CategoryID])
REFERENCES [dbo].[Category] ([CategoryID])
GO

ALTER TABLE [dbo].[CategoryLog] CHECK CONSTRAINT [FK_CategoryLog_Category]
GO
Delete records from the Log table that are older than X amount of days
You can delete records older than a set number of days. As an example, use the following command to delete all records over 30 days old in Delete records.
BEGIN
Delete from CategoryLog where Logid in (Select Logid from Log where Timestamp <= dateadd(day, -30,getdate()));
Delete from Log where LogID not in (select logid from CategoryLog);
END;
Shrink the database files
The following command shrinks the database to the last allocated extent.
USE [Logging]
DBCC SHRINKDATABASE ([Logging], TRUNCATEONLY);
GO