Citrix NetScaler Multi-Data Store Integration Guide (SAML)
Introduction
Use this guide to enable Single Sign-on (SSO) access via SAML to Citrix NetScaler in a Multi-Data Store setup.
Prerequisites
1. Have Citrix NetScaler 10.X for SAML Support
2. Configure a Multi-Data Store Web Service on SecureAuth IdP
See Web Service (Multi-Data Store) as Additional Profile Provider Configuration Guide
Citrix NetScaler Configuration Steps
Configure Authentication Servers
 |
1. Go to: Configuration > Netscaler Gateway > Policies > Authentication > LDAP > Servers
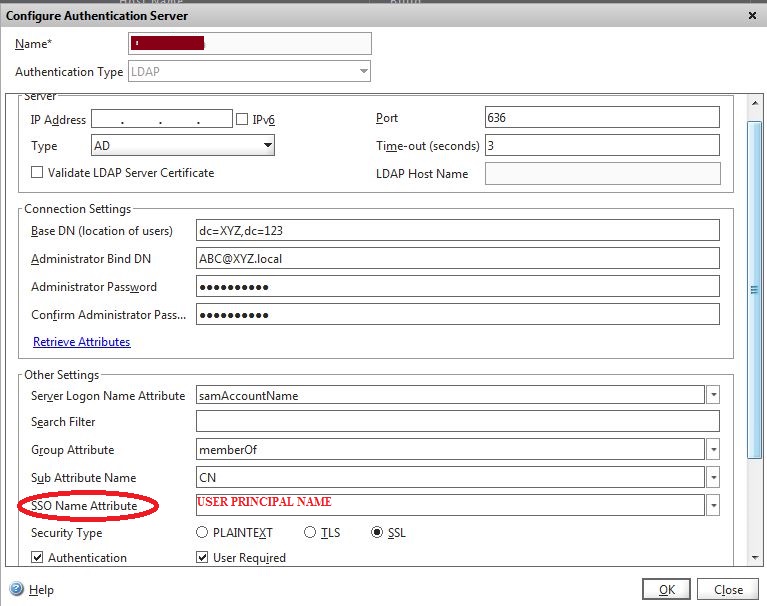
2. Under Server, make the following entries for the LDAP server
a. Name
b. IP Address
c. Port: use 636 for SSL
3. Under Connection Settings, enter Distinguished Name and Admin credentials to bind to the LDAP server
Note
Click Retrieve Attributes to ensure accurate LDAP settings
4. Under Other Settings, make the following entries or selection as required
a. Server Logon Name Attribute:samAccountName
b. Search Filter:Add as required
c. Group Attribute:CN
d. SSO Name Attribute:UserPrincipalName
e. Security Type:SSL
Create Authentication Policy
5. Go to: Configuration > Netscaler Gateway > Policies > Authentication > LDAP > Policies
6. In the Create Authentication Policy window, do the following
a. Name the new policy – e.g.: Domain 1
b. Input the LDAP Server Name that was entered in the Configure Authentication Servers section – e.g. LDAP 1
c. Add the Expression: ns_true
For a Web browser, add an expression such as: "REQ.HTTP.HEADER Cookie CONTAINS DC1"
For a Citrix Receiver, add an expression such as: "REQ.HTTP.HEADER User-Agent CONTAINS CitrixReceiver"
Warning
Repeat these steps for other LDAP servers to be used to authenticate users
e.g.: LDAP 2, LDAP 3
Configure NetScaler Gateway Virtual Server
 |
7. Go to: Configuration > Netscaler Gateway > Virtual Servers
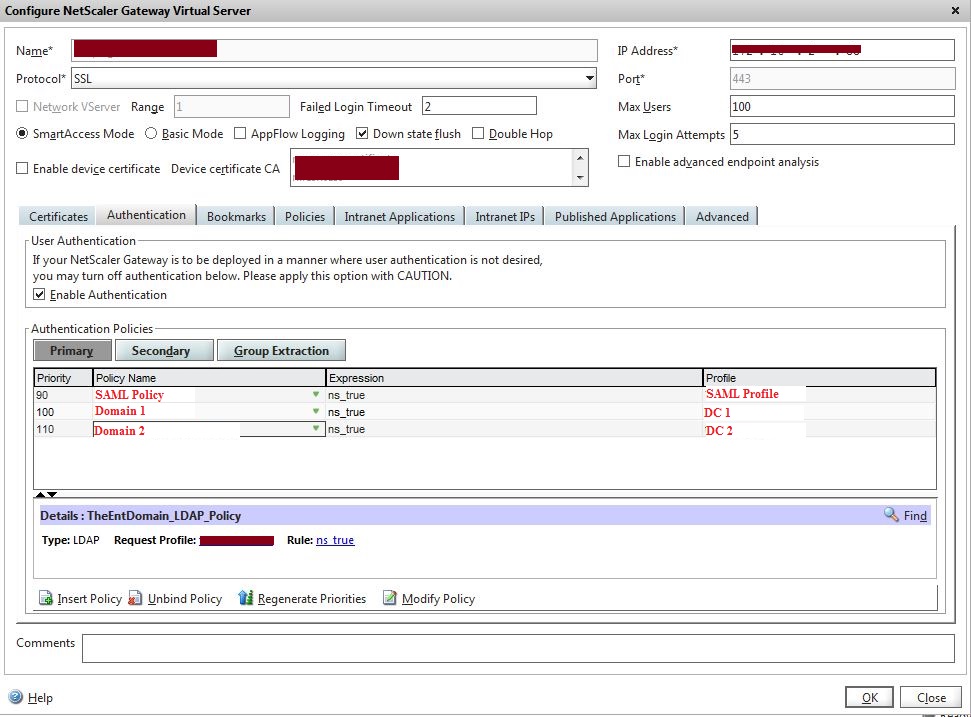
8. In the Configure NetScaler Gateway Virtual Server window, do the following
a. Enter the Virtual IP Address (VIP) to be used for Multi-Data Store authentication
b. Click the Authentication Tab
i. In the Authentication Policies table, reorder the SAML policies to place the one with the highest priority first (i.e. the lowest number)
ii. Add the policies for LDAP that were created subsequently
Other NetScaler Configurations
Active Directory Group Extraction
 |
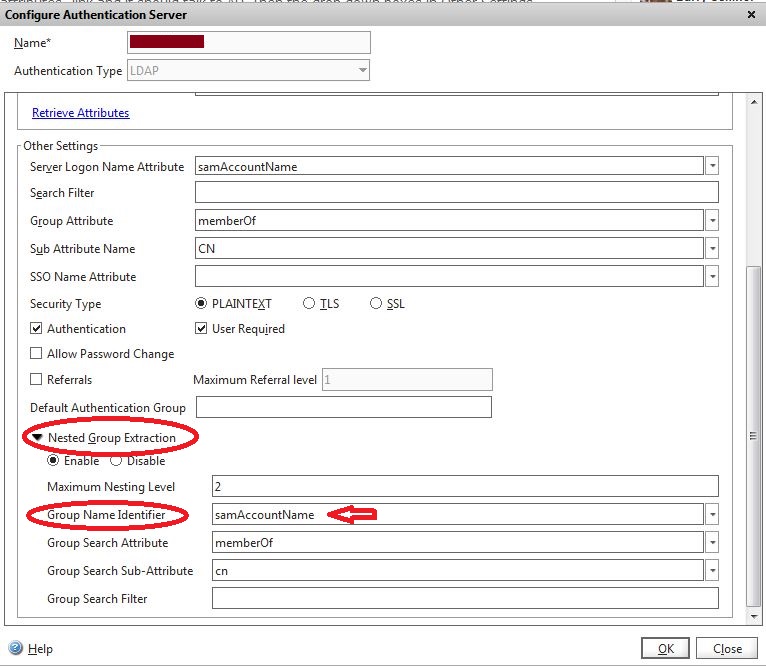
9. Configure the NetScaler appliance for the Active Directory Group Extraction and enable clients to access the NetScaler VPN based on the Active Directory groups
a. Access Configure Authentication Server for the LDAP server and modify Other Settings for these fields
i. Maximum Nesting Level: Enable the maximum nesting level as required
ii. Nested Group Extraction: Enable
iii. Group Name Identifier: samAccountName
iv. Group Search Attribute: memberOf
v. Group Search Sub-Attribute: cn
Published Applications
 |
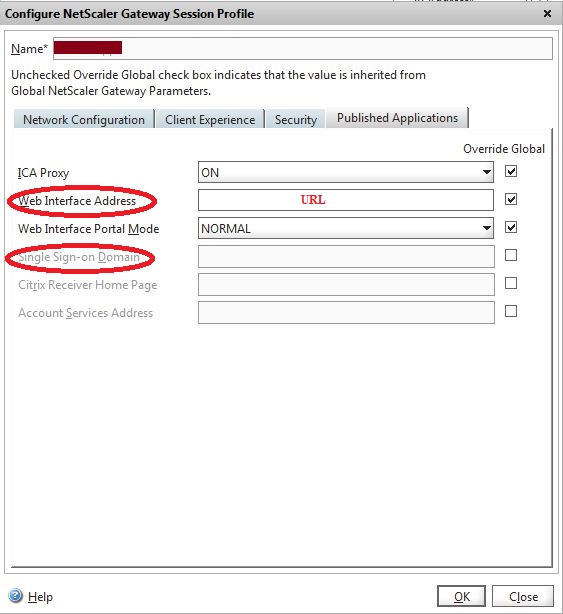
10. If using a Multi-Data Store with Published Applications, modify session policies as follows
a. Go to: Configuration > Netscaler Gateway > Virtual Servers
b. Click the Policies Tab
c. Open the Profile
d. In the Configure NetScaler Gateway Session Profile window, click the Published Applications Tab
i. Uncheck Single Sign-on Domain
ii. Repeat for all the Policies using Published Applications
NetScaler Troubleshooting
Log onto NetScaler using Putty or similar application and type the following command to check the logs
cat /tmp/aaad.debug